
Workflow instance methods
pause(),resume(),restart(), andterminate()are now available in local development when usingwrangler dev.You can now test the full Workflow instance lifecycle locally:
TypeScript const instance = await env.MY_WORKFLOW.create({id: "my-instance-id",});await instance.pause(); // pauses a running workflow instanceawait instance.resume(); // resumes a paused instanceawait instance.restart(); // restarts the instance from the beginningawait instance.terminate(); // terminates the instance immediately
The latest release of the Agents SDK ↗ exposes agent state as a readable property, prevents duplicate schedule rows across Durable Object restarts, brings full TypeScript inference to
AgentClient, and migrates to Zod 4.Both
useAgent(React) andAgentClient(vanilla JS) now expose astateproperty that reflects the current agent state. Previously, reading state required manually tracking it through theonStateUpdatecallback.React (
useAgent)JavaScript const agent = useAgent({agent: "game-agent",name: "room-123",});// Read state directly — no separate useState + onStateUpdate neededreturn <div>Score: {agent.state?.score}</div>;// Spread for partial updatesagent.setState({ ...agent.state, score: (agent.state?.score ?? 0) + 10 });TypeScript const agent = useAgent<GameAgent, GameState>({agent: "game-agent",name: "room-123",});// Read state directly — no separate useState + onStateUpdate neededreturn <div>Score: {agent.state?.score}</div>;// Spread for partial updatesagent.setState({ ...agent.state, score: (agent.state?.score ?? 0) + 10 });agent.stateis reactive — the component re-renders when state changes from either the server or a client-sidesetState()call.Vanilla JS (
AgentClient)JavaScript const client = new AgentClient({agent: "game-agent",name: "room-123",host: "your-worker.workers.dev",});client.setState({ score: 100 });console.log(client.state); // { score: 100 }TypeScript const client = new AgentClient<GameAgent>({agent: "game-agent",name: "room-123",host: "your-worker.workers.dev",});client.setState({ score: 100 });console.log(client.state); // { score: 100 }State starts as
undefinedand is populated when the server sends the initial state on connect (frominitialState) or whensetState()is called. Use optional chaining (agent.state?.field) for safe access. TheonStateUpdatecallback continues to work as before — the newstateproperty is additive.schedule()now supports anidempotentoption that deduplicates by(type, callback, payload), preventing duplicate rows from accumulating when called in places that run on every Durable Object restart such asonStart().Cron schedules are idempotent by default. Calling
schedule("0 * * * *", "tick")multiple times with the same callback, expression, and payload returns the existing schedule row instead of creating a new one. Pass{ idempotent: false }to override.Delayed and date-scheduled types support opt-in idempotency:
JavaScript import { Agent } from "agents";class MyAgent extends Agent {async onStart() {// Safe across restarts — only one row is createdawait this.schedule(60, "maintenance", undefined, { idempotent: true });}}TypeScript import { Agent } from "agents";class MyAgent extends Agent {async onStart() {// Safe across restarts — only one row is createdawait this.schedule(60, "maintenance", undefined, { idempotent: true });}}Two new warnings help catch common foot-guns:
- Calling
schedule()insideonStart()without{ idempotent: true }emits aconsole.warnwith actionable guidance (once per callback; skipped for cron and whenidempotentis set explicitly). - If an alarm cycle processes 10 or more stale one-shot rows for the same callback, the SDK emits a
console.warnand aschedule:duplicate_warningdiagnostics channel event.
AgentClientnow accepts an optional agent type parameter for full type inference on RPC calls, matching the typed experience already available withuseAgent.JavaScript const client = new AgentClient({agent: "my-agent",host: window.location.host,});// Typed call — method name autocompletes, args and return type inferredconst value = await client.call("getValue");// Typed stub — direct RPC-style proxyawait client.stub.getValue();await client.stub.add(1, 2);TypeScript const client = new AgentClient<MyAgent>({agent: "my-agent",host: window.location.host,});// Typed call — method name autocompletes, args and return type inferredconst value = await client.call("getValue");// Typed stub — direct RPC-style proxyawait client.stub.getValue();await client.stub.add(1, 2);State is automatically inferred from the agent type, so
onStateUpdateis also typed:JavaScript const client = new AgentClient({agent: "my-agent",host: window.location.host,onStateUpdate: (state) => {// state is typed as MyAgent's state type},});TypeScript const client = new AgentClient<MyAgent>({agent: "my-agent",host: window.location.host,onStateUpdate: (state) => {// state is typed as MyAgent's state type},});Existing untyped usage continues to work without changes. The RPC type utilities (
AgentMethods,AgentStub,RPCMethods) are now exported fromagents/clientfor advanced typing scenarios.agents,@cloudflare/ai-chat, and@cloudflare/codemodenow requirezod ^4.0.0. Zod v3 is no longer supported.- Turn serialization —
onChatMessage()and_reply()work is now queued so user requests, tool continuations, andsaveMessages()never stream concurrently. - Duplicate messages on stop — Clicking stop during an active stream no longer splits the assistant message into two entries.
- Duplicate messages after tool calls — Orphaned client IDs no longer leak into persistent storage.
keepAlive()now uses a lightweight in-memory ref count instead of schedule rows. Multiple concurrent callers share a single alarm cycle. The@experimentaltag has been removed from bothkeepAlive()andkeepAliveWhile().A new entry point
@cloudflare/codemode/tanstack-aiadds support for TanStack AI's ↗chat()as an alternative to the Vercel AI SDK'sstreamText():JavaScript import {createCodeTool,tanstackTools,} from "@cloudflare/codemode/tanstack-ai";import { chat } from "@tanstack/ai";const codeTool = createCodeTool({tools: [tanstackTools(myServerTools)],executor,});const stream = chat({ adapter, tools: [codeTool], messages });TypeScript import { createCodeTool, tanstackTools } from "@cloudflare/codemode/tanstack-ai";import { chat } from "@tanstack/ai";const codeTool = createCodeTool({tools: [tanstackTools(myServerTools)],executor,});const stream = chat({ adapter, tools: [codeTool], messages });To update to the latest version:
Terminal window npm i agents@latest @cloudflare/ai-chat@latest- Calling
AI Search now offers new REST API endpoints for search and chat that use an OpenAI compatible format. This means you can use the familiar
messagesarray structure that works with existing OpenAI SDKs and tools. The messages array also lets you pass previous messages within a session, so the model can maintain context across multiple turns.Endpoint Path Chat Completions POST /accounts/{account_id}/ai-search/instances/{name}/chat/completionsSearch POST /accounts/{account_id}/ai-search/instances/{name}/searchHere is an example request to the Chat Completions endpoint using the new
messagesarray format:Terminal window curl https://api.cloudflare.com/client/v4/accounts/{ACCOUNT_ID}/ai-search/instances/{NAME}/chat/completions \-H "Content-Type: application/json" \-H "Authorization: Bearer {API_TOKEN}" \-d '{"messages": [{"role": "system","content": "You are a helpful documentation assistant."},{"role": "user","content": "How do I get started?"}]}'For more details, refer to the AI Search REST API guide.
If you are using the previous AutoRAG API endpoints (
/autorag/rags/), we recommend migrating to the new endpoints. The previous AutoRAG API endpoints will continue to be fully supported.Refer to the migration guide for step-by-step instructions.
AI Search now supports public endpoints, UI snippets, and MCP, making it easy to add search to your website or connect AI agents.
Public endpoints allow you to expose AI Search capabilities without requiring API authentication. To enable public endpoints:
- Go to AI Search in the Cloudflare dashboard. Go to AI Search
- Select your instance, and turn on Public Endpoint in Settings. For more details, refer to Public endpoint configuration.
UI snippets are pre-built search and chat components you can embed in your website. Visit search.ai.cloudflare.com ↗ to configure and preview components for your AI Search instance.

To add a search modal to your page:
<scripttype="module"src="https://<INSTANCE_ID>.search.ai.cloudflare.com/assets/v0.0.25/search-snippet.es.js"></script><search-modal-snippetapi-url="https://<INSTANCE_ID>.search.ai.cloudflare.com/"placeholder="Search..."></search-modal-snippet>For more details, refer to the UI snippets documentation.
The MCP endpoint allows AI agents to search your content via the Model Context Protocol. Connect your MCP client to:
https://<INSTANCE_ID>.search.ai.cloudflare.com/mcpFor more details, refer to the MCP documentation.
AI Search now supports custom metadata filtering, allowing you to define your own metadata fields and filter search results based on attributes like category, version, or any custom field you define.
You can define up to 5 custom metadata fields per AI Search instance. Each field has a name and data type (
text,number, orboolean):Terminal window curl -X POST https://api.cloudflare.com/client/v4/accounts/{ACCOUNT_ID}/ai-search/instances \-H "Content-Type: application/json" \-H "Authorization: Bearer {API_TOKEN}" \-d '{"id": "my-instance","type": "r2","source": "my-bucket","custom_metadata": [{ "field_name": "category", "data_type": "text" },{ "field_name": "version", "data_type": "number" },{ "field_name": "is_public", "data_type": "boolean" }]}'How you attach metadata depends on your data source:
- R2 bucket: Set metadata using S3-compatible custom headers (
x-amz-meta-*) when uploading objects. Refer to R2 custom metadata for examples. - Website: Add
<meta>tags to your HTML pages. Refer to Website custom metadata for details.
Use custom metadata fields in your search queries alongside built-in attributes like
folderandtimestamp:Terminal window curl https://api.cloudflare.com/client/v4/accounts/{ACCOUNT_ID}/ai-search/instances/{NAME}/search \-H "Content-Type: application/json" \-H "Authorization: Bearer {API_TOKEN}" \-d '{"messages": [{"content": "How do I configure authentication?","role": "user"}],"ai_search_options": {"retrieval": {"filters": {"category": "documentation","version": { "$gte": 2.0 }}}}}'Learn more in the metadata filtering documentation.
- R2 bucket: Set metadata using S3-compatible custom headers (
Two new fields are now available in the
httpRequestsAdaptiveandhttpRequestsAdaptiveGroupsGraphQL Analytics API datasets:webAssetsOperationId— the ID of the saved endpoint that matched the incoming request.webAssetsLabelsManaged— the managed labels mapped to the matched operation at the time of the request (for example,cf-llm,cf-log-in). At most 10 labels are returned per request.
Both fields are empty when no operation matched.
webAssetsLabelsManagedis also empty when no managed labels are assigned to the matched operation.These fields allow you to determine, per request, which Web Assets operation was matched and which managed labels were active. This is useful for troubleshooting downstream security detection verdicts — for example, understanding why AI Security for Apps did or did not flag a request.
Refer to Endpoint labeling service for GraphQL query examples.
R2 SQL now supports an expanded SQL grammar so you can write richer analytical queries without exporting data. This release adds CASE expressions, column aliases, arithmetic in clauses, 163 scalar functions, 33 aggregate functions, EXPLAIN, Common Table Expressions (CTEs),and full struct/array/map access. R2 SQL is Cloudflare's serverless, distributed, analytics query engine for querying Apache Iceberg ↗ tables stored in R2 Data Catalog. This page documents the supported SQL syntax.
- Column aliases —
SELECT col AS aliasnow works in all clauses - CASE expressions — conditional logic directly in SQL (searched and simple forms)
- Scalar functions — 163 new functions across math, string, datetime, regex, crypto, encoding, and type inspection categories
- Aggregate functions — statistical (variance, stddev, correlation, regression), bitwise, boolean, and positional aggregates join the existing basic and approximate functions
- Complex types — query struct fields with bracket notation, use 46 array functions, and extract map keys/values
- Common table expressions (CTEs) — use
WITH ... ASto define named temporary result sets. Chained CTEs are supported. All CTEs must reference the same single table. - Full expression support — arithmetic, type casting (
CAST,TRY_CAST,::shorthand), andEXTRACTin SELECT, WHERE, GROUP BY, HAVING, and ORDER BY
SELECT source,CASEWHEN AVG(price) > 30 THEN 'premium'WHEN AVG(price) > 10 THEN 'mid-tier'ELSE 'budget'END AS tier,round(stddev(price), 2) AS price_volatility,approx_percentile_cont(price, 0.95) AS p95_priceFROM my_namespace.sales_dataGROUP BY sourceSELECT product_name,pricing['price'] AS price,array_to_string(tags, ', ') AS tag_listFROM my_namespace.productsWHERE array_has(tags, 'Action')ORDER BY pricing['price'] DESCLIMIT 10WITH monthly AS (SELECT date_trunc('month', sale_timestamp) AS month,department,COUNT(*) AS transactions,round(AVG(total_amount), 2) AS avg_amountFROM my_namespace.sales_dataWHERE sale_timestamp BETWEEN '2025-01-01T00:00:00Z' AND '2025-12-31T23:59:59Z'GROUP BY date_trunc('month', sale_timestamp), department),ranked AS (SELECT month, department, transactions, avg_amount,CASEWHEN avg_amount > 1000 THEN 'high-value'WHEN avg_amount > 500 THEN 'mid-value'ELSE 'standard'END AS tierFROM monthlyWHERE transactions > 100)SELECT * FROM rankedORDER BY month, avg_amount DESCFor the full function reference and syntax details, refer to the SQL reference. For limitations and best practices, refer to Limitations and best practices.
- Column aliases —
This week's release focuses on new improvements to enhance coverage.
Key Findings
- Existing rule enhancements have been deployed to improve detection resilience against broad classes of web attacks and strengthen behavioral coverage.
Ruleset Rule ID Legacy Rule ID Description Previous Action New Action Comments Cloudflare Managed Ruleset N/A Command Injection - Generic 9 - URI Vector Log Disabled This is a new detection. Cloudflare Managed Ruleset N/A Command Injection - Generic 9 - Header Vector Log Disabled This is a new detection. Cloudflare Managed Ruleset N/A Command Injection - Generic 9 - Body Vector Log Disabled This is a new detection. Cloudflare Managed Ruleset N/A PHP, vBulletin, jQuery File Upload - Code Injection, Dangerous File Upload - CVE:CVE-2018-9206, CVE:CVE-2019-17132 (beta) Log Block This rule has been merged into the original rule "PHP, vBulletin, jQuery File Upload - Code Injection, Dangerous File Upload - CVE:CVE-2018-9206, CVE:CVE-2019-17132" (ID:
DNS Analytics is now available for customers with Customer Metadata Boundary (CMB) set to EU. Query your DNS analytics data while keeping metadata stored in the EU region.
This update includes:
- DNS Analytics — Access the same DNS analytics experience for zones in CMB=EU accounts.
- EU data residency — Analytics data is stored and queried from the EU region, meeting data localization requirements.
- DNS Firewall Analytics — DNS Firewall analytics is now supported for CMB=EU customers.
Available to customers with the Data Localization Suite who have Customer Metadata Boundary configured for the EU region.
-
Authoritative DNS: In the Cloudflare dashboard, select your zone and go to the Analytics page.
Go to Analytics -
DNS Firewall: In the Cloudflare dashboard, go to the DNS Firewall Analytics page.
Go to Analytics
For more information, refer to DNS Analytics and DNS Firewall Analytics.
In the Cloudflare One dashboard, the overview page for a specific Cloudflare Tunnel now shows all replicas of that tunnel and supports streaming logs from multiple replicas at once.
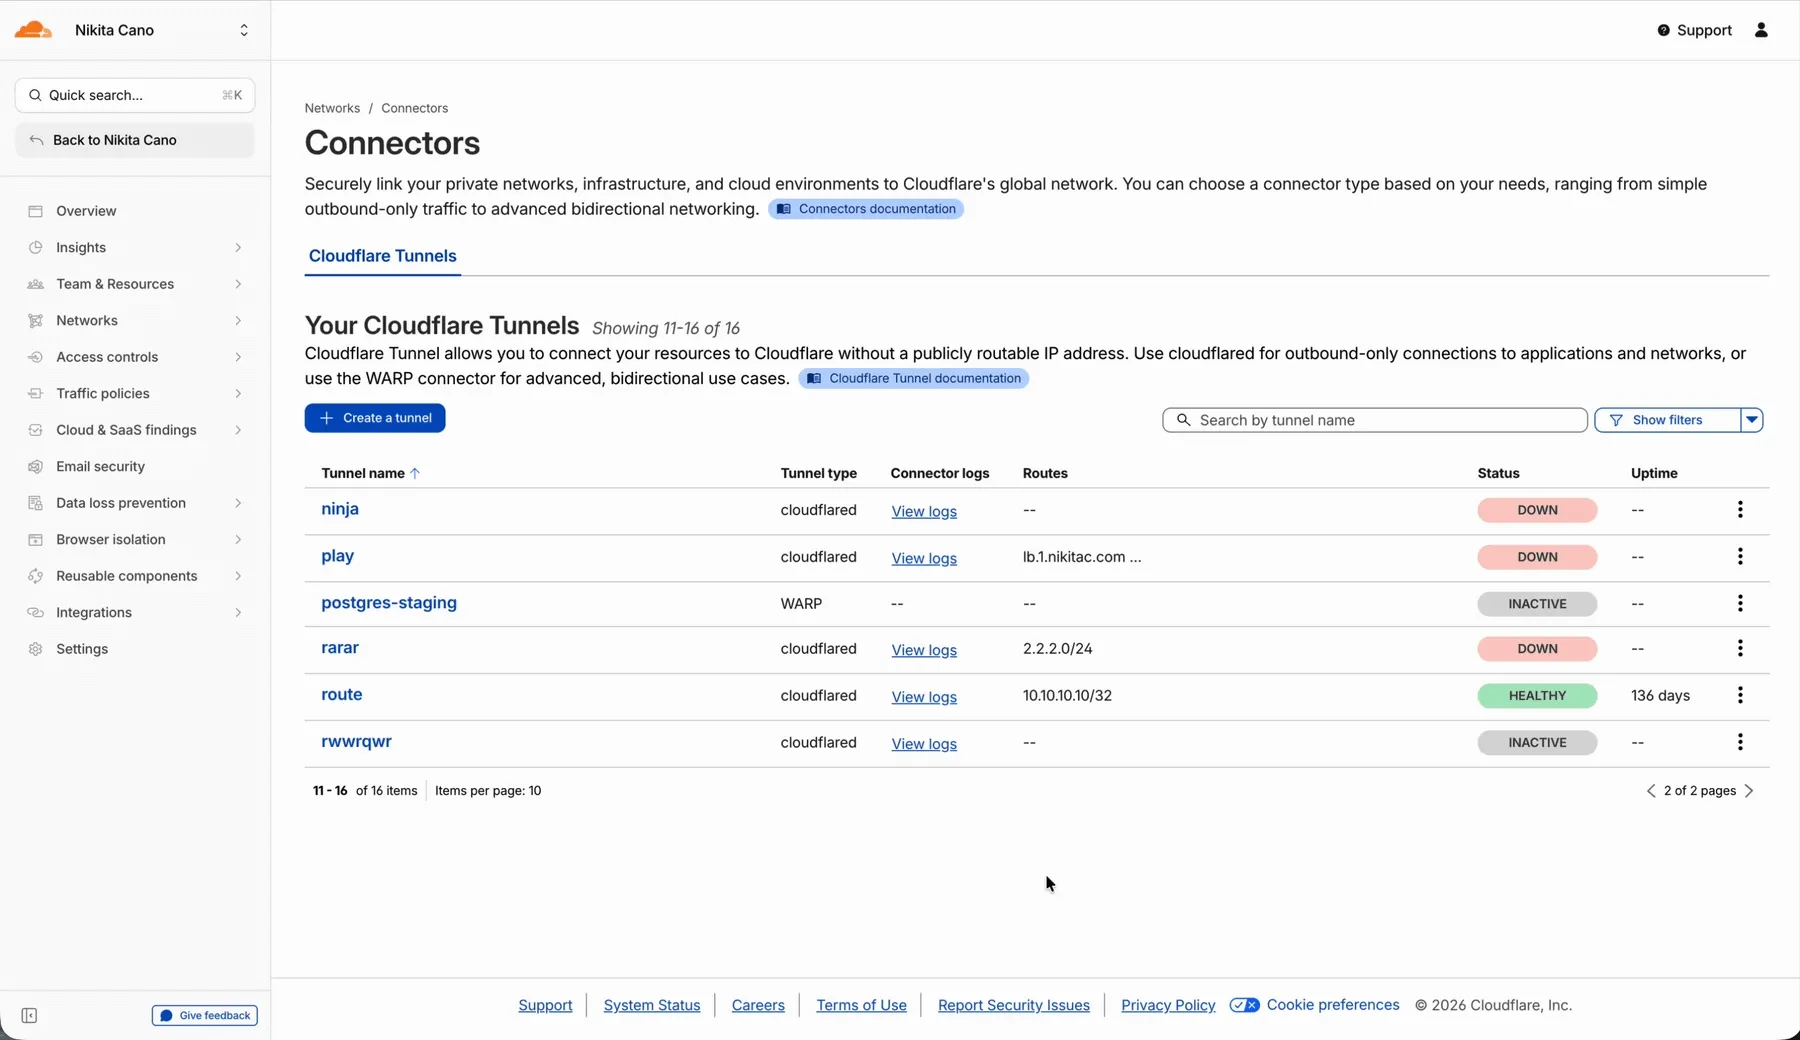
Previously, you could only stream logs from one replica at a time. With this update:
- Replicas on the tunnel overview — All active replicas for the selected tunnel now appear on that tunnel's overview page under Connectors. Select any replica to stream its logs.
- Multi-connector log streaming — Stream logs from multiple replicas simultaneously, making it easier to correlate events across your infrastructure during debugging or incident response. To try it out, log in to Cloudflare One ↗ and go to Networks > Connectors > Cloudflare Tunnels. Select View logs next to the tunnel you want to monitor.
For more information, refer to Tunnel log streams and Deploy replicas.
Each VPC Service now has a Metrics tab so you can monitor connection health and debug failures without leaving the dashboard.
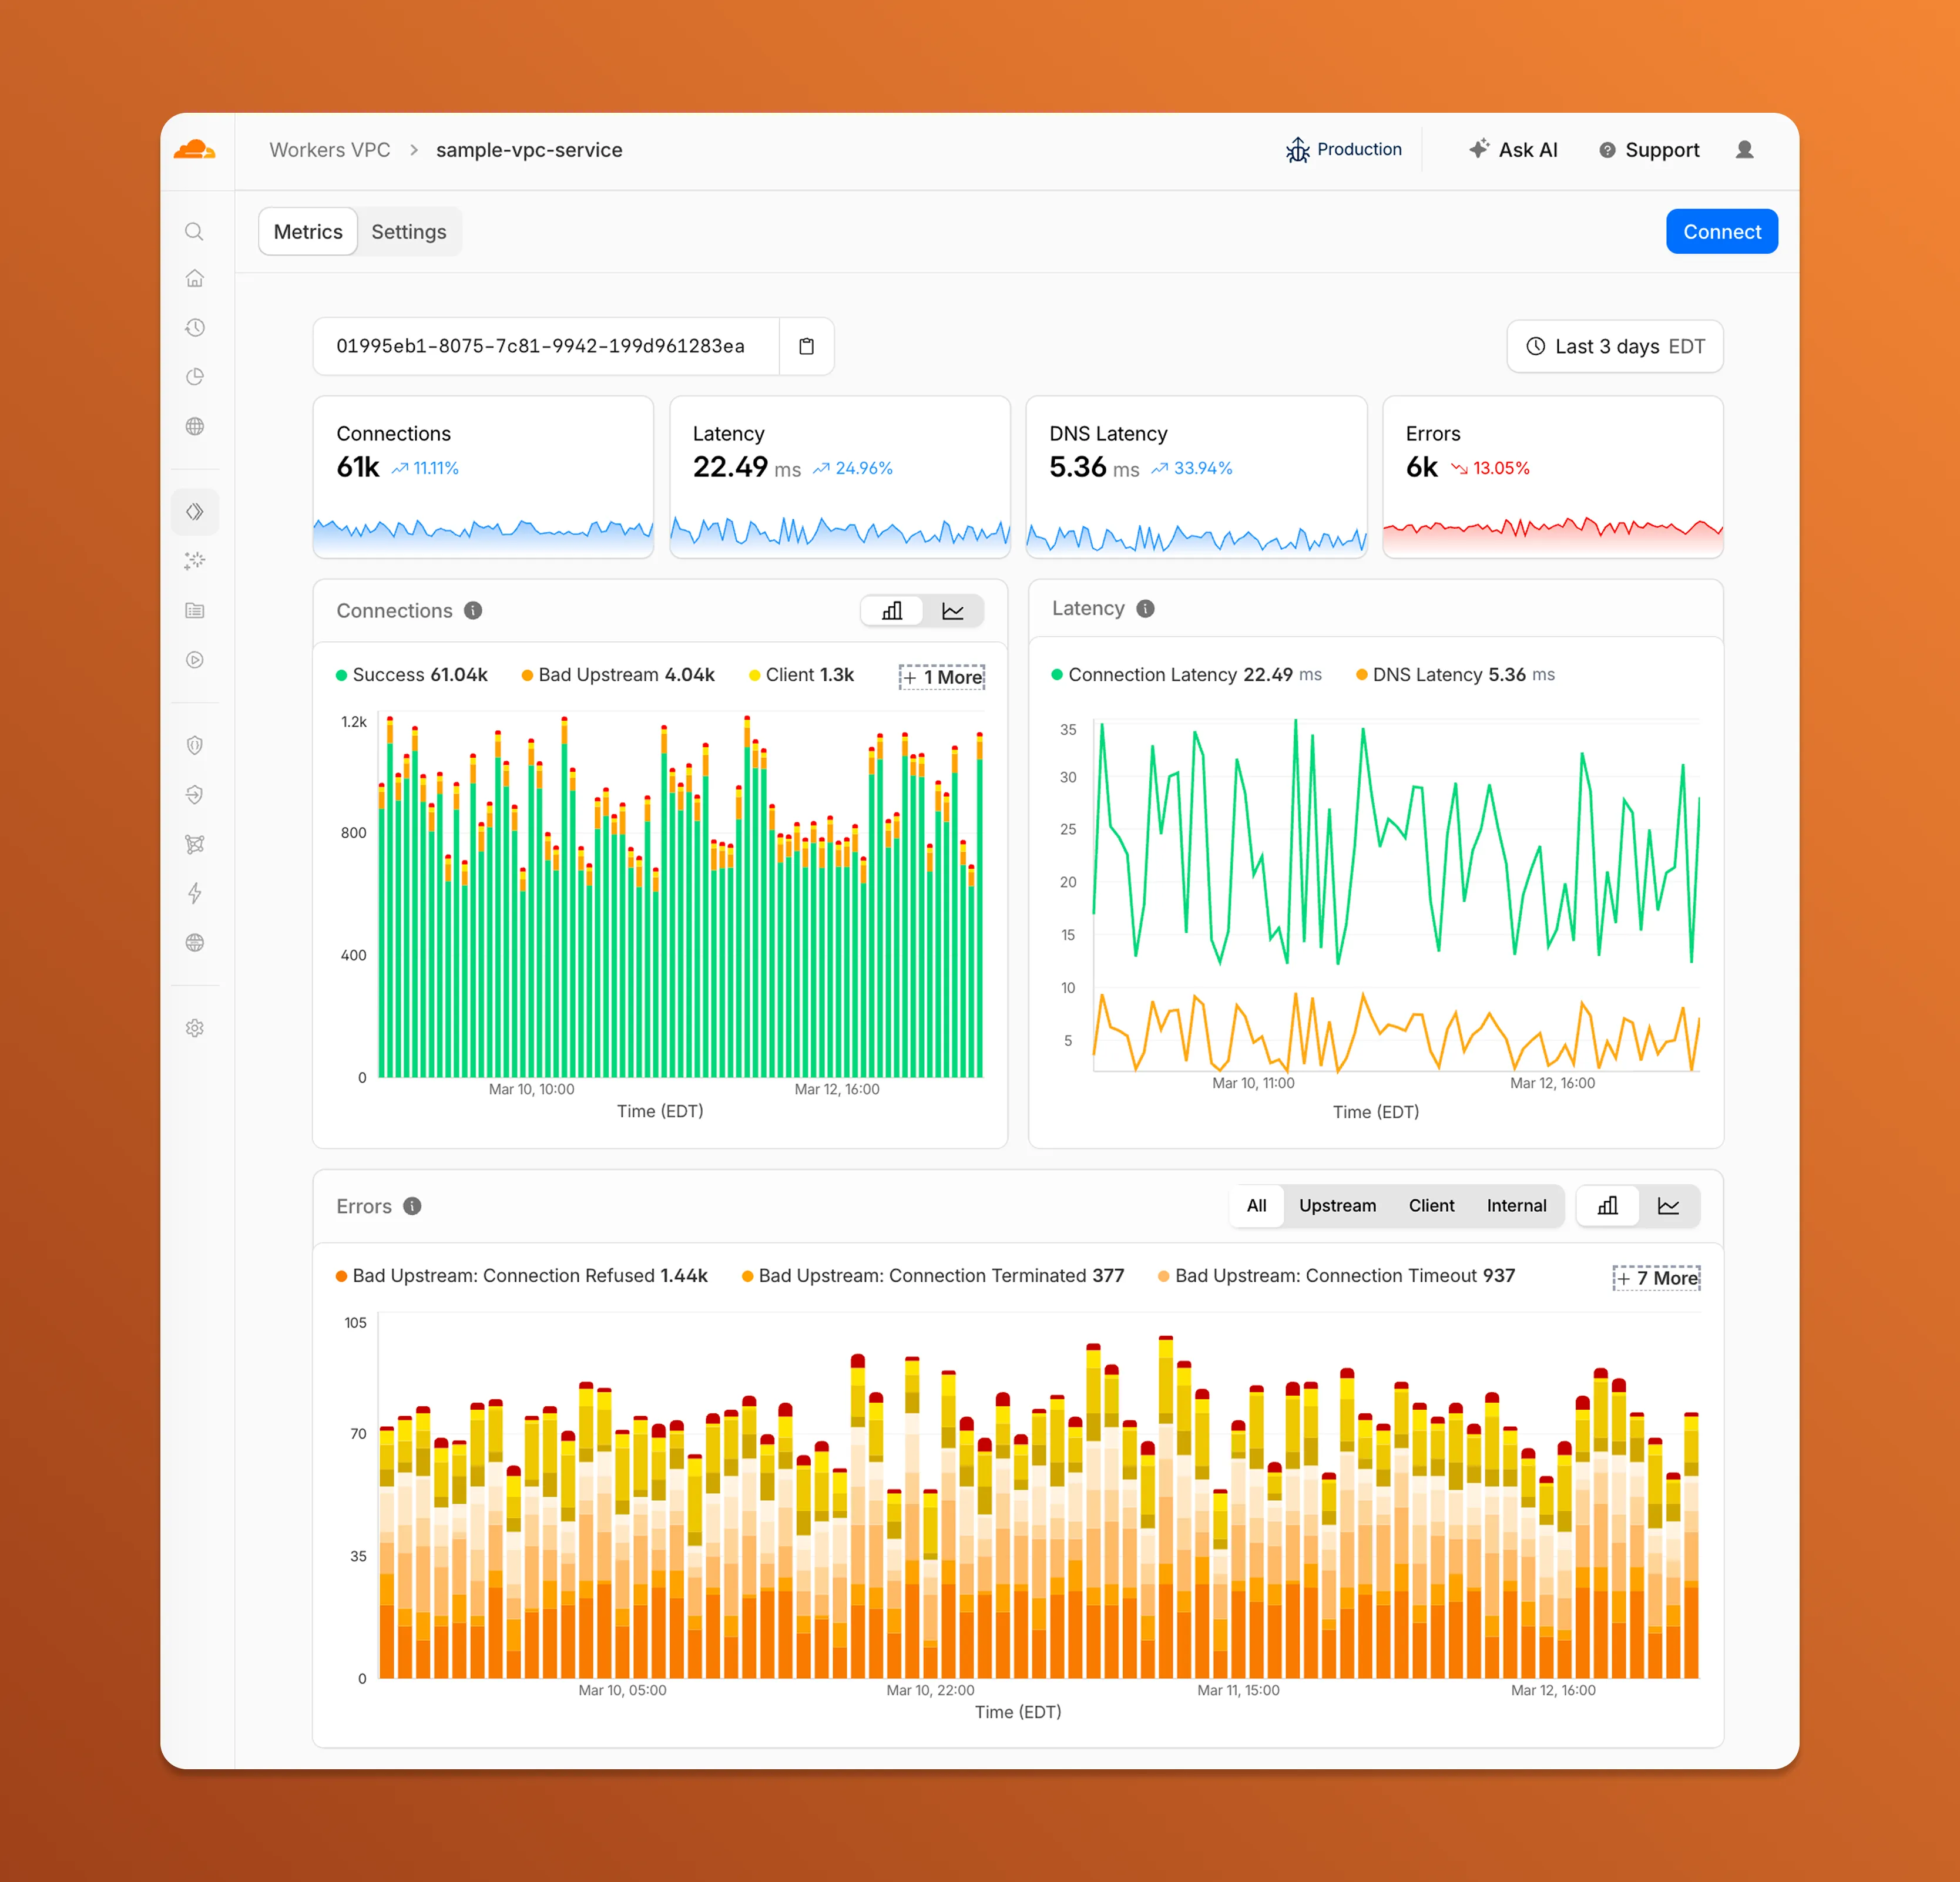
- Connections — See successful and failed connections over time, broken down by what is responsible: your origin (Bad Upstream), your configuration (Client), or Cloudflare (Internal).
- Latency — Track connection and DNS resolution latency trends.
- Errors — Drill into specific error codes grouped by category, with filters to isolate upstream, client, or internal failures.
You can also view and edit your VPC Service configuration, host details, and port assignments from the Settings tab.
For a full list of error codes and what they mean, refer to Troubleshooting.
Service Key authentication for the Cloudflare API is deprecated. Service Keys will stop working on September 30, 2026.
API Tokens replace Service Keys with fine-grained permissions, expiration, and revocation.
Replace any use of the
X-Auth-User-Service-Keyheader with an API Token scoped to the permissions your integration requires.If you use
cloudflared, update to a version from November 2022 or later. These versions already use API Tokens.If you use origin-ca-issuer ↗, update to a version that supports API Token authentication.
For more information, refer to API deprecations.
Hyperdrive now supports custom TLS/SSL certificates for MySQL databases, bringing the same certificate options previously available for PostgreSQL to MySQL connections.
You can now configure:
- Server certificate verification with
VERIFY_CAorVERIFY_IDENTITYSSL modes to verify that your MySQL database server's certificate is signed by the expected certificate authority (CA). - Client certificates (mTLS) for Hyperdrive to authenticate itself to your MySQL database with credentials beyond username and password.
Create a Hyperdrive configuration with custom certificates for MySQL:
Terminal window # Upload a CA certificatenpx wrangler cert upload certificate-authority --ca-cert your-ca-cert.pem --name your-custom-ca-name# Create a Hyperdrive with VERIFY_IDENTITY modenpx wrangler hyperdrive create your-hyperdrive-config \--connection-string="mysql://user:password@hostname:port/database" \--ca-certificate-id <CA_CERT_ID> \--sslmode VERIFY_IDENTITYFor more information, refer to SSL/TLS certificates for Hyperdrive and MySQL TLS/SSL modes.
- Server certificate verification with
You can now manage Cloudflare Tunnels directly from Wrangler, the CLI for the Cloudflare Developer Platform. The new
wrangler tunnelcommands let you create, run, and manage tunnels without leaving your terminal.
Available commands:
wrangler tunnel create— Create a new remotely managed tunnel.wrangler tunnel list— List all tunnels in your account.wrangler tunnel info— Display details about a specific tunnel.wrangler tunnel delete— Delete a tunnel.wrangler tunnel run— Run a tunnel using the cloudflared daemon.wrangler tunnel quick-start— Start a free, temporary tunnel without an account using Quick Tunnels.
Wrangler handles downloading and managing the cloudflared binary automatically. On first use, you will be prompted to download
cloudflaredto a local cache directory.These commands are currently experimental and may change without notice.
To get started, refer to the Wrangler tunnel commands documentation.
Workers AI is officially in the big models game.
@cf/moonshotai/kimi-k2.5is the first frontier-scale open-source model on our AI inference platform — a large model with a full 256k context window, multi-turn tool calling, vision inputs, and structured outputs. By bringing a frontier-scale model directly onto the Cloudflare Developer Platform, you can now run the entire agent lifecycle on a single, unified platform.The model has proven to be a fast, efficient alternative to larger proprietary models without sacrificing quality. As AI adoption increases, the volume of inference is skyrocketing — now you can access frontier intelligence at a fraction of the cost.
- 256,000 token context window for retaining full conversation history, tool definitions, and entire codebases across long-running agent sessions
- Multi-turn tool calling for building agents that invoke tools across multiple conversation turns
- Vision inputs for processing images alongside text
- Structured outputs with JSON mode and JSON Schema support for reliable downstream parsing
- Function calling for integrating external tools and APIs into agent workflows
When an agent sends a new prompt, it resends all previous prompts, tools, and context from the session. The delta between consecutive requests is usually just a few new lines of input. Prefix caching avoids reprocessing the shared context, saving time and compute from the prefill stage. This means faster Time to First Token (TTFT) and higher Tokens Per Second (TPS) throughput.
Workers AI has done prefix caching, but we are now surfacing cached tokens as a usage metric and offering a discount on cached tokens compared to input tokens (pricing is listed on the model page).
Terminal window curl -X POST \"https://api.cloudflare.com/client/v4/accounts/{account_id}/ai/run/@cf/moonshotai/kimi-k2.5" \-H "Authorization: Bearer {api_token}" \-H "Content-Type: application/json" \-H "x-session-affinity: ses_12345678" \-d '{"messages": [{"role": "system","content": "You are a helpful assistant."},{"role": "user","content": "What is prefix caching and why does it matter?"}],"max_tokens": 2400,"stream": true}'Some clients like OpenCode ↗ implement session affinity automatically. The Agents SDK ↗ starter also sets up the wiring for you.
For volumes of requests that exceed synchronous rate limits, you can submit batches of inferences to be completed asynchronously. We have revamped the Asynchronous Batch API with a pull-based system that processes queued requests as soon as capacity is available. With internal testing, async requests usually execute within 5 minutes, but this depends on live traffic.
The async API is the best way to avoid capacity errors in durable workflows. It is ideal for use cases that are not real-time, such as code scanning agents or research agents.
To use the asynchronous API, pass
queueRequest: true:JavaScript // 1. Push a batch of requests into the queueconst res = await env.AI.run("@cf/moonshotai/kimi-k2.5",{requests: [{messages: [{ role: "user", content: "Tell me a joke" }],},{messages: [{ role: "user", content: "Explain the Pythagoras theorem" }],},],},{ queueRequest: true },);// 2. Grab the request IDconst requestId = res.request_id;// 3. Poll for the resultconst result = await env.AI.run("@cf/moonshotai/kimi-k2.5", {request_id: requestId,});if (result.status === "queued" || result.status === "running") {// Retry by polling again} else {return Response.json(result);}You can also set up event notifications to know when inference is complete instead of polling.
Use Kimi K2.5 through the Workers AI binding (
env.AI.run()), the REST API at/runor/v1/chat/completions, AI Gateway, or via the OpenAI-compatible endpoint.For more information, refer to the Kimi K2.5 model page, pricing, and prompt caching.
Cloudflare dashboard SCIM provisioning now supports Authentik ↗ as an identity provider, joining Okta and Microsoft Entra ID as explicitly supported providers.
Customers can now sync users and group information from Authentik to Cloudflare, apply Permission Policies to those groups, and manage the lifecycle of users & groups directly from your Authentik Identity Provider.
For more information:
Cloudflare dashboard SCIM provisioning operations are now captured in Audit Logs v2, giving you visibility into user and group changes made by your identity provider.

Logged actions:
Action Type Description Create SCIM User User provisioned from IdP Replace SCIM User User fully replaced (PUT) Update SCIM User User attributes modified (PATCH) Delete SCIM User Member deprovisioned Create SCIM Group Group provisioned from IdP Update SCIM Group Group membership or attributes modified Delete SCIM Group Group deprovisioned For more details, refer to the Audit Logs v2 documentation.
The
cf.timings.worker_msecfield is now available in the Ruleset Engine. This field reports the wall-clock time that a Cloudflare Worker spent handling a request, measured in milliseconds.You can use this field to identify slow Worker executions, detect performance regressions, or build rules that respond differently based on Worker processing time, such as logging requests that exceed a latency threshold.
Field Type Description cf.timings.worker_msecInteger The time spent executing a Cloudflare Worker in milliseconds. Returns 0if no Worker was invoked.Example filter expression:
cf.timings.worker_msec > 500For more information, refer to the Fields reference.
We are introducing Logo Match Preview, bringing the same pre-save visibility to visual assets that was previously only available for string-based queries. This update allows you to fine-tune your brand detection strategy before committing to a live monitor.
- Upload your brand logo and immediately see a sample of potential matches from recently detected sites before finalizing the query
- Adjust your similarity score (from 75% to 100%) and watch the results refresh in real-time to find the balance between broad detection and noise reduction
- Review the specific logos triggered by your current settings to ensure your query is capturing the right level of brand infringement
If you are ready to test your brand assets, go to the Brand Protection dashboard ↗ to try the new preview tool.
You can now use a Workers binding to transform videos with Media Transformations. This allows you to resize, crop, extract frames, and extract audio from videos stored anywhere, even in private locations like R2 buckets.
The Media Transformations binding is useful when you want to:
- Transform videos stored in private or protected sources
- Optimize videos and store the output directly back to R2 for re-use
- Extract still frames for classification or description with Workers AI
- Extract audio tracks for transcription using Workers AI
To get started, add the Media binding to your Wrangler configuration:
JSONC {"$schema": "./node_modules/wrangler/config-schema.json","media": {"binding": "MEDIA"}}TOML [media]binding = "MEDIA"Then use the binding in your Worker to transform videos:
JavaScript export default {async fetch(request, env) {const video = await env.R2_BUCKET.get("input.mp4");const result = env.MEDIA.input(video.body).transform({ width: 480, height: 270 }).output({ mode: "video", duration: "5s" });return await result.response();},};TypeScript export default {async fetch(request, env) {const video = await env.R2_BUCKET.get("input.mp4");const result = env.MEDIA.input(video.body).transform({ width: 480, height: 270 }).output({ mode: "video", duration: "5s" });return await result.response();},};Output modes include
videofor optimized MP4 clips,framefor still images,spritesheetfor multiple frames, andaudiofor M4A extraction.For more information, refer to the Media Transformations binding documentation.
The latest releases of
@cloudflare/codemode↗ add a new MCP barrel export, removeaiandzodas required peer dependencies from the main entry point, and give you more control over the sandbox.A new
@cloudflare/codemode/mcpentry point provides two functions that wrap MCP servers with Code Mode:codeMcpServer({ server, executor })— wraps an existing MCP server with a singlecodetool where each upstream tool becomes a typedcodemode.*method.openApiMcpServer({ spec, executor, request })— createssearchandexecuteMCP tools from an OpenAPI spec with host-side request proxying and automatic$refresolution.
JavaScript import { codeMcpServer } from "@cloudflare/codemode/mcp";import { DynamicWorkerExecutor } from "@cloudflare/codemode";const executor = new DynamicWorkerExecutor({ loader: env.LOADER });// Wrap an existing MCP server — all its tools become// typed methods the LLM can call from generated codeconst server = await codeMcpServer({ server: upstreamMcp, executor });TypeScript import { codeMcpServer } from "@cloudflare/codemode/mcp";import { DynamicWorkerExecutor } from "@cloudflare/codemode";const executor = new DynamicWorkerExecutor({ loader: env.LOADER });// Wrap an existing MCP server — all its tools become// typed methods the LLM can call from generated codeconst server = await codeMcpServer({ server: upstreamMcp, executor });Breaking change in v0.2.0:
generateTypesand theToolDescriptor/ToolDescriptorstypes have moved to@cloudflare/codemode/ai:JavaScript // Beforeimport { generateTypes } from "@cloudflare/codemode";// Afterimport { generateTypes } from "@cloudflare/codemode/ai";TypeScript // Beforeimport { generateTypes } from "@cloudflare/codemode";// Afterimport { generateTypes } from "@cloudflare/codemode/ai";The main entry point (
@cloudflare/codemode) no longer requires theaiorzodpeer dependencies. It now exports:Export Description sanitizeToolNameSanitize tool names into valid JS identifiers normalizeCodeNormalize LLM-generated code into async arrow functions generateTypesFromJsonSchemaGenerate TypeScript type definitions from plain JSON Schema jsonSchemaToTypeConvert a single JSON Schema to a TypeScript type string DynamicWorkerExecutorSandboxed code execution via Dynamic Worker Loader ToolDispatcherRPC target for dispatching tool calls from sandbox to host The
aiandzodpeer dependencies are now optional — only required when importing from@cloudflare/codemode/ai.DynamicWorkerExecutornow accepts an optionalmodulesoption to inject custom ES modules into the sandbox:JavaScript const executor = new DynamicWorkerExecutor({loader: env.LOADER,modules: {"utils.js": `export function add(a, b) { return a + b; }`,},});// Sandbox code can then: import { add } from "utils.js"TypeScript const executor = new DynamicWorkerExecutor({loader: env.LOADER,modules: {"utils.js": `export function add(a, b) { return a + b; }`,},});// Sandbox code can then: import { add } from "utils.js"DynamicWorkerExecutornow normalizes code and sanitizes tool names internally. You no longer need to callnormalizeCode()orsanitizeToolName()before passing code and functions toexecute().Terminal window npm i @cloudflare/codemode@latestSee the Code Mode documentation for the full API reference.
AI Gateway now supports the
cf-aig-collect-log-payloadheader, which controls whether request and response bodies are stored in logs. By default, this header is set totrueand payloads are stored alongside metadata. Set this header tofalseto skip payload storage while still logging metadata such as token counts, model, provider, status code, cost, and duration.This is useful when you need usage metrics but do not want to persist sensitive prompt or response data.
Terminal window curl https://gateway.ai.cloudflare.com/v1/$ACCOUNT_ID/$GATEWAY_ID/openai/chat/completions \--header "Authorization: Bearer $TOKEN" \--header 'Content-Type: application/json' \--header 'cf-aig-collect-log-payload: false' \--data '{"model": "gpt-4o-mini","messages": [{"role": "user","content": "What is the email address and phone number of user123?"}]}'For more information, refer to Logging.
The Security Overview has been updated to provide Application Security customers with more actionable insights and a clearer view of their security posture.
Key improvements include:
- Criticality for all Insights: Every insight now includes a criticality rating, allowing you to prioritize the most impactful security action items first.
- Detection Tools Section: A new section displays the security detection tools available to you, indicating which are currently enabled and which can be activated to strengthen your defenses.
- Industry Peer Comparison (Enterprise customers): A new module from Security Reports benchmarks your security posture against industry peers, highlighting relative strengths and areas for improvement.
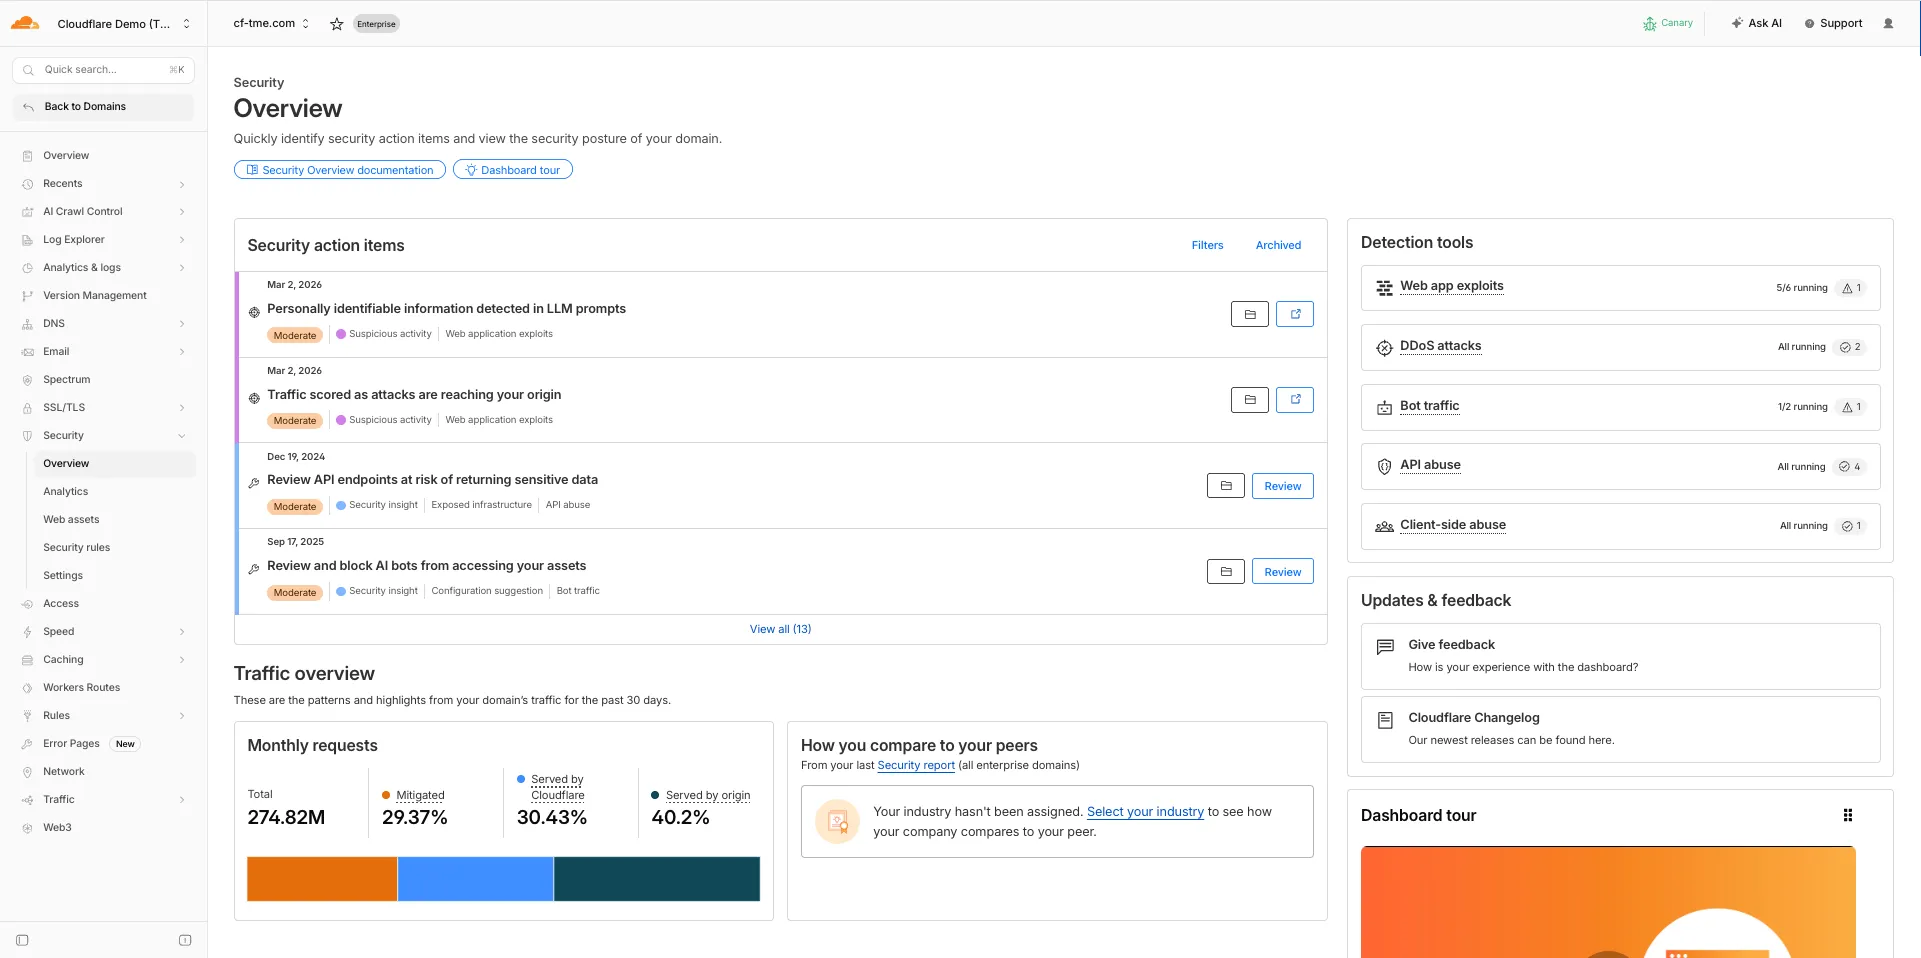
For more information, refer to Security Overview.
You can now set
topKup to50when a Vectorize query returns values or full metadata. This raises the previous limit of20for queries that usereturnValues: trueorreturnMetadata: "all".Use the higher limit when you need more matches in a single query response without dropping values or metadata. Refer to the Vectorize API reference for query options and current
topKlimits.
You can now SSH into running Container instances using Wrangler. This is useful for debugging, inspecting running processes, or executing one-off commands inside a Container.
To connect, enable
wrangler_sshin your Container configuration and add yourssh-ed25519public key toauthorized_keys:JSONC {"containers": [{"wrangler_ssh": {"enabled": true},"authorized_keys": [{"name": "<NAME>","public_key": "<YOUR_PUBLIC_KEY_HERE>"}]}]}TOML [[containers]][containers.wrangler_ssh]enabled = true[[containers.authorized_keys]]name = "<NAME>"public_key = "<YOUR_PUBLIC_KEY_HERE>"Then connect with:
Terminal window wrangler containers ssh <INSTANCE_ID>You can also run a single command without opening an interactive shell:
Terminal window wrangler containers ssh <INSTANCE_ID> -- ls -alUse
wrangler containers instances <APPLICATION>to find the instance ID for a running Container.For more information, refer to the SSH documentation.