
Cloudflare Pipelines is now available in beta, to all users with a Workers Paid plan.
Pipelines let you ingest high volumes of real time data, without managing the underlying infrastructure. A single pipeline can ingest up to 100 MB of data per second, via HTTP or from a Worker. Ingested data is automatically batched, written to output files, and delivered to an R2 bucket in your account. You can use Pipelines to build a data lake of clickstream data, or to store events from a Worker.
Create your first pipeline with a single command:
Create a pipeline $ npx wrangler@latest pipelines create my-clickstream-pipeline --r2-bucket my-bucket🌀 Authorizing R2 bucket "my-bucket"🌀 Creating pipeline named "my-clickstream-pipeline"✅ Successfully created pipeline my-clickstream-pipelineId: 0e00c5ff09b34d018152af98d06f5a1xvcName: my-clickstream-pipelineSources:HTTP:Endpoint: https://0e00c5ff09b34d018152af98d06f5a1xvc.pipelines.cloudflare.com/Authentication: offFormat: JSONWorker:Format: JSONDestination:Type: R2Bucket: my-bucketFormat: newline-delimited JSONCompression: GZIPBatch hints:Max bytes: 100 MBMax duration: 300 secondsMax records: 100,000🎉 You can now send data to your pipeline!Send data to your pipeline's HTTP endpoint:curl "https://0e00c5ff09b34d018152af98d06f5a1xvc.pipelines.cloudflare.com/" -d '[{ ...JSON_DATA... }]'To send data to your pipeline from a Worker, add the following configuration to your config file:{"pipelines": [{"pipeline": "my-clickstream-pipeline","binding": "PIPELINE"}]}Head over to our getting started guide for an in-depth tutorial to building with Pipelines.
Today, we're launching R2 Data Catalog in open beta, a managed Apache Iceberg catalog built directly into your Cloudflare R2 bucket.
If you're not already familiar with it, Apache Iceberg ↗ is an open table format designed to handle large-scale analytics datasets stored in object storage, offering ACID transactions and schema evolution. R2 Data Catalog exposes a standard Iceberg REST catalog interface, so you can connect engines like Spark, Snowflake, and PyIceberg to start querying your tables using the tools you already know.
To enable a data catalog on your R2 bucket, find R2 Data Catalog in your buckets settings in the dashboard, or run:
Terminal window npx wrangler r2 bucket catalog enable my-bucketAnd that's it. You'll get a catalog URI and warehouse you can plug into your favorite Iceberg engines.
Visit our getting started guide for step-by-step instructions on enabling R2 Data Catalog, creating tables, and running your first queries.
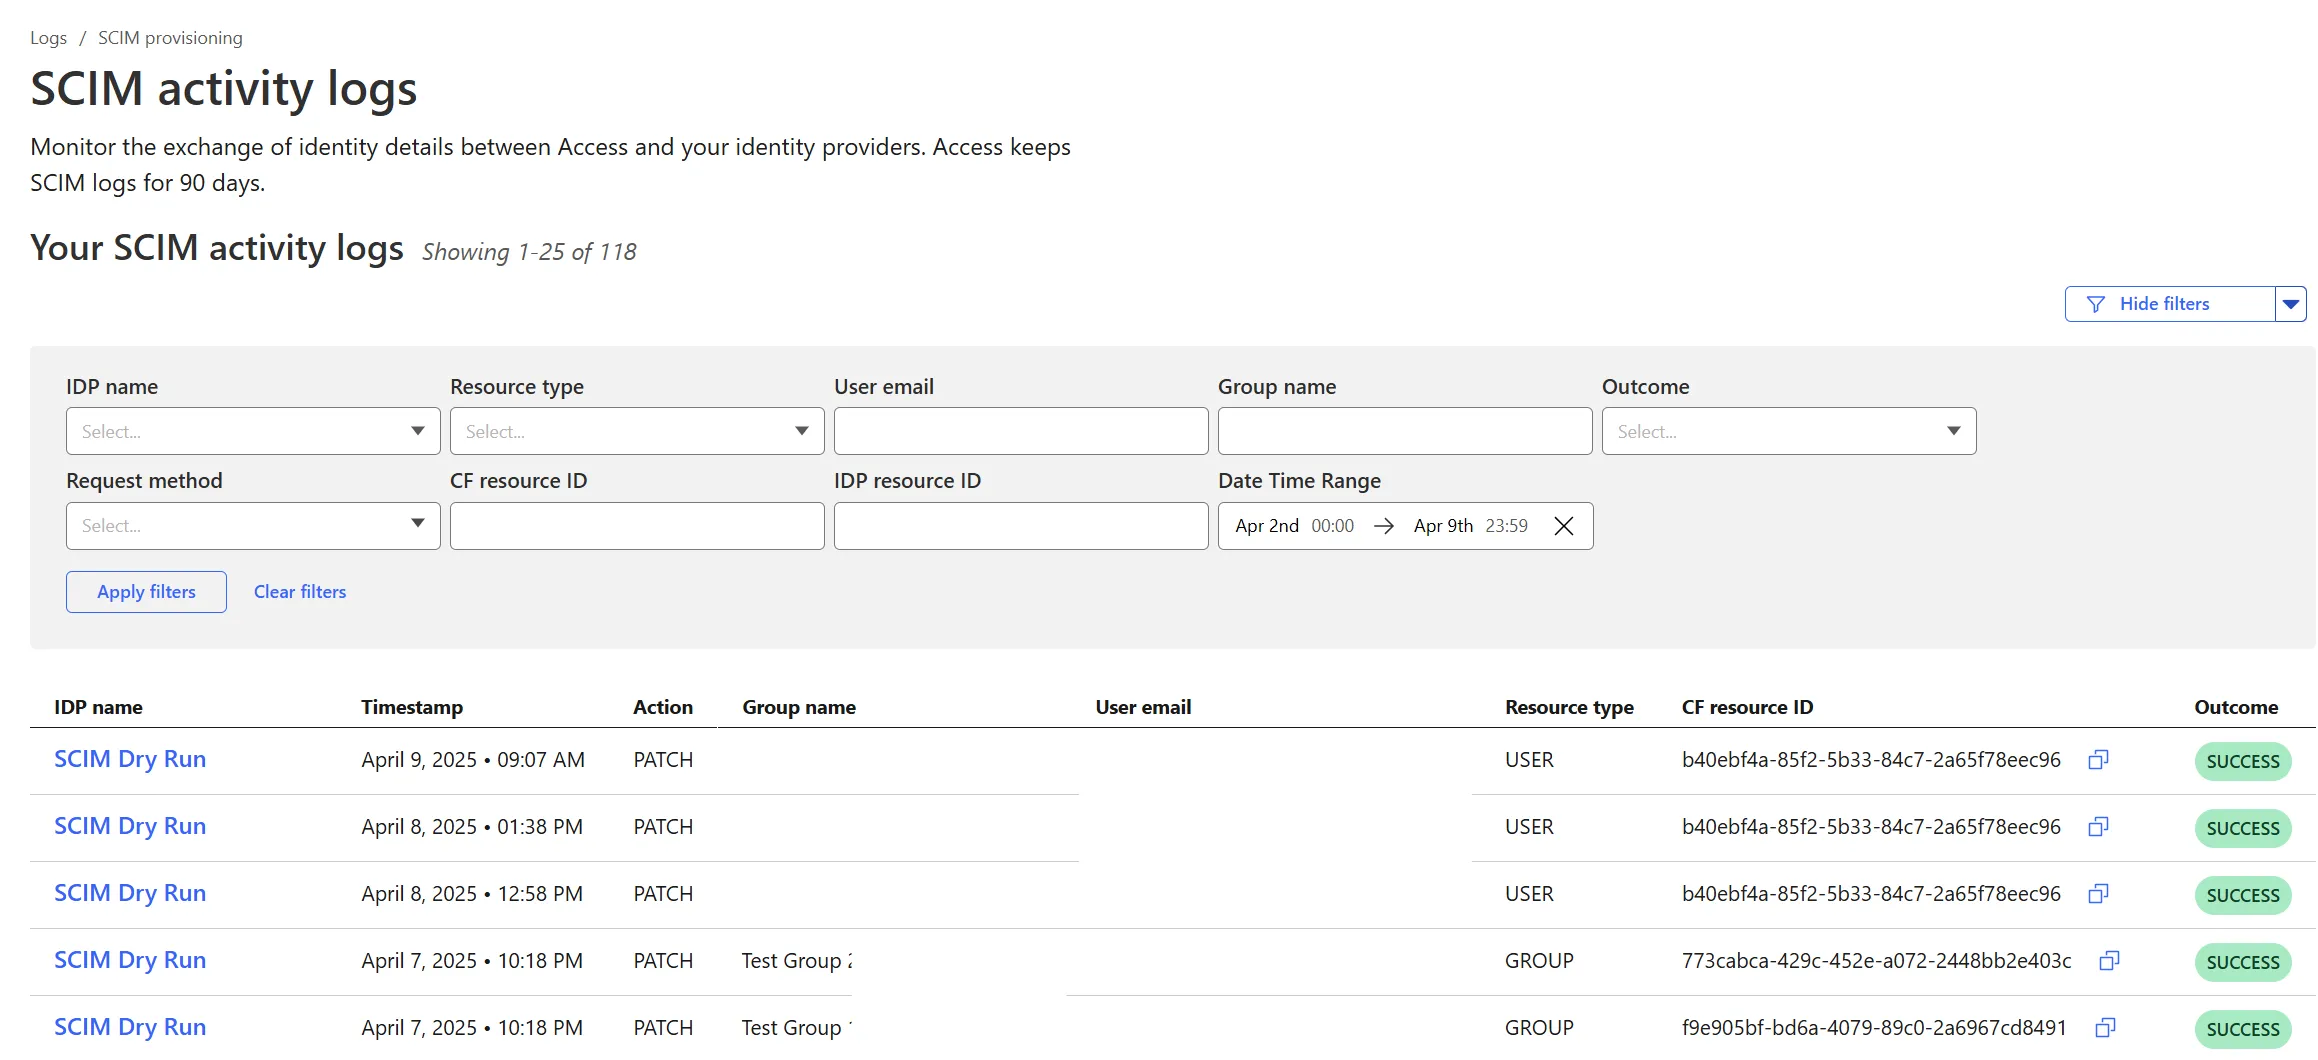
Cloudflare Zero Trust SCIM provisioning now has a full audit log of all create, update and delete event from any SCIM Enabled IdP. The SCIM logs support filtering by IdP, Event type, Result and many more fields. This will help with debugging user and group update issues and questions.
SCIM logs can be found on the Zero Trust Dashboard under Logs -> SCIM provisioning.
Hyperdrive now supports more SSL/TLS security options for your database connections:
- Configure Hyperdrive to verify server certificates with
verify-caorverify-fullSSL modes and protect against man-in-the-middle attacks - Configure Hyperdrive to provide client certificates to the database server to authenticate itself (mTLS) for stronger security beyond username and password
Use the new
wrangler certcommands to create certificate authority (CA) certificate bundles or client certificate pairs:Terminal window # Create CA certificate bundlenpx wrangler cert upload certificate-authority --ca-cert your-ca-cert.pem --name your-custom-ca-name# Create client certificate pairnpx wrangler cert upload mtls-certificate --cert client-cert.pem --key client-key.pem --name your-client-cert-nameThen create a Hyperdrive configuration with the certificates and desired SSL mode:
Terminal window npx wrangler hyperdrive create your-hyperdrive-config \--connection-string="postgres://user:password@hostname:port/database" \--ca-certificate-id <CA_CERT_ID> \--mtls-certificate-id <CLIENT_CERT_ID>--sslmode verify-fullLearn more about configuring SSL/TLS certificates for Hyperdrive to enhance your database security posture.
- Configure Hyperdrive to verify server certificates with

Cloudflare Snippets are now generally available at no extra cost across all paid plans — giving you a fast, flexible way to programmatically control HTTP traffic using lightweight JavaScript.
You can now use Snippets to modify HTTP requests and responses with confidence, reliability, and scale. Snippets are production-ready and deeply integrated with Cloudflare Rules, making them ideal for everything from quick dynamic header rewrites to advanced routing logic.
What's new:
-
Snippets are now GA – Available at no extra cost on all Pro, Business, and Enterprise plans.
-
Ready for production – Snippets deliver a production-grade experience built for scale.
-
Part of the Cloudflare Rules platform – Snippets inherit request modifications from other Cloudflare products and support sequential execution, allowing you to run multiple Snippets on the same request and apply custom modifications step by step.
-
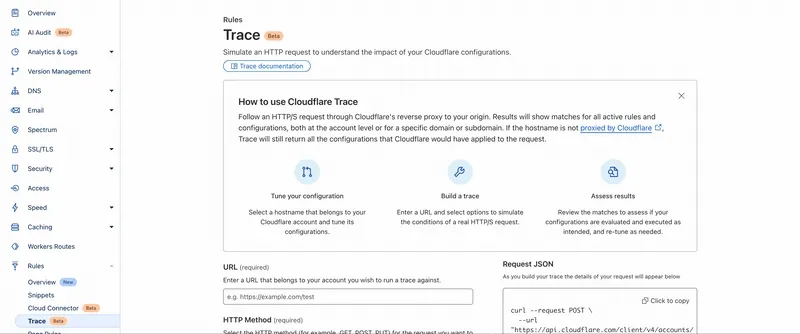
Trace integration – Use Cloudflare Trace to see which Snippets were triggered on a request — helping you understand traffic flow and debug more effectively.
Learn more in the launch blog post ↗.
-
Cloudflare Secrets Store is available today in Beta. You can now store, manage, and deploy account level secrets from a secure, centralized platform to your Workers.
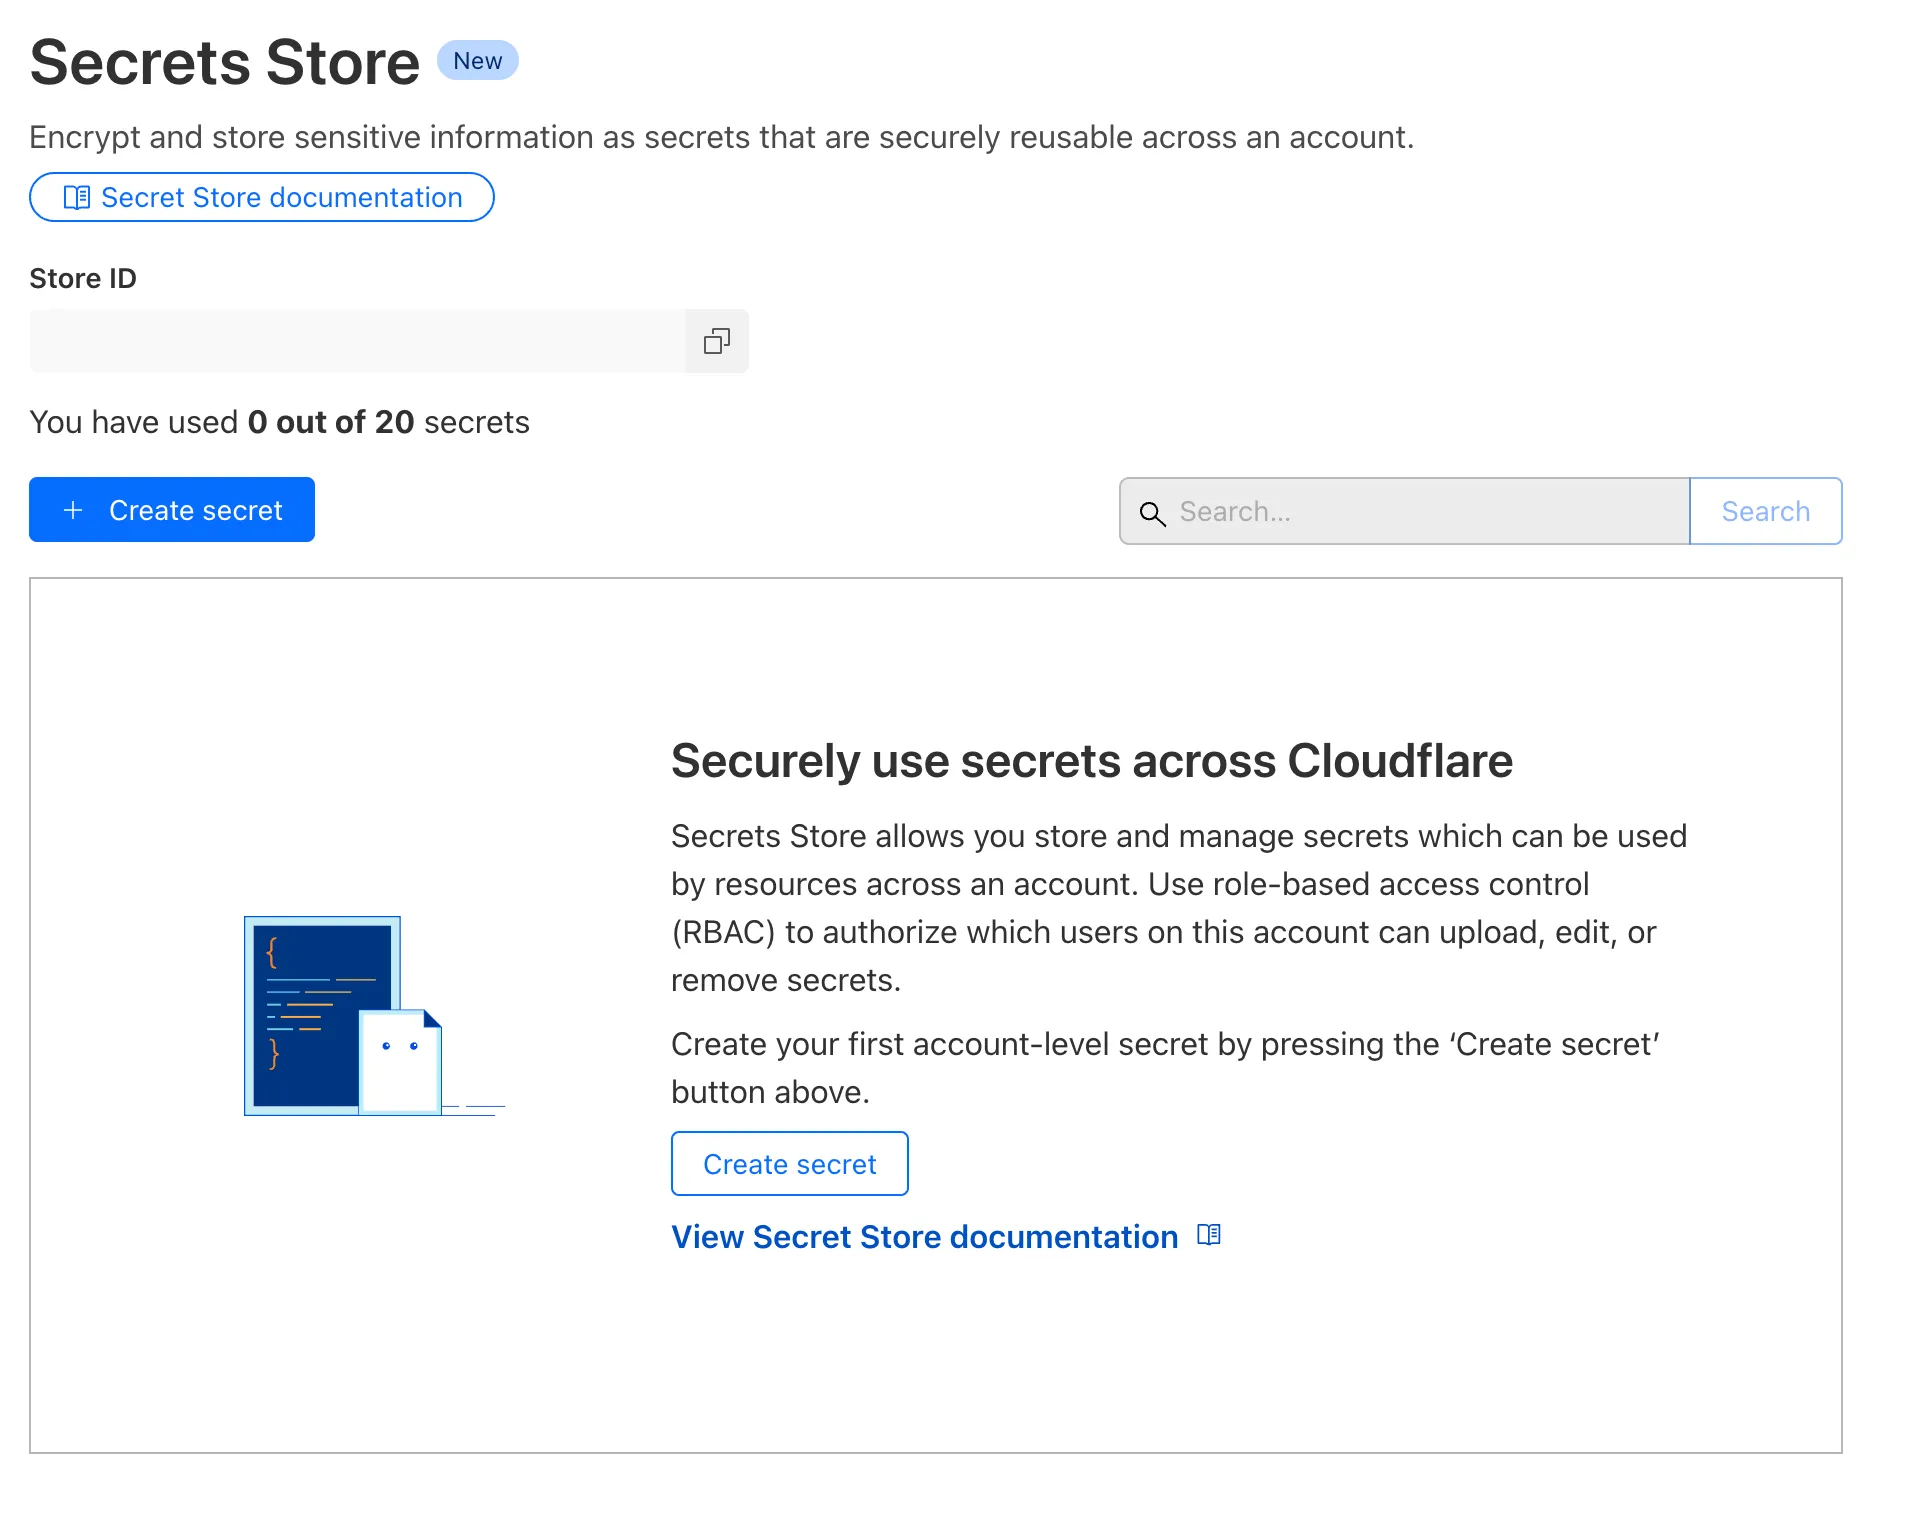
To spin up your Cloudflare Secrets Store, simply click the new Secrets Store tab in the dashboard ↗ or use this Wrangler command:
Terminal window wrangler secrets-store store create <name> --remoteThe following are supported in the Secrets Store beta:
- Secrets Store UI & API: create your store & create, duplicate, update, scope, and delete a secret
- Workers UI: bind a new or existing account level secret to a Worker and deploy in code
- Wrangler: create your store & create, duplicate, update, scope, and delete a secret
- Account Management UI & API: assign Secrets Store permissions roles & view audit logs for actions taken in Secrets Store core platform
For instructions on how to get started, visit our developer documentation.
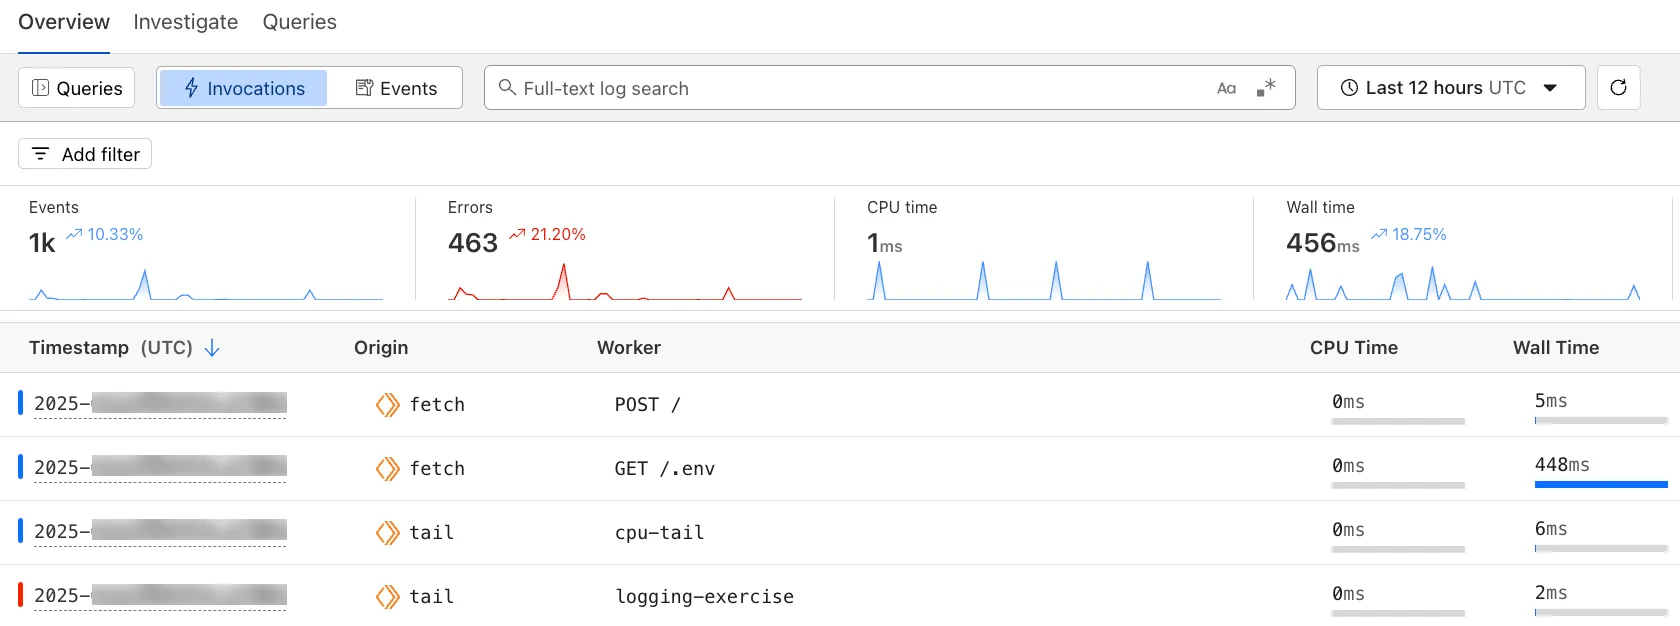
The Workers Observability dashboard ↗ offers a single place to investigate and explore your Workers Logs.
The Overview tab shows logs from all your Workers in one place. The Invocations view groups logs together by invocation, which refers to the specific trigger that started the execution of the Worker (i.e. fetch). The Events view shows logs in the order they were produced, based on timestamp. Previously, you could only view logs for a single Worker.
The Investigate tab presents a Query Builder, which helps you write structured queries to investigate and visualize your logs. The Query Builder can help answer questions such as:
- Which paths are experiencing the most 5XX errors?
- What is the wall time distribution by status code for my Worker?
- What are the slowest requests, and where are they coming from?
- Who are my top N users?
The Query Builder can use any field that you store in your logs as a key to visualize, filter, and group by. Use the Query Builder to quickly access your data, build visualizations, save queries, and share them with your team.
Workers Logs is now Generally Available. With a small change to your Wrangler configuration, Workers Logs ingests, indexes, and stores all logs emitted from your Workers for up to 7 days.
We've introduced a number of changes during our beta period, including:
- Dashboard enhancements with customizable fields as columns in the Logs view and support for invocation-based grouping
- Performance improvements to ensure no adverse impact
- Public API endpoints ↗ for broader consumption
The API documents three endpoints: list the keys in the telemetry dataset, run a query, and list the unique values for a key. For more, visit our REST API documentation ↗.
Visit the docs to learn more about the capabilities and methods exposed by the Query Builder. Start using Workers Logs and the Query Builder today by enabling observability for your Workers:
JSONC {"observability": {"enabled": true,"logs": {"invocation_logs": true,"head_sampling_rate": 1 // optional. default = 1.}}}TOML [observability]enabled = true[observability.logs]invocation_logs = truehead_sampling_rate = 1
You can now observe and investigate the CPU time and Wall time for every Workers Invocations.
- For Workers Logs, CPU time and Wall time are surfaced in the Invocation Log..
- For Tail Workers, CPU time and Wall time are surfaced at the top level of the Workers Trace Events object.
- For Workers Logpush, CPU and Wall time are surfaced at the top level of the Workers Trace Events object. All new jobs will have these new fields included by default. Existing jobs need to be updated to include CPU time and Wall time.
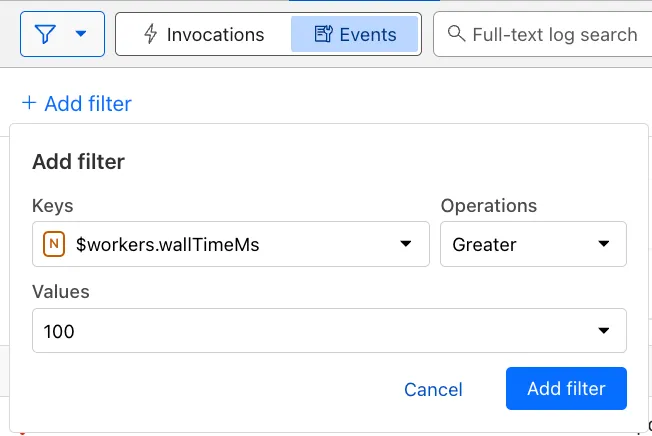
You can use a Workers Logs filter to search for logs where Wall time exceeds 100ms.
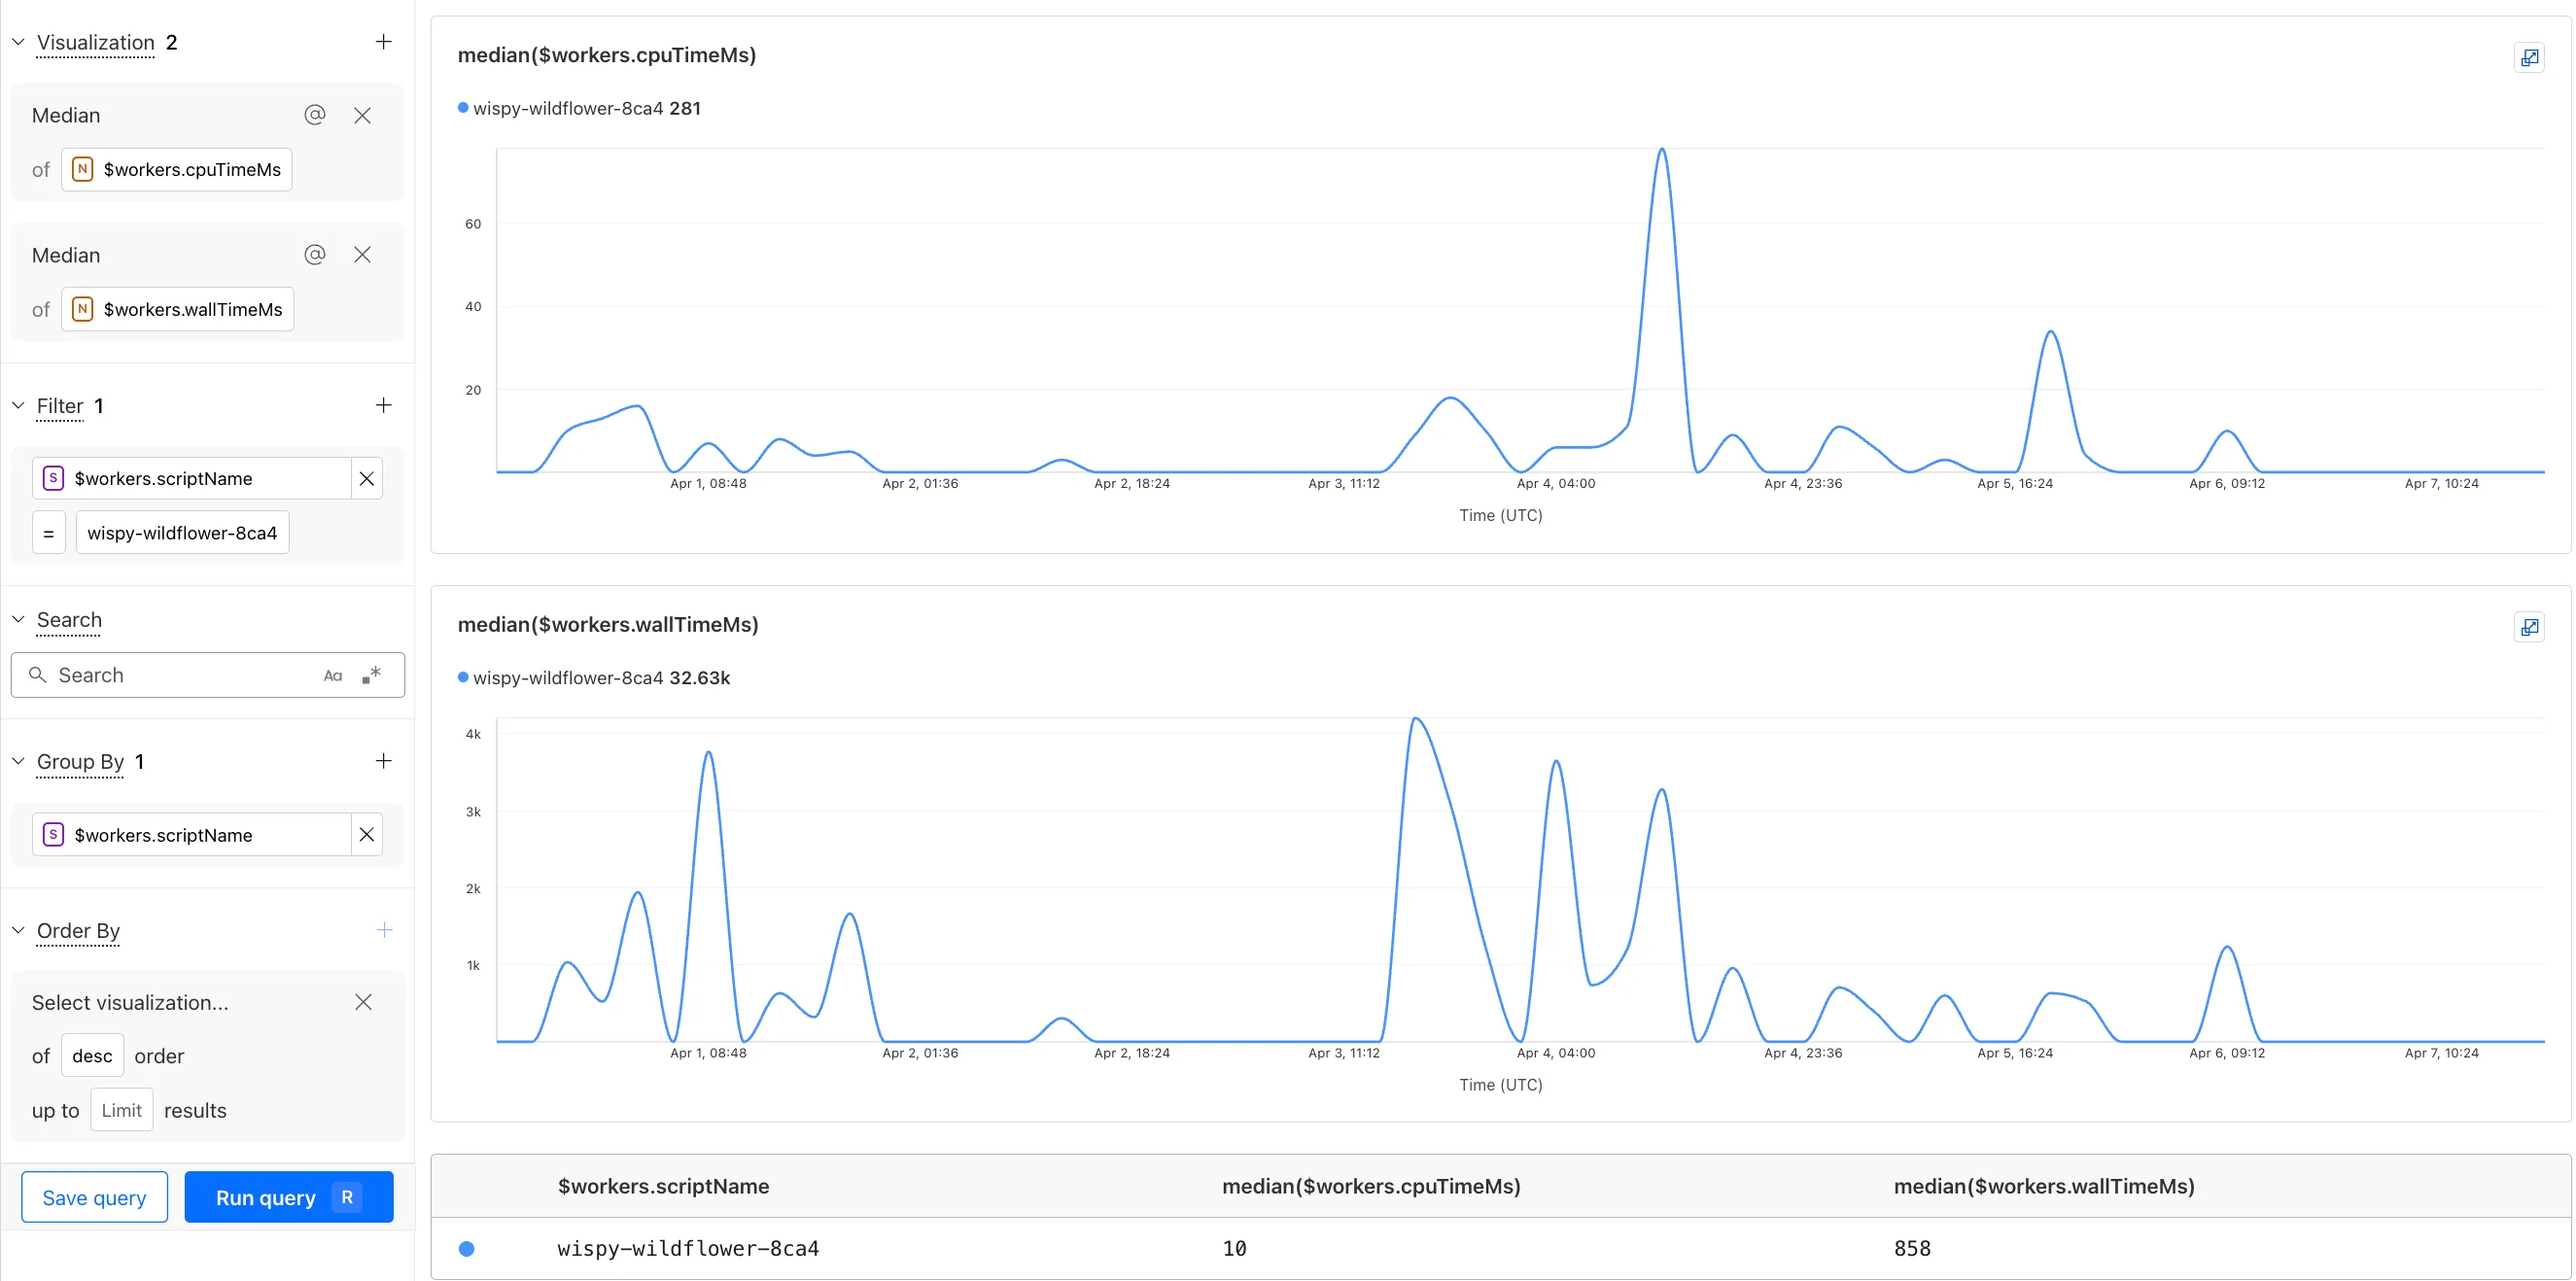
You can also use the Workers Observability Query Builder ↗ to find the median CPU time and median Wall time for all of your Workers.
A new GA release for the Windows WARP client is now available on the stable releases downloads page.
This release contains a hotfix for captive portal detection for the 2025.2.600.0 release.
Changes and improvements
- Fix to reduce the number of browser tabs opened during captive portal logins.
Known issues
DNS resolution may be broken when the following conditions are all true:
- WARP is in Secure Web Gateway without DNS filtering (tunnel-only) mode.
- A custom DNS server address is configured on the primary network adapter.
- The custom DNS server address on the primary network adapter is changed while WARP is connected.
To work around this issue, reconnect the WARP client by toggling off and back on.
A new GA release for the macOS WARP client is now available on the stable releases downloads page.
This release contains a hotfix for captive portal detection and PF state tables for the 2025.2.600.0 release.
Changes and improvements
- Fix to reduce the number of browser tabs opened during captive portal logins.
- Improvement to exclude local DNS traffic entries from PF state table to reduce risk of connectivity issues from exceeding table capacity.
Known issues
- macOS Sequoia: Due to changes Apple introduced in macOS 15.0.x, the WARP client may not behave as expected. Cloudflare recommends the use of macOS 15.4 or later.
Email Workers enables developers to programmatically take action on anything that hits their email inbox. If you're building with Email Workers, you can now test the behavior of an Email Worker script, receiving, replying and sending emails in your local environment using
wrangler dev.Below is an example that shows you how you can receive messages using the
email()handler and parse them using postal-mime ↗:TypeScript import * as PostalMime from "postal-mime";export default {async email(message, env, ctx) {const parser = new PostalMime.default();const rawEmail = new Response(message.raw);const email = await parser.parse(await rawEmail.arrayBuffer());console.log(email);},};Now when you run
npx wrangler dev, wrangler will expose a local/cdn-cgi/handler/emailendpoint that you canPOSTemail messages to and trigger your Worker'semail()handler:Terminal window curl -X POST 'http://localhost:8787/cdn-cgi/handler/email' \--url-query 'from=sender@example.com' \--url-query 'to=recipient@example.com' \--header 'Content-Type: application/json' \--data-raw 'Received: from smtp.example.com (127.0.0.1)by cloudflare-email.com (unknown) id 4fwwffRXOpyRfor <recipient@example.com>; Tue, 27 Aug 2024 15:50:20 +0000From: "John" <sender@example.com>Reply-To: sender@example.comTo: recipient@example.comSubject: Testing Email Workers Local DevContent-Type: text/html; charset="windows-1252"X-Mailer: CurlDate: Tue, 27 Aug 2024 08:49:44 -0700Message-ID: <6114391943504294873000@ZSH-GHOSTTY>Hi there'This is what you get in the console:
{"headers": [{"key": "received","value": "from smtp.example.com (127.0.0.1) by cloudflare-email.com (unknown) id 4fwwffRXOpyR for <recipient@example.com>; Tue, 27 Aug 2024 15:50:20 +0000"},{ "key": "from", "value": "\"John\" <sender@example.com>" },{ "key": "reply-to", "value": "sender@example.com" },{ "key": "to", "value": "recipient@example.com" },{ "key": "subject", "value": "Testing Email Workers Local Dev" },{ "key": "content-type", "value": "text/html; charset=\"windows-1252\"" },{ "key": "x-mailer", "value": "Curl" },{ "key": "date", "value": "Tue, 27 Aug 2024 08:49:44 -0700" },{"key": "message-id","value": "<6114391943504294873000@ZSH-GHOSTTY>"}],"from": { "address": "sender@example.com", "name": "John" },"to": [{ "address": "recipient@example.com", "name": "" }],"replyTo": [{ "address": "sender@example.com", "name": "" }],"subject": "Testing Email Workers Local Dev","messageId": "<6114391943504294873000@ZSH-GHOSTTY>","date": "2024-08-27T15:49:44.000Z","html": "Hi there\n","attachments": []}Local development is a critical part of the development flow, and also works for sending, replying and forwarding emails. See our documentation for more information.
Hyperdrive is now available on the Free plan of Cloudflare Workers, enabling you to build Workers that connect to PostgreSQL or MySQL databases without compromise.
Low-latency access to SQL databases is critical to building full-stack Workers applications. We want you to be able to build on fast, global apps on Workers, regardless of the tools you use. So we made Hyperdrive available for all, to make it easier to build Workers that connect to PostgreSQL and MySQL.
If you want to learn more about how Hyperdrive works, read the deep dive ↗ on how Hyperdrive can make your database queries up to 4x faster.
Visit the docs to get started with Hyperdrive for PostgreSQL or MySQL.
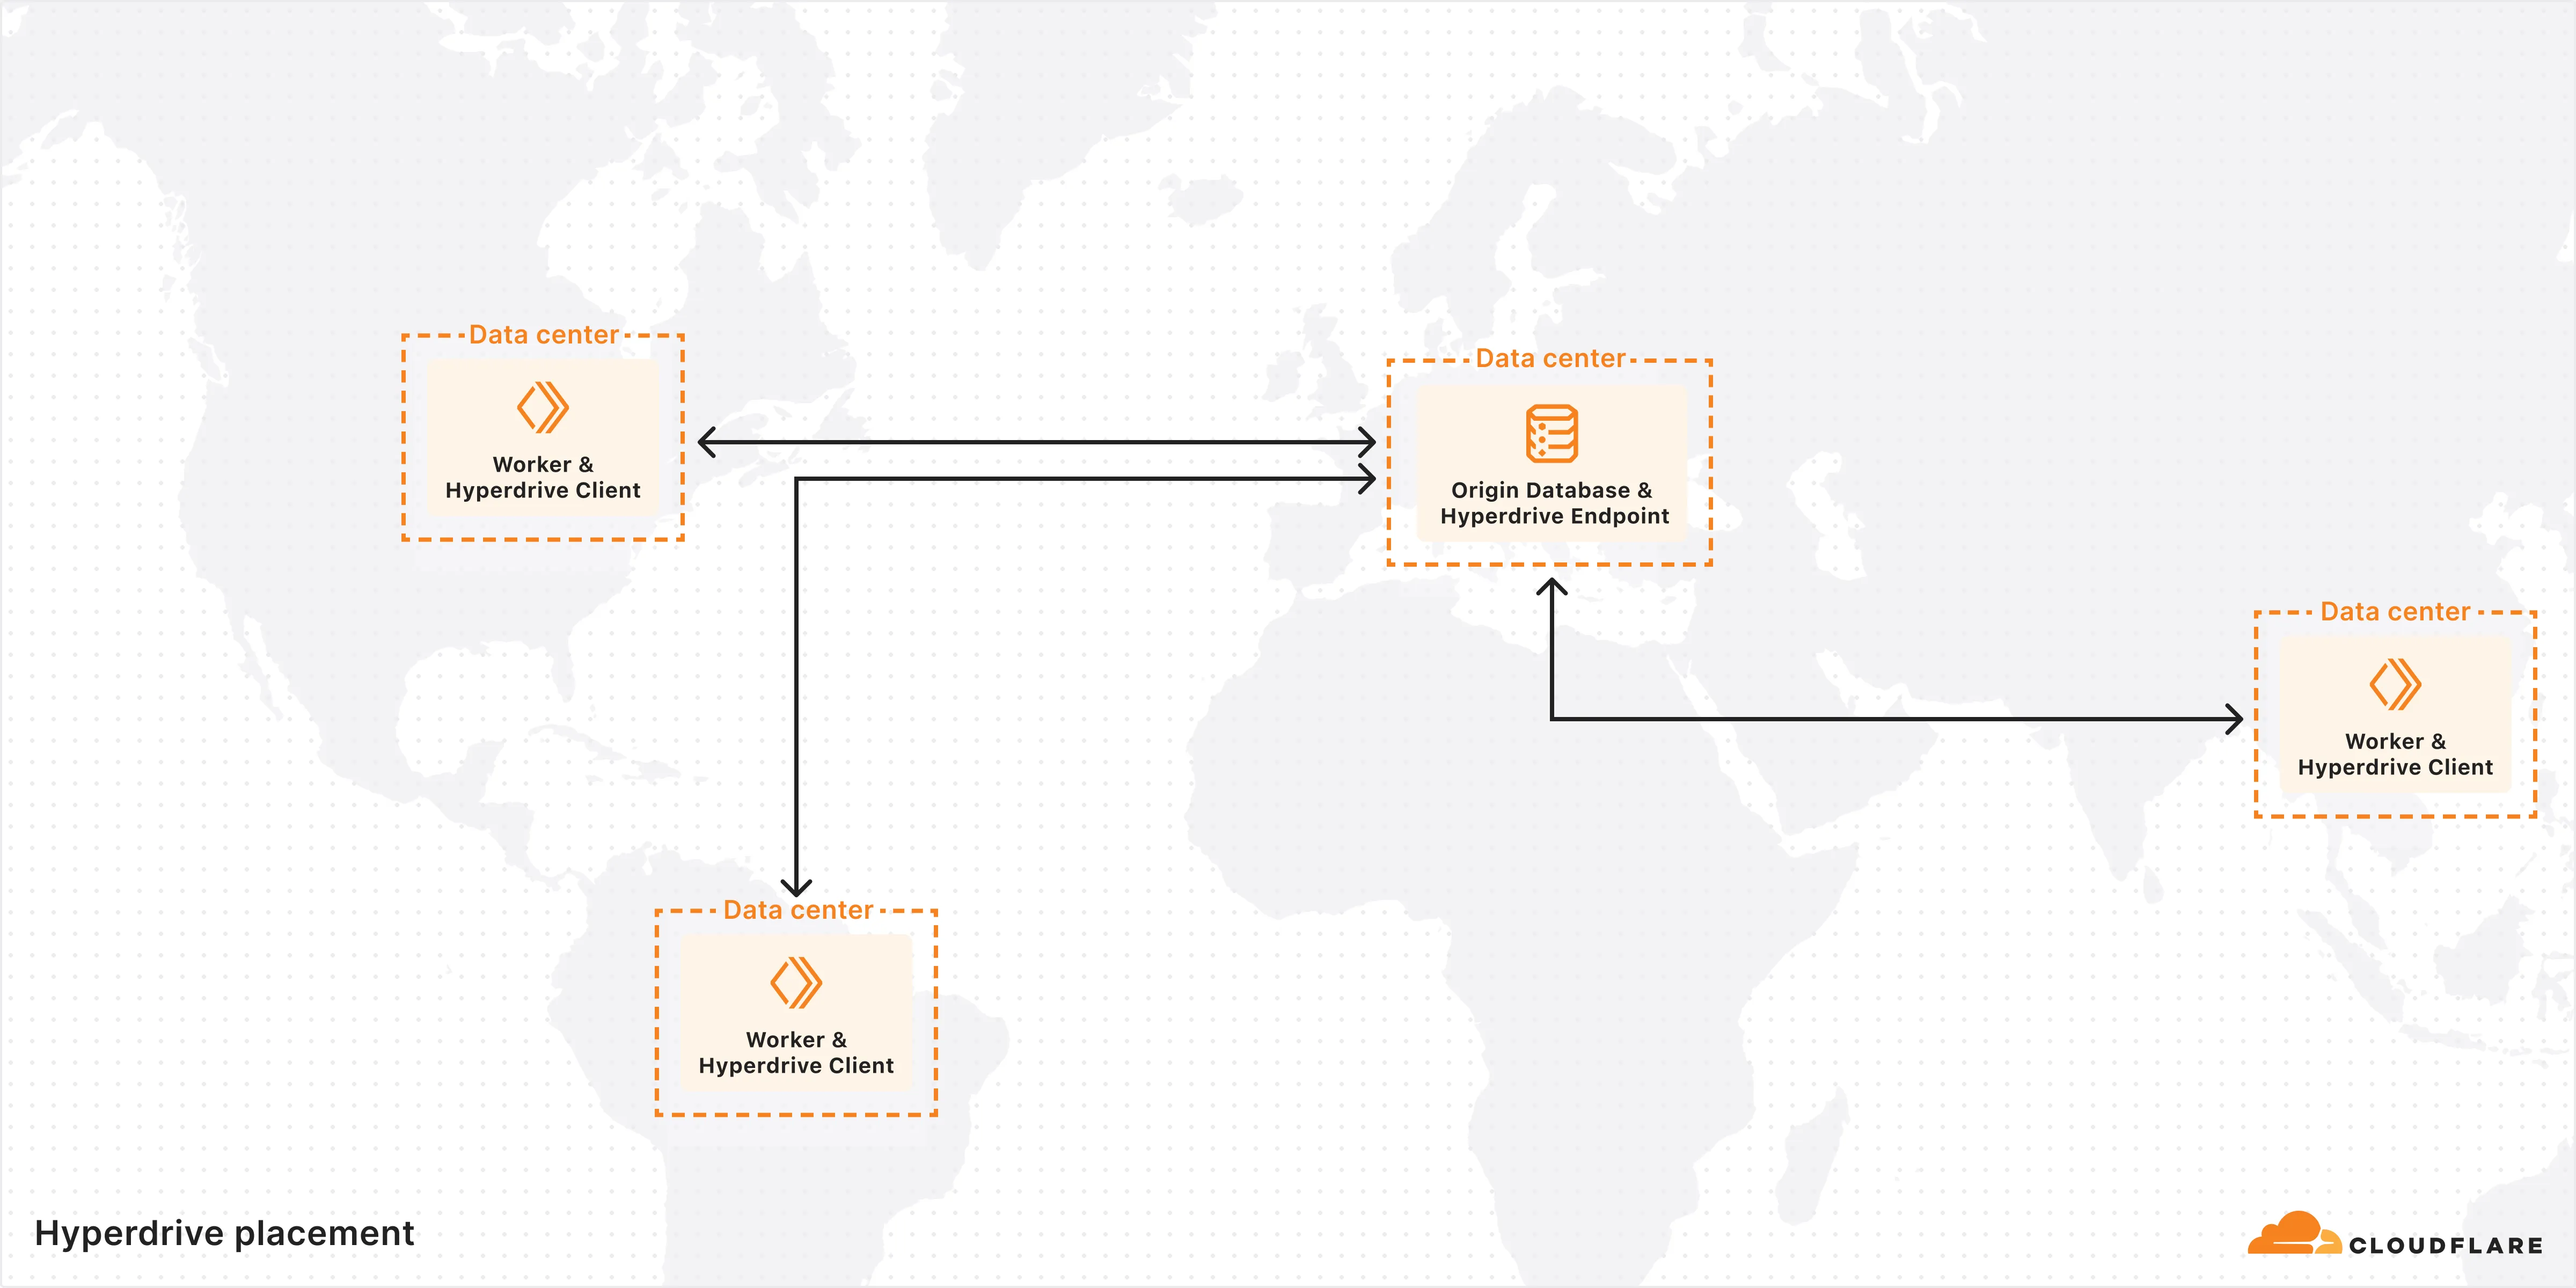
Hyperdrive now supports connecting to MySQL and MySQL-compatible databases, including Amazon RDS and Aurora MySQL, Google Cloud SQL for MySQL, Azure Database for MySQL, PlanetScale and MariaDB.
Hyperdrive makes your regional, MySQL databases fast when connecting from Cloudflare Workers. It eliminates unnecessary network roundtrips during connection setup, pools database connections globally, and can cache query results to provide the fastest possible response times.
Best of all, you can connect using your existing drivers, ORMs, and query builders with Hyperdrive's secure credentials, no code changes required.
TypeScript import { createConnection } from "mysql2/promise";export interface Env {HYPERDRIVE: Hyperdrive;}export default {async fetch(request, env, ctx): Promise<Response> {const connection = await createConnection({host: env.HYPERDRIVE.host,user: env.HYPERDRIVE.user,password: env.HYPERDRIVE.password,database: env.HYPERDRIVE.database,port: env.HYPERDRIVE.port,disableEval: true, // Required for Workers compatibility});const [results, fields] = await connection.query("SHOW tables;");ctx.waitUntil(connection.end());return new Response(JSON.stringify({ results, fields }), {headers: {"Content-Type": "application/json","Access-Control-Allow-Origin": "*",},});},} satisfies ExportedHandler<Env>;Learn more about how Hyperdrive works and get started building Workers that connect to MySQL with Hyperdrive.
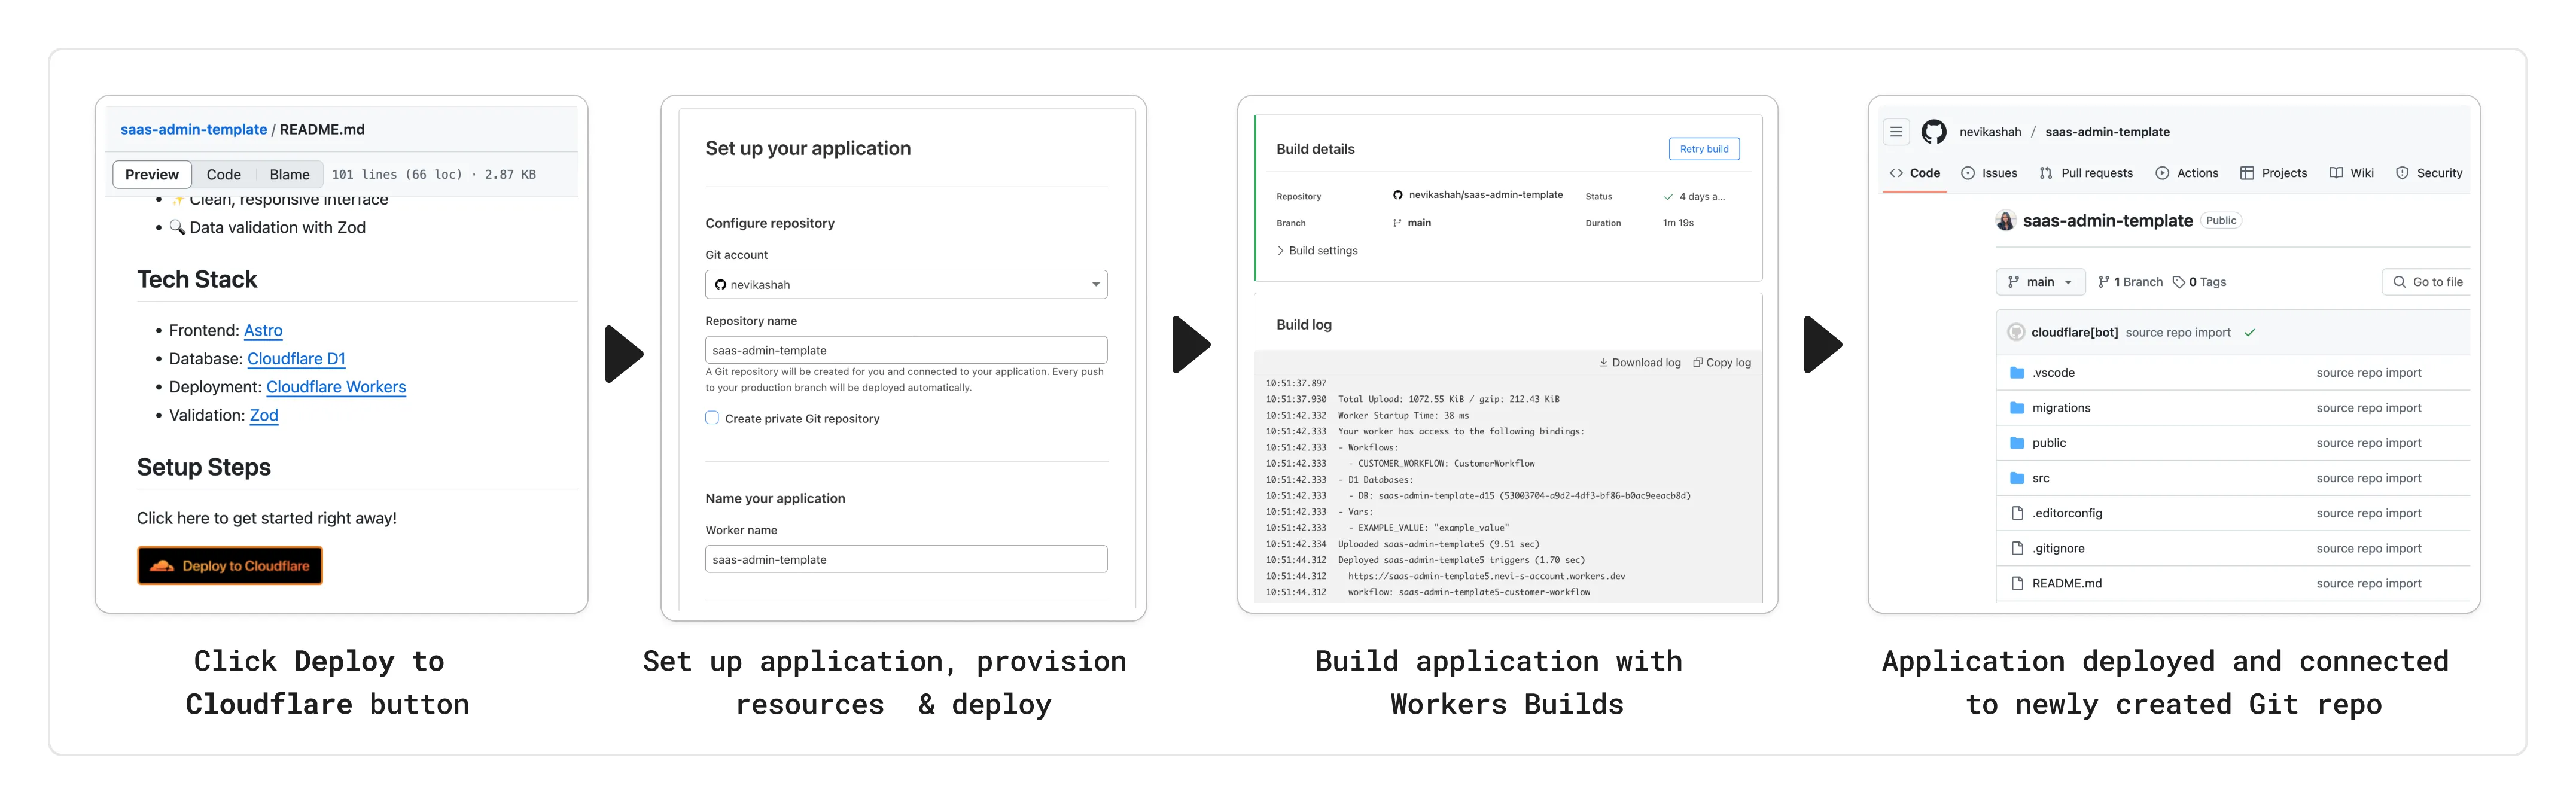
You can now add a Deploy to Cloudflare button to the README of your Git repository containing a Workers application — making it simple for other developers to quickly set up and deploy your project!
The Deploy to Cloudflare button:
- Creates a new Git repository on your GitHub/ GitLab account: Cloudflare will automatically clone and create a new repository on your account, so you can continue developing.
- Automatically provisions resources the app needs: If your repository requires Cloudflare primitives like a Workers KV namespace, a D1 database, or an R2 bucket, Cloudflare will automatically provision them on your account and bind them to your Worker upon deployment.
- Configures Workers Builds (CI/CD): Every new push to your production branch on your newly created repository will automatically build and deploy courtesy of Workers Builds.
- Adds preview URLs to each pull request: If you'd like to test your changes before deploying, you can push changes to a non-production branch and preview URLs will be generated and posted back to GitHub as a comment.
To create a Deploy to Cloudflare button in your README, you can add the following snippet, including your Git repository URL:
[](https://deploy.workers.cloudflare.com/?url=<YOUR_GIT_REPO_URL>)Check out our documentation for more information on how to set up a deploy button for your application and best practices to ensure a successful deployment for other developers.
The following full-stack frameworks now have Generally Available ("GA") adapters for Cloudflare Workers, and are ready for you to use in production:
The following frameworks are now in beta, with GA support coming very soon:
- Next.js, supported through @opennextjs/cloudflare ↗ is now
v1.0-beta. - Angular
- SolidJS (SolidStart)
You can also build complete full-stack apps on Workers without a framework:
- You can “just use Vite" ↗ and React together, and build a back-end API in the same Worker. Follow our React SPA with an API tutorial to learn how.
Get started building today with our framework guides, or read our Developer Week 2025 blog post ↗ about all the updates to building full-stack applications on Workers.
- Next.js, supported through @opennextjs/cloudflare ↗ is now
When using a Worker with the
nodejs_compatcompatibility flag enabled, the following Node.js APIs are now available:This make it easier to reuse existing Node.js code in Workers or use npm packages that depend on these APIs.
The full
node:crypto↗ API is now available in Workers.You can use it to verify and sign data:
JavaScript import { sign, verify } from "node:crypto";const signature = sign("sha256", "-data to sign-", env.PRIVATE_KEY);const verified = verify("sha256", "-data to sign-", env.PUBLIC_KEY, signature);Or, to encrypt and decrypt data:
JavaScript import { publicEncrypt, privateDecrypt } from "node:crypto";const encrypted = publicEncrypt(env.PUBLIC_KEY, "some data");const plaintext = privateDecrypt(env.PRIVATE_KEY, encrypted);See the
node:cryptodocumentation for more information.The following APIs from
node:tlsare now available:This enables secure connections over TLS (Transport Layer Security) to external services.
JavaScript import { connect } from "node:tls";// ... in a request handler ...const connectionOptions = { key: env.KEY, cert: env.CERT };const socket = connect(url, connectionOptions, () => {if (socket.authorized) {console.log("Connection authorized");}});socket.on("data", (data) => {console.log(data);});socket.on("end", () => {console.log("server ends connection");});See the
node:tlsdocumentation for more information.
The Cloudflare Vite plugin has reached v1.0 ↗ and is now Generally Available ("GA").
When you use
@cloudflare/vite-plugin, you can use Vite's local development server and build tooling, while ensuring that while developing, your code runs inworkerd↗, the open-source Workers runtime.This lets you get the best of both worlds for a full-stack app — you can use Hot Module Replacement ↗ from Vite right alongside Durable Objects and other runtime APIs and bindings that are unique to Cloudflare Workers.
@cloudflare/vite-pluginis made possible by the new environment API ↗ in Vite, and was built in partnership with the Vite team ↗.You can build any type of application with
@cloudflare/vite-plugin, using any rendering mode, from single page applications (SPA) and static sites to server-side rendered (SSR) pages and API routes.React Router v7 (Remix) is the first full-stack framework to provide full support for Cloudflare Vite plugin, allowing you to use all parts of Cloudflare's developer platform, without additional build steps.
You can also build complete full-stack apps on Workers without a framework — "just use Vite" ↗ and React together, and build a back-end API in the same Worker. Follow our React SPA with an API tutorial to learn how.
If you're already using Vite ↗ in your build and development toolchain, you can start using our plugin with minimal changes to your
vite.config.ts:vite.config.ts import { defineConfig } from "vite";import { cloudflare } from "@cloudflare/vite-plugin";export default defineConfig({plugins: [cloudflare()],});Take a look at the documentation for our Cloudflare Vite plugin for more information!
The Agents SDK now includes built-in support for building remote MCP (Model Context Protocol) servers directly as part of your Agent. This allows you to easily create and manage MCP servers, without the need for additional infrastructure or configuration.
The SDK includes a new
MCPAgentclass that extends theAgentclass and allows you to expose resources and tools over the MCP protocol, as well as authorization and authentication to enable remote MCP servers.JavaScript export class MyMCP extends McpAgent {server = new McpServer({name: "Demo",version: "1.0.0",});async init() {this.server.resource(`counter`, `mcp://resource/counter`, (uri) => {// ...});this.server.tool("add","Add two numbers together",{ a: z.number(), b: z.number() },async ({ a, b }) => {// ...},);}}TypeScript export class MyMCP extends McpAgent<Env> {server = new McpServer({name: "Demo",version: "1.0.0",});async init() {this.server.resource(`counter`, `mcp://resource/counter`, (uri) => {// ...});this.server.tool("add","Add two numbers together",{ a: z.number(), b: z.number() },async ({ a, b }) => {// ...},);}}See the example ↗ for the full code and as the basis for building your own MCP servers, and the client example ↗ for how to build an Agent that acts as an MCP client.
To learn more, review the announcement blog ↗ as part of Developer Week 2025.
We've made a number of improvements to the Agents SDK, including:
- Support for building MCP servers with the new
MCPAgentclass. - The ability to export the current agent, request and WebSocket connection context using
import { context } from "agents", allowing you to minimize or avoid direct dependency injection when calling tools. - Fixed a bug that prevented query parameters from being sent to the Agent server from the
useAgentReact hook. - Automatically converting the
agentname inuseAgentoruseAgentChatto kebab-case to ensure it matches the naming convention expected byrouteAgentRequest.
To install or update the Agents SDK, run
npm i agents@latestin an existing project, or explore theagents-starterproject:Terminal window npm create cloudflare@latest -- --template cloudflare/agents-starterSee the full release notes and changelog on the Agents SDK repository ↗ and
- Support for building MCP servers with the new
AutoRAG is now in open beta, making it easy for you to build fully-managed retrieval-augmented generation (RAG) pipelines without managing infrastructure. Just upload your docs to R2, and AutoRAG handles the rest: embeddings, indexing, retrieval, and response generation via API.
With AutoRAG, you can:
- Customize your pipeline: Choose from Workers AI models, configure chunking strategies, edit system prompts, and more.
- Instant setup: AutoRAG provisions everything you need from Vectorize, AI gateway, to pipeline logic for you, so you can go from zero to a working RAG pipeline in seconds.
- Keep your index fresh: AutoRAG continuously syncs your index with your data source to ensure responses stay accurate and up to date.
- Ask questions: Query your data and receive grounded responses via a Workers binding or API.
Whether you're building internal tools, AI-powered search, or a support assistant, AutoRAG gets you from idea to deployment in minutes.
Get started in the Cloudflare dashboard ↗ or check out the guide for instructions on how to build your RAG pipeline today.
We’re excited to announce Browser Rendering is now available on the Workers Free plan ↗, making it even easier to prototype and experiment with web search and headless browser use-cases when building applications on Workers.
The Browser Rendering REST API is now Generally Available, allowing you to control browser instances from outside of Workers applications. We've added three new endpoints to help automate more browser tasks:
- Extract structured data – Use
/jsonto retrieve structured data from a webpage. - Retrieve links – Use
/linksto pull all links from a webpage. - Convert to Markdown – Use
/markdownto convert webpage content into Markdown format.
For example, to fetch the Markdown representation of a webpage:
Markdown example curl -X 'POST' 'https://api.cloudflare.com/client/v4/accounts/<accountId>/browser-rendering/markdown' \-H 'Content-Type: application/json' \-H 'Authorization: Bearer <apiToken>' \-d '{"url": "https://example.com"}'For the full list of endpoints, check out our REST API documentation. You can also interact with Browser Rendering via the Cloudflare TypeScript SDK ↗.
We also recently landed support for Playwright in Browser Rendering for browser automation from Cloudflare Workers, in addition to Puppeteer, giving you more flexibility to test across different browser environments.
Visit the Browser Rendering docs to learn more about how to use headless browsers in your applications.
- Extract structured data – Use
Durable Objects can now be used with zero commitment on the Workers Free plan allowing you to build AI agents with Agents SDK, collaboration tools, and real-time applications like chat or multiplayer games.
Durable Objects let you build stateful, serverless applications with millions of tiny coordination instances that run your application code alongside (in the same thread!) your durable storage. Each Durable Object can access its own SQLite database through a Storage API. A Durable Object class is defined in a Worker script encapsulating the Durable Object's behavior when accessed from a Worker. To try the code below, click the button:
JavaScript import { DurableObject } from "cloudflare:workers";// Durable Objectexport class MyDurableObject extends DurableObject {...async sayHello(name) {return `Hello, ${name}!`;}}// Workerexport default {async fetch(request, env) {// Every unique ID refers to an individual instance of the Durable Object classconst id = env.MY_DURABLE_OBJECT.idFromName("foo");// A stub is a client used to invoke methods on the Durable Objectconst stub = env.MY_DURABLE_OBJECT.get(id);// Methods on the Durable Object are invoked via the stubconst response = await stub.sayHello("world");return response;},};Free plan limits apply to Durable Objects compute and storage usage. Limits allow developers to build real-world applications, with every Worker request able to call a Durable Object on the free plan.
For more information, checkout:
SQLite in Durable Objects is now generally available (GA) with 10GB SQLite database per Durable Object. Since the public beta ↗ in September 2024, we've added feature parity and robustness for the SQLite storage backend compared to the preexisting key-value (KV) storage backend for Durable Objects.
SQLite-backed Durable Objects are recommended for all new Durable Object classes, using
new_sqlite_classesWrangler configuration. Only SQLite-backed Durable Objects have access to Storage API's SQL and point-in-time recovery methods, which provide relational data modeling, SQL querying, and better data management.JavaScript export class MyDurableObject extends DurableObject {sql: SqlStorageconstructor(ctx: DurableObjectState, env: Env) {super(ctx, env);this.sql = ctx.storage.sql;}async sayHello() {let result = this.sql.exec("SELECT 'Hello, World!' AS greeting").one();return result.greeting;}}KV-backed Durable Objects remain for backwards compatibility, and a migration path from key-value storage to SQL storage for existing Durable Object classes will be offered in the future.
For more details on SQLite storage, checkout Zero-latency SQLite storage in every Durable Object blog ↗.
You can now capture a maximum of 256 KB of log events per Workers invocation, helping you gain better visibility into application behavior.
All console.log() statements, exceptions, request metadata, and headers are automatically captured during the Worker invocation and emitted as JSON object. Workers Logs deserializes this object before indexing the fields and storing them. You can also capture, transform, and export the JSON object in a Tail Worker.
256 KB is a 2x increase from the previous 128 KB limit. After you exceed this limit, further context associated with the request will not be recorded in your logs.
This limit is automatically applied to all Workers.
Workflows is now Generally Available (or "GA"): in short, it's ready for production workloads. Alongside marking Workflows as GA, we've introduced a number of changes during the beta period, including:
- A new
waitForEventAPI that allows a Workflow to wait for an event to occur before continuing execution. - Increased concurrency: you can run up to 4,500 Workflow instances concurrently — and this will continue to grow.
- Improved observability, including new CPU time metrics that allow you to better understand which Workflow instances are consuming the most resources and/or contributing to your bill.
- Support for
vitestfor testing Workflows locally and in CI/CD pipelines.
Workflows also supports the new increased CPU limits that apply to Workers, allowing you to run more CPU-intensive tasks (up to 5 minutes of CPU time per instance), not including the time spent waiting on network calls, AI models, or other I/O bound tasks.
The new
step.waitForEventAPI allows a Workflow instance to wait on events and data, enabling human-in-the-the-loop interactions, such as approving or rejecting a request, directly handling webhooks from other systems, or pushing event data to a Workflow while it's running.Because Workflows are just code, you can conditionally execute code based on the result of a
waitForEventcall, and/or callwaitForEventmultiple times in a single Workflow based on what the Workflow needs.For example, if you wanted to implement a human-in-the-loop approval process, you could use
waitForEventto wait for a user to approve or reject a request, and then conditionally execute code based on the result.JavaScript import {WorkflowEntrypoint,WorkflowStep,WorkflowEvent,} from "cloudflare:workers";export class MyWorkflow extends WorkflowEntrypoint {async run(event, step) {// Other steps in your Workflowlet stripeEvent = await step.waitForEvent("receive invoice paid webhook from Stripe",{ type: "stripe-webhook", timeout: "1 hour" },);// Rest of your Workflow}}TypeScript import { WorkflowEntrypoint, WorkflowStep, WorkflowEvent } from "cloudflare:workers";export class MyWorkflow extends WorkflowEntrypoint<Env, Params> {async run(event: WorkflowEvent<Params>, step: WorkflowStep) {// Other steps in your Workflowlet stripeEvent = await step.waitForEvent<IncomingStripeWebhook>("receive invoice paid webhook from Stripe", { type: "stripe-webhook", timeout: "1 hour" })// Rest of your Workflow}}You can then send a Workflow an event from an external service via HTTP or from within a Worker using the Workers API for Workflows:
JavaScript export default {async fetch(req, env) {const instanceId = new URL(req.url).searchParams.get("instanceId");const webhookPayload = await req.json();let instance = await env.MY_WORKFLOW.get(instanceId);// Send our event, with `type` matching the event type defined in// our step.waitForEvent callawait instance.sendEvent({type: "stripe-webhook",payload: webhookPayload,});return Response.json({status: await instance.status(),});},};TypeScript export default {async fetch(req: Request, env: Env) {const instanceId = new URL(req.url).searchParams.get("instanceId")const webhookPayload = await req.json<Payload>()let instance = await env.MY_WORKFLOW.get(instanceId);// Send our event, with `type` matching the event type defined in// our step.waitForEvent callawait instance.sendEvent({type: "stripe-webhook", payload: webhookPayload})return Response.json({status: await instance.status(),});},};Read the GA announcement blog ↗ to learn more about what landed as part of the Workflows GA.
- A new
We're excited to share that you can now use Playwright's browser automation capabilities ↗ from Cloudflare Workers.
Playwright ↗ is an open-source package developed by Microsoft that can do browser automation tasks; it's commonly used to write software tests, debug applications, create screenshots, and crawl pages. Like Puppeteer, we forked ↗ Playwright and modified it to be compatible with Cloudflare Workers and Browser Rendering ↗.
Below is an example of how to use Playwright with Browser Rendering to test a TODO application using assertions:
Assertion example import { launch, type BrowserWorker } from "@cloudflare/playwright";import { expect } from "@cloudflare/playwright/test";interface Env {MYBROWSER: BrowserWorker;}export default {async fetch(request: Request, env: Env) {const browser = await launch(env.MYBROWSER);const page = await browser.newPage();await page.goto("https://demo.playwright.dev/todomvc");const TODO_ITEMS = ["buy some cheese","feed the cat","book a doctors appointment",];const newTodo = page.getByPlaceholder("What needs to be done?");for (const item of TODO_ITEMS) {await newTodo.fill(item);await newTodo.press("Enter");}await expect(page.getByTestId("todo-title")).toHaveCount(TODO_ITEMS.length);await Promise.all(TODO_ITEMS.map((value, index) =>expect(page.getByTestId("todo-title").nth(index)).toHaveText(value),),);},};Playwright is available as an npm package at
@cloudflare/playwright↗ and the code is at GitHub ↗.Learn more in our documentation.