
Cloudflare One Appliance version 2026.2.0 adds post-quantum encryption support using hybrid ML-KEM (Module-Lattice-Based Key-Encapsulation Mechanism).
The appliance now uses TLS 1.3 with hybrid ML-KEM for its connection to the Cloudflare edge. During the TLS handshake, the appliance and the edge share a symmetric secret over the TLS connection and inject it into the ESP layer of IPsec. This protects IPsec data plane traffic against harvest-now, decrypt-later attacks.
This upgrade deploys automatically to all appliances during their configured interrupt windows with no manual action required.
For more information, refer to Cloudflare One Appliance.
Workers no longer have a limit of 1000 subrequests per invocation, allowing you to make more
fetch()calls or requests to Cloudflare services on every incoming request. This is especially important for long-running Workers requests, such as open websockets on Durable Objects or long-running Workflows, as these could often exceed this limit and error.By default, Workers on paid plans are now limited to 10,000 subrequests per invocation, but this limit can be increased up to 10 million by setting the new
subrequestslimit in your Wrangler configuration file.JSONC {"limits": {"subrequests": 50000,},}TOML [limits]subrequests = 50_000Workers on the free plan remain limited to 50 external subrequests and 1000 subrequests to Cloudflare services per invocation.
To protect against runaway code or unexpected costs, you can also set a lower limit for both subrequests and CPU usage.
JSONC {"limits": {"subrequests": 10,"cpu_ms": 1000,},}TOML [limits]subrequests = 10cpu_ms = 1_000For more information, refer to the Wrangler configuration documentation for limits and subrequest limits.
The Cloudflare Vite plugin now integrates seamlessly @vitejs/plugin-rsc ↗, the official Vite plugin for React Server Components ↗.
A
childEnvironmentsoption has been added to the plugin config to enable using multiple environments within a single Worker. The parent environment can then import modules from a child environment in order to access a separate module graph. For a typical RSC use case, the plugin might be configured as in the following example:vite.config.ts export default defineConfig({plugins: [cloudflare({viteEnvironment: {name: "rsc",childEnvironments: ["ssr"],},}),],});@vitejs/plugin-rscprovides the lower level functionality that frameworks, such as React Router ↗, build upon. The GitHub repository includes a basic Cloudflare example ↗.
This week’s release changes the rule action from BLOCK to Disabled for Anomaly:Header:User-Agent - Fake Google Bot.
Ruleset Rule ID Legacy Rule ID Description Previous Action New Action Comments Cloudflare Managed Ruleset N/A Anomaly:Header:User-Agent - Fake Google Bot Enabled Disabled We are changing the action for this rule from BLOCK to Disabled
The latest release of the Agents SDK ↗ brings readonly connections, MCP protocol and security improvements, x402 payment protocol v2 migration, and the ability to customize OAuth for MCP server connections.
Agents can now restrict WebSocket clients to read-only access, preventing them from modifying agent state. This is useful for dashboards, spectator views, or any scenario where clients should observe but not mutate.
New hooks:
shouldConnectionBeReadonly,setConnectionReadonly,isConnectionReadonly. Readonly connections block both client-sidesetState()and mutating@callable()methods, and the readonly flag survives hibernation.JavaScript class MyAgent extends Agent {shouldConnectionBeReadonly(connection) {// Make spectators readonlyreturn connection.url.includes("spectator");}}TypeScript class MyAgent extends Agent {shouldConnectionBeReadonly(connection) {// Make spectators readonlyreturn connection.url.includes("spectator");}}The new
createMcpOAuthProvidermethod on theAgentclass allows subclasses to override the default OAuth provider used when connecting to MCP servers. This enables custom authentication strategies such as pre-registered client credentials or mTLS, beyond the built-in dynamic client registration.JavaScript class MyAgent extends Agent {createMcpOAuthProvider(callbackUrl) {return new MyCustomOAuthProvider(this.ctx.storage, this.name, callbackUrl);}}TypeScript class MyAgent extends Agent {createMcpOAuthProvider(callbackUrl: string): AgentMcpOAuthProvider {return new MyCustomOAuthProvider(this.ctx.storage, this.name, callbackUrl);}}Upgraded the MCP SDK to 1.26.0 to prevent cross-client response leakage. Stateless MCP Servers should now create a new
McpServerinstance per request instead of sharing a single instance. A guard is added in this version of the MCP SDK which will prevent connection to a Server instance that has already been connected to a transport. Developers will need to modify their code if they declare theirMcpServerinstance as a global variable.Added
callbackPathoption toaddMcpServerto prevent instance name leakage in MCP OAuth callback URLs. WhensendIdentityOnConnectisfalse,callbackPathis now required — the default callback URL would expose the instance name, undermining the security intent. Also fixes callback request detection to match via thestateparameter instead of a loose/callbackURL substring check, enabling custom callback paths.onStateChangedis a drop-in rename ofonStateUpdate(same signature, same behavior).onStateUpdatestill works but emits a one-time console warning per class.validateStateChangerejections now propagate aCF_AGENT_STATE_ERRORmessage back to the client.Migrated the x402 MCP payment integration from the legacy
x402package to@x402/coreand@x402/evmv2.Breaking changes for x402 users:
- Peer dependencies changed: replace
x402with@x402/coreand@x402/evm PaymentRequirementstype now uses v2 fields (e.g.amountinstead ofmaxAmountRequired)X402ClientConfig.accounttype changed fromviem.AccounttoClientEvmSigner(structurally compatible withprivateKeyToAccount())
Terminal window npm uninstall x402npm install @x402/core @x402/evmNetwork identifiers now accept both legacy names and CAIP-2 format:
TypeScript // Legacy name (auto-converted){network: "base-sepolia",}// CAIP-2 format (preferred){network: "eip155:84532",}Other x402 changes:
X402ClientConfig.networkis now optional — the client auto-selects from available payment requirements- Server-side lazy initialization: facilitator connection is deferred until the first paid tool invocation
- Payment tokens support both v2 (
PAYMENT-SIGNATURE) and v1 (X-PAYMENT) HTTP headers - Added
normalizeNetworkexport for converting legacy network names to CAIP-2 format - Re-exports
PaymentRequirements,PaymentRequired,Network,FacilitatorConfig, andClientEvmSignerfromagents/x402
- Fix
useAgentandAgentClientcrashing when usingbasePathrouting - CORS handling delegated to partyserver's native support (simpler, more reliable)
- Client-side
onStateUpdateErrorcallback for handling rejected state updates
To update to the latest version:
Terminal window npm i agents@latest- Peer dependencies changed: replace
The Sandbox SDK ↗ now supports PTY (pseudo-terminal) passthrough, enabling browser-based terminal UIs to connect to sandbox shells via WebSocket.
The new
terminal()method proxies a WebSocket upgrade to the container's PTY endpoint, with output buffering for replay on reconnect.JavaScript // Worker: proxy WebSocket to container terminalreturn sandbox.terminal(request, { cols: 80, rows: 24 });TypeScript // Worker: proxy WebSocket to container terminalreturn sandbox.terminal(request, { cols: 80, rows: 24 });Each session can have its own terminal with an isolated working directory and environment, so users can run separate shells side-by-side in the same container.
JavaScript // Multiple isolated terminals in the same sandboxconst dev = await sandbox.getSession("dev");return dev.terminal(request);TypeScript // Multiple isolated terminals in the same sandboxconst dev = await sandbox.getSession("dev");return dev.terminal(request);The new
@cloudflare/sandbox/xtermexport provides aSandboxAddonfor xterm.js ↗ with automatic reconnection (exponential backoff + jitter), buffered output replay, and resize forwarding.JavaScript import { SandboxAddon } from "@cloudflare/sandbox/xterm";const addon = new SandboxAddon({getWebSocketUrl: ({ sandboxId, origin }) =>`${origin}/ws/terminal?id=${sandboxId}`,onStateChange: (state, error) => updateUI(state),});terminal.loadAddon(addon);addon.connect({ sandboxId: "my-sandbox" });TypeScript import { SandboxAddon } from "@cloudflare/sandbox/xterm";const addon = new SandboxAddon({getWebSocketUrl: ({ sandboxId, origin }) =>`${origin}/ws/terminal?id=${sandboxId}`,onStateChange: (state, error) => updateUI(state),});terminal.loadAddon(addon);addon.connect({ sandboxId: "my-sandbox" });To update to the latest version:
Terminal window npm i @cloudflare/sandbox@latest
AI Crawl Control metrics have been enhanced with new views, improved filtering, and better data visualization.
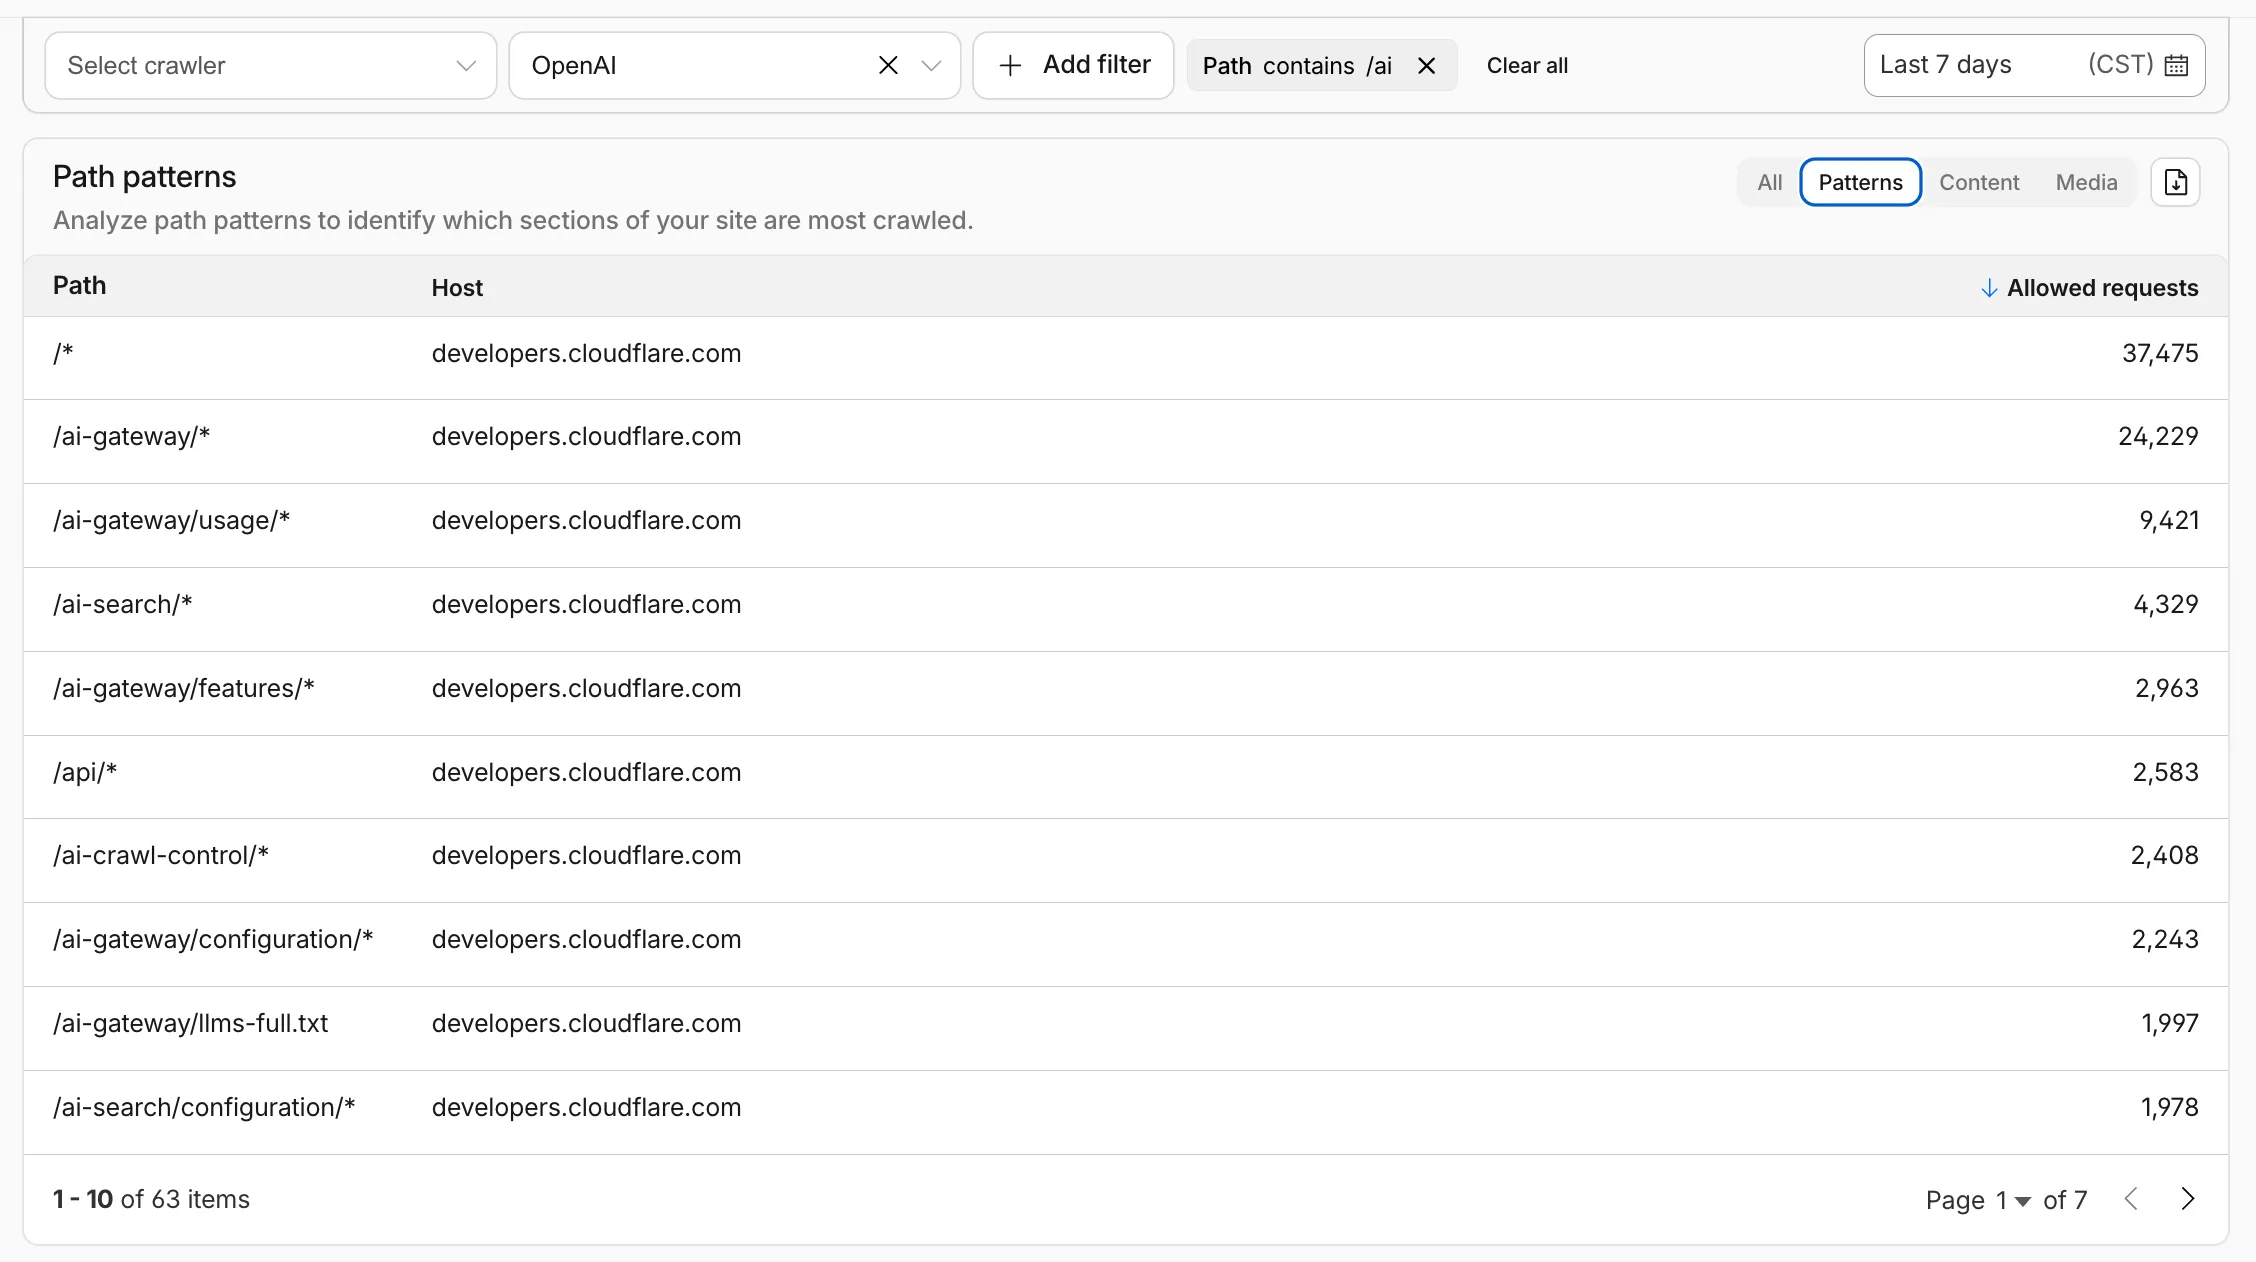
Path pattern grouping
- In the Metrics tab > Most popular paths table, use the new Patterns tab that groups requests by URI pattern (
/blog/*,/api/v1/*,/docs/*) to identify which site areas crawlers target most. Refer to the screenshot above.
Enhanced referral analytics
- Destination patterns show which site areas receive AI-driven referral traffic.
- In the Metrics tab, a new Referrals over time chart shows trends by operator or source.
Data transfer metrics
- In the Metrics tab > Allowed requests over time chart, toggle Bytes to show bandwidth consumption.
- In the Crawlers tab, a new Bytes Transferred column shows bandwidth per crawler.
Image exports
- Export charts and tables as images for reports and presentations.
Learn more about analyzing AI traffic.
- In the Metrics tab > Most popular paths table, use the new Patterns tab that groups requests by URI pattern (
Get your content updates into AI Search faster and avoid a full rescan when you do not need it.
Updated a file or need to retry one that errored? When you know exactly which file changed, you can now reindex it directly instead of rescanning your entire data source.
Go to Overview > Indexed Items and select the sync icon next to any file to reindex it immediately.

By default, AI Search crawls all sitemaps listed in your
robots.txt, up to the maximum files per index limit. If your site has multiple sitemaps but you only want to index a specific set, you can now specify a single sitemap URL to limit what the crawler visits.For example, if your
robots.txtlists bothblog-sitemap.xmlanddocs-sitemap.xml, you can specify justhttps://example.com/docs-sitemap.xmlto index only your documentation.Configure your selection anytime in Settings > Parsing options > Specific sitemaps, then trigger a sync to apply the changes.

Learn more about indexing controls and website crawling configuration.
Log Explorer now supports multiple concurrent queries with the new Tabs feature. Work with multiple queries simultaneously and pivot between datasets to investigate malicious activity more effectively.
- Multiple tabs: Open and switch between multiple query tabs to compare results across different datasets.
- Quick filtering: Select the filter button from query results to add a value as a filter to your current query.
- Pivot to new tab: Use Cmd + click on the filter button to start a new query tab with that filter applied.
- Preserved progress: Your query progress is preserved on each tab if you navigate away and return.
For more information, refer to the Log Explorer documentation.
R2 SQL now supports five approximate aggregation functions for fast analysis of large datasets. These functions trade minor precision for improved performance on high-cardinality data.
APPROX_PERCENTILE_CONT(column, percentile)— Returns the approximate value at a given percentile (0.0 to 1.0). Works on integer and decimal columns.APPROX_PERCENTILE_CONT_WITH_WEIGHT(column, weight, percentile)— Weighted percentile calculation where each row contributes proportionally to its weight column value.APPROX_MEDIAN(column)— Returns the approximate median. Equivalent toAPPROX_PERCENTILE_CONT(column, 0.5).APPROX_DISTINCT(column)— Returns the approximate number of distinct values. Works on any column type.APPROX_TOP_K(column, k)— Returns thekmost frequent values with their counts as a JSON array.
All functions support
WHEREfilters. All exceptAPPROX_TOP_KsupportGROUP BY.-- Percentile analysis on revenue dataSELECT approx_percentile_cont(total_amount, 0.25),approx_percentile_cont(total_amount, 0.5),approx_percentile_cont(total_amount, 0.75)FROM my_namespace.sales_data-- Median per departmentSELECT department, approx_median(total_amount)FROM my_namespace.sales_dataGROUP BY department-- Approximate distinct customers by regionSELECT region, approx_distinct(customer_id)FROM my_namespace.sales_dataGROUP BY region-- Top 5 most frequent departmentsSELECT approx_top_k(department, 5)FROM my_namespace.sales_data-- Combine approximate and standard aggregationsSELECT COUNT(*),AVG(total_amount),approx_percentile_cont(total_amount, 0.5),approx_distinct(customer_id)FROM my_namespace.sales_dataWHERE region = 'North'For the full syntax and additional examples, refer to the SQL reference.
The Workers Observability dashboard ↗ has some major updates to make it easier to debug your application's issues and share findings with your team.
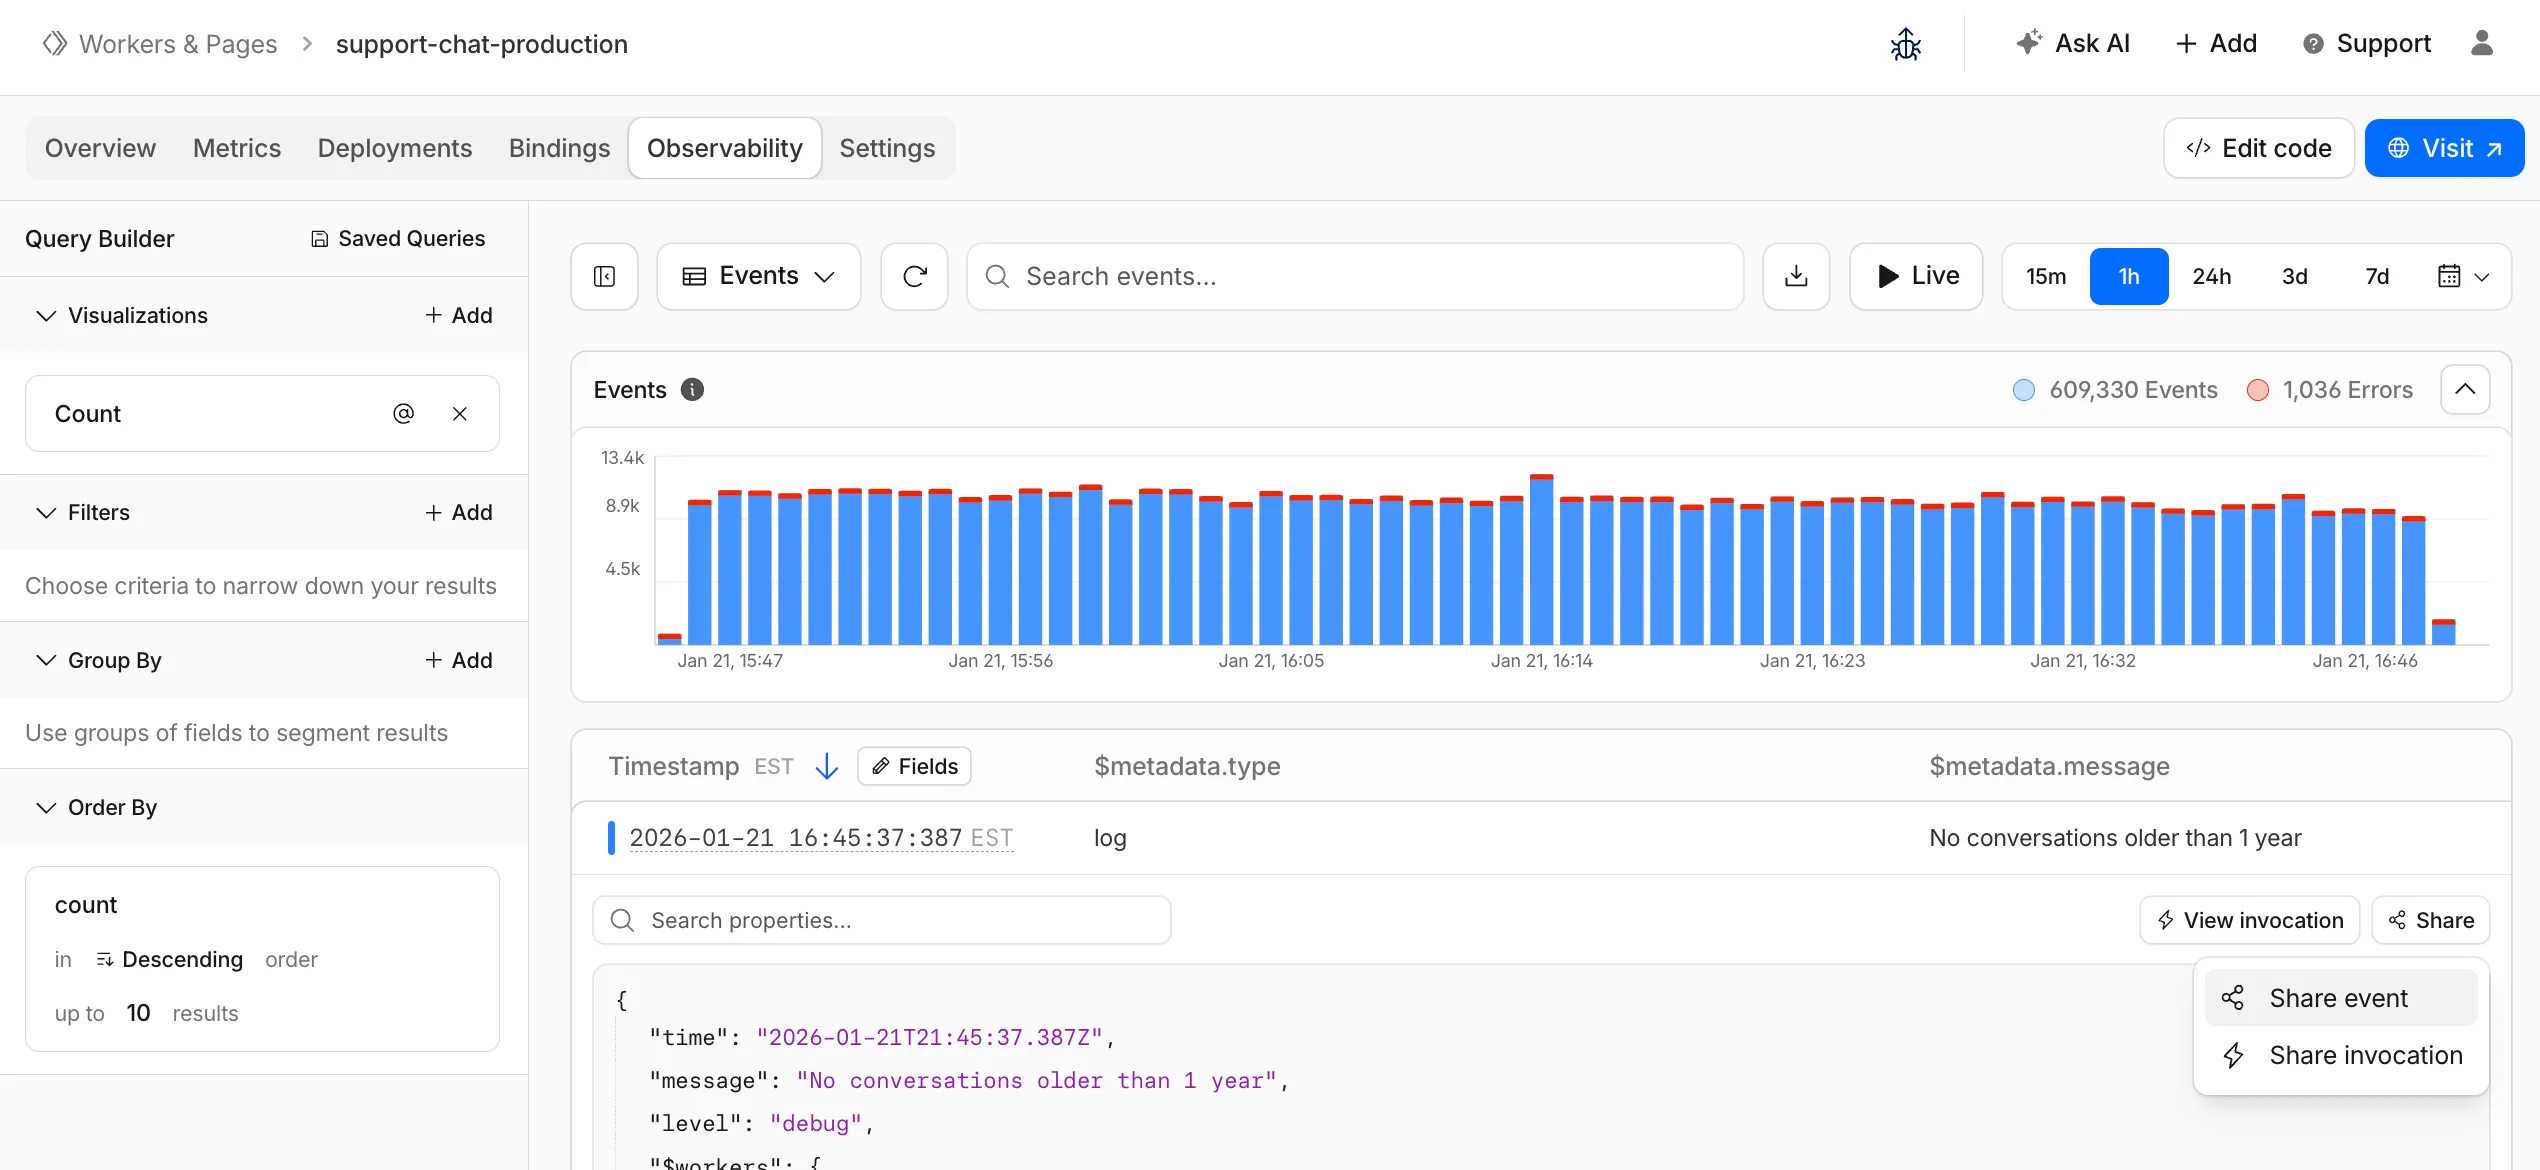
You can now:
- Create visualizations — Build charts from your Worker data directly in a Worker's Observability tab
- Export data as JSON or CSV — Download logs and traces for offline analysis or to share with teammates
- Share events and traces — Generate direct URLs to specific events, invocations, and traces that open standalone pages with full context
- Customize table columns — Improved field picker to add, remove, and reorder columns in the events table
- Expandable event details — Expand events inline to view full details without leaving the table
- Keyboard shortcuts — Navigate the dashboard with hotkey support
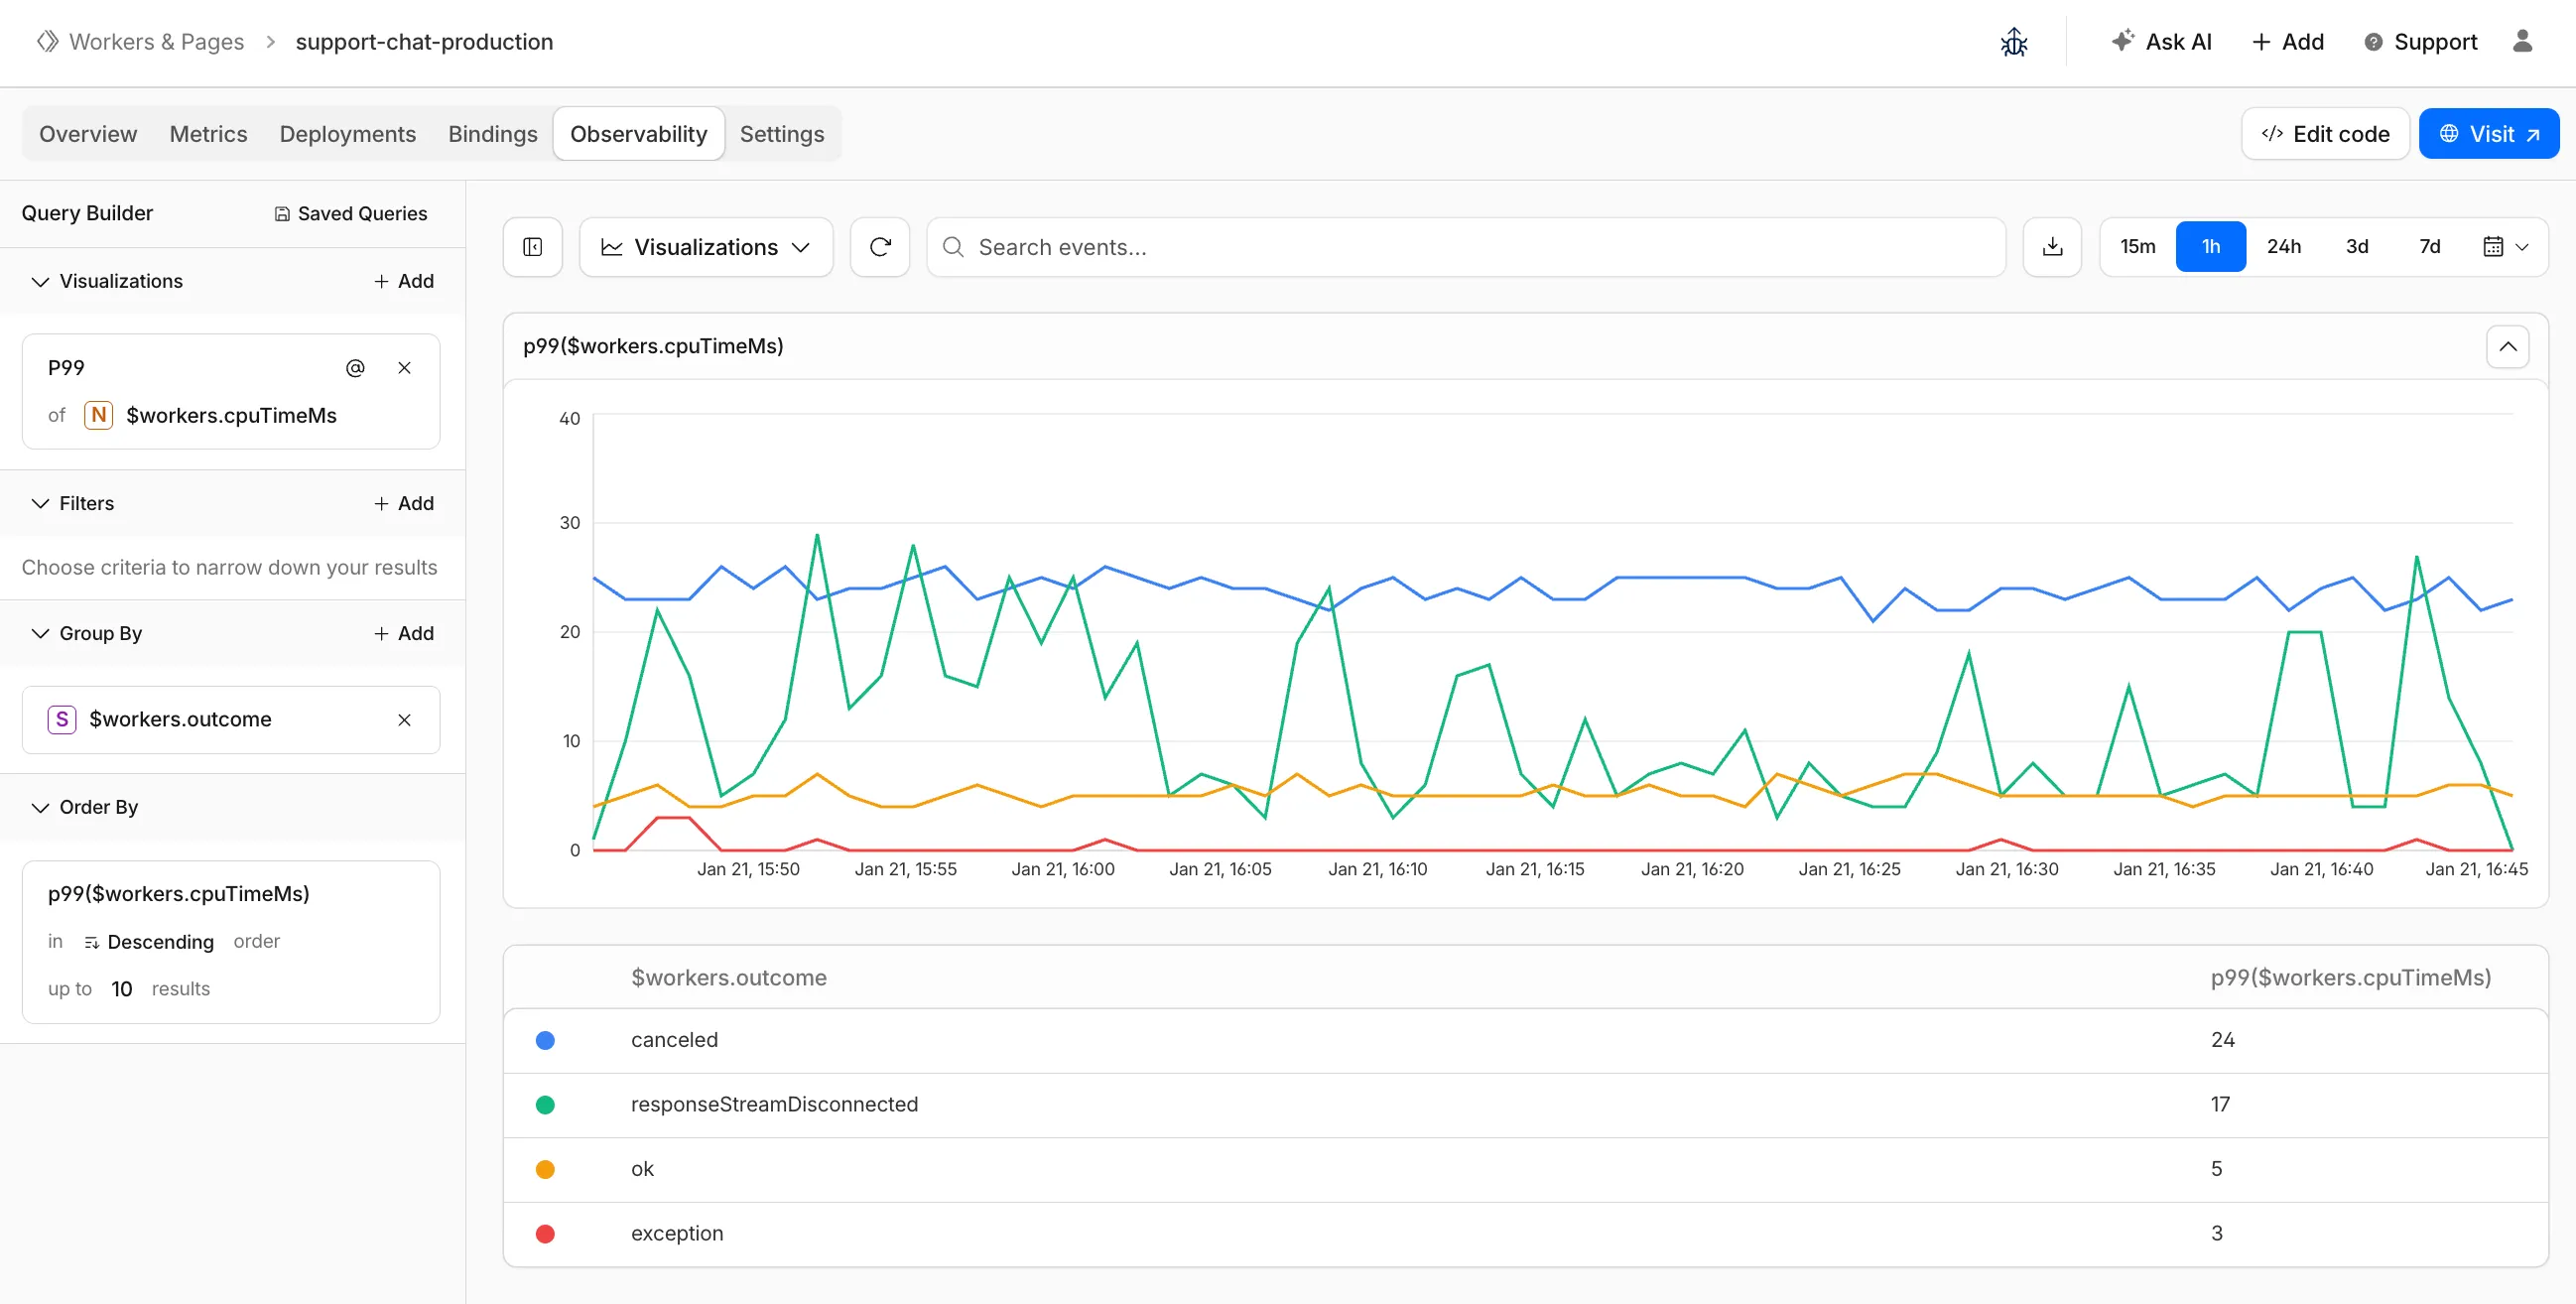
These updates are now live in the Cloudflare dashboard, both in a Worker's Observability tab and in the account-level Observability dashboard for a unified experience. To get started, go to Workers & Pages > select your Worker > Observability.
New reference documentation is now available for AI Crawl Control:
- GraphQL API reference — Query examples for crawler requests, top paths, referral traffic, and data transfer. Includes key filters for detection IDs, user agents, and referrer domains.
- Bot reference — Detection IDs and user agents for major AI crawlers from OpenAI, Anthropic, Google, Meta, and others.
- Worker templates — Deploy the x402 Payment-Gated Proxy to monetize crawler access or charge bots while letting humans through free.
Cloudflare Queues is now part of the Workers free plan, offering guaranteed message delivery across up to 10,000 queues to either Cloudflare Workers or HTTP pull consumers. Every Cloudflare account now includes 10,000 operations per day across reads, writes, and deletes. For more details on how each operation is defined, refer to Queues pricing ↗.
All features of the existing Queues functionality are available on the free plan, including unlimited event subscriptions. Note that the maximum retention period on the free tier, however, is 24 hours rather than 14 days.
If you are new to Cloudflare Queues, follow this guide ↗ or try one of our tutorials to get started.
Cloudflare Workflows now automatically generates visual diagrams from your code
Your Workflow is parsed to provide a visual map of the Workflow structure, allowing you to:
- Understand how steps connect and execute
- Visualize loops and nested logic
- Follow branching paths for conditional logic
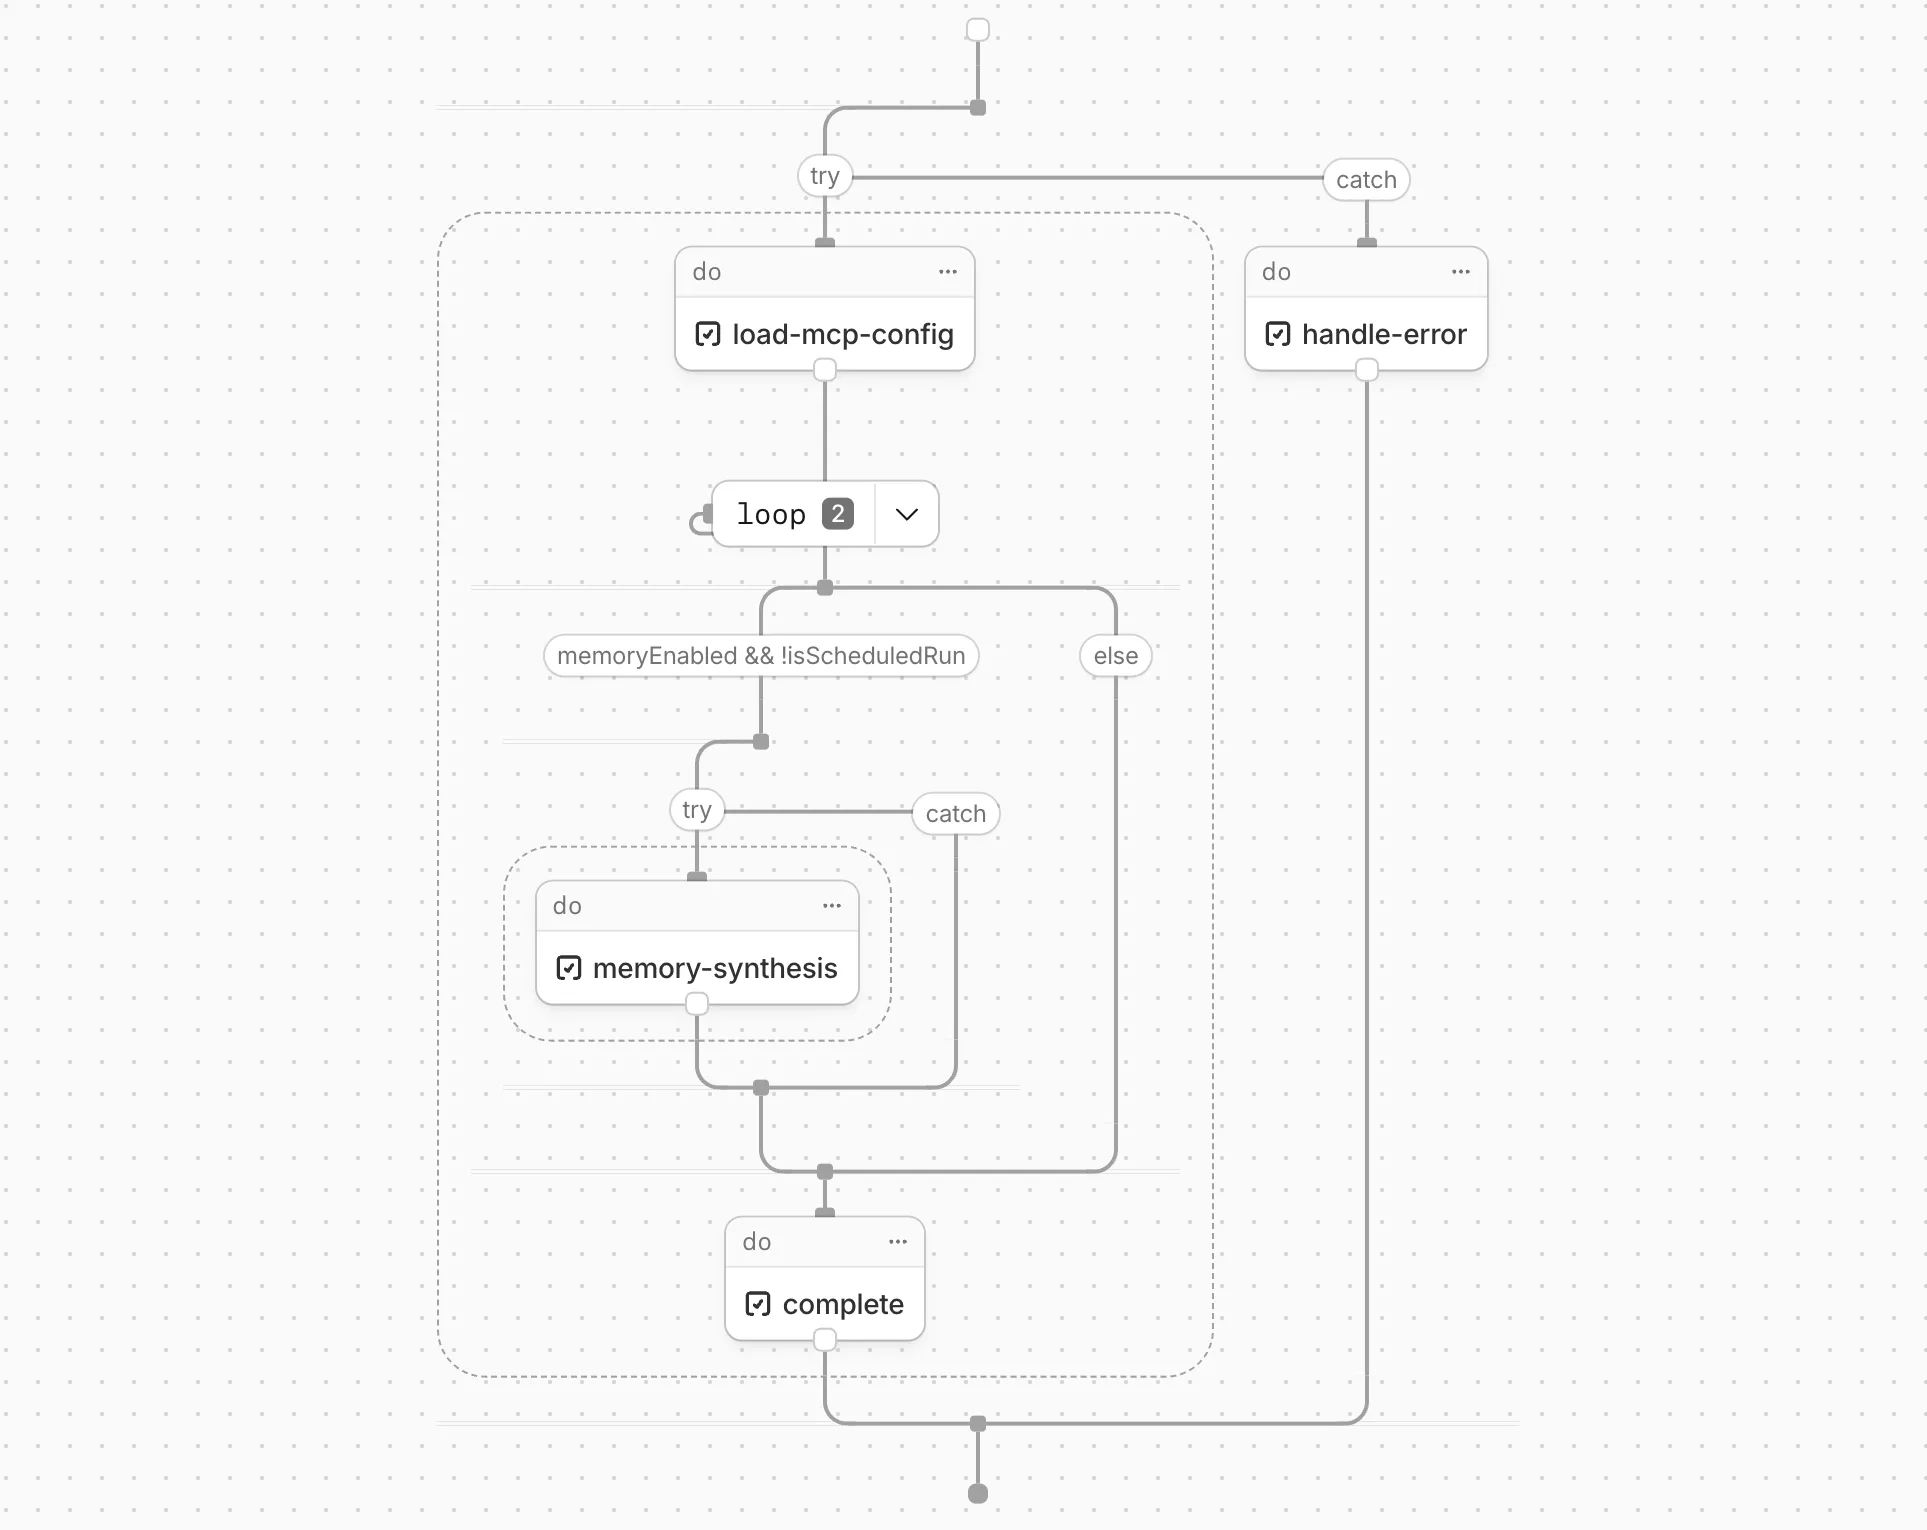
You can collapse loops and nested logic to see the high-level flow, or expand them to see every step.
Workflow diagrams are available in beta for all JavaScript and TypeScript Workflows. Find your Workflows in the Cloudflare dashboard ↗ to see their diagrams.
The latest release of the Agents SDK ↗ brings first-class support for Cloudflare Workflows, synchronous state management, and new scheduling capabilities.
Agents excel at real-time communication and state management. Workflows excel at durable execution. Together, they enable powerful patterns where Agents handle WebSocket connections while Workflows handle long-running tasks, retries, and human-in-the-loop flows.
Use the new
AgentWorkflowclass to define workflows with typed access to your Agent:JavaScript import { AgentWorkflow } from "agents/workflows";export class ProcessingWorkflow extends AgentWorkflow {async run(event, step) {// Call Agent methods via RPCawait this.agent.updateStatus(event.payload.taskId, "processing");// Non-durable: progress reporting to clientsawait this.reportProgress({ step: "process", percent: 0.5 });this.broadcastToClients({ type: "update", taskId: event.payload.taskId });// Durable via step: idempotent, won't repeat on retryawait step.mergeAgentState({ taskProgress: 0.5 });const result = await step.do("process", async () => {return processData(event.payload.data);});await step.reportComplete(result);return result;}}TypeScript import { AgentWorkflow } from "agents/workflows";import type { AgentWorkflowEvent, AgentWorkflowStep } from "agents/workflows";export class ProcessingWorkflow extends AgentWorkflow<MyAgent, TaskParams> {async run(event: AgentWorkflowEvent<TaskParams>, step: AgentWorkflowStep) {// Call Agent methods via RPCawait this.agent.updateStatus(event.payload.taskId, "processing");// Non-durable: progress reporting to clientsawait this.reportProgress({ step: "process", percent: 0.5 });this.broadcastToClients({ type: "update", taskId: event.payload.taskId });// Durable via step: idempotent, won't repeat on retryawait step.mergeAgentState({ taskProgress: 0.5 });const result = await step.do("process", async () => {return processData(event.payload.data);});await step.reportComplete(result);return result;}}Start workflows from your Agent with
runWorkflow()and handle lifecycle events:JavaScript export class MyAgent extends Agent {async startTask(taskId, data) {const instanceId = await this.runWorkflow("PROCESSING_WORKFLOW", {taskId,data,});return { instanceId };}async onWorkflowProgress(workflowName, instanceId, progress) {this.broadcast(JSON.stringify({ type: "progress", progress }));}async onWorkflowComplete(workflowName, instanceId, result) {console.log(`Workflow ${instanceId} completed`);}async onWorkflowError(workflowName, instanceId, error) {console.error(`Workflow ${instanceId} failed:`, error);}}TypeScript export class MyAgent extends Agent {async startTask(taskId: string, data: string) {const instanceId = await this.runWorkflow("PROCESSING_WORKFLOW", {taskId,data,});return { instanceId };}async onWorkflowProgress(workflowName: string,instanceId: string,progress: unknown,) {this.broadcast(JSON.stringify({ type: "progress", progress }));}async onWorkflowComplete(workflowName: string,instanceId: string,result?: unknown,) {console.log(`Workflow ${instanceId} completed`);}async onWorkflowError(workflowName: string,instanceId: string,error: unknown,) {console.error(`Workflow ${instanceId} failed:`, error);}}Key workflow methods on your Agent:
runWorkflow(workflowName, params, options?)— Start a workflow with optional metadatagetWorkflow(workflowId)/getWorkflows(criteria?)— Query workflows with cursor-based paginationapproveWorkflow(workflowId)/rejectWorkflow(workflowId)— Human-in-the-loop approval flowspauseWorkflow(),resumeWorkflow(),terminateWorkflow()— Workflow control
State updates are now synchronous with a new
validateStateChange()validation hook:JavaScript export class MyAgent extends Agent {validateStateChange(oldState, newState) {// Return false to reject the changeif (newState.count < 0) return false;// Return modified state to transformreturn { ...newState, lastUpdated: Date.now() };}}TypeScript export class MyAgent extends Agent<Env, State> {validateStateChange(oldState: State, newState: State): State | false {// Return false to reject the changeif (newState.count < 0) return false;// Return modified state to transformreturn { ...newState, lastUpdated: Date.now() };}}The new
scheduleEvery()method enables fixed-interval recurring tasks with built-in overlap prevention:JavaScript // Run every 5 minutesawait this.scheduleEvery("syncData", 5 * 60 * 1000, { source: "api" });TypeScript // Run every 5 minutesawait this.scheduleEvery("syncData", 5 * 60 * 1000, { source: "api" });- Client-side RPC timeout — Set timeouts on callable method invocations
StreamingResponse.error(message)— Graceful stream error signalinggetCallableMethods()— Introspection API for discovering callable methods- Connection close handling — Pending calls are automatically rejected on disconnect
JavaScript await agent.call("method", [args], {timeout: 5000,stream: { onChunk, onDone, onError },});TypeScript await agent.call("method", [args], {timeout: 5000,stream: { onChunk, onDone, onError },});Secure email reply routing — Email replies are now secured with HMAC-SHA256 signed headers, preventing unauthorized routing of emails to agent instances.
Routing improvements:
basePathoption to bypass default URL construction for custom routing- Server-sent identity — Agents send
nameandagenttype on connect - New
onIdentityandonIdentityChangecallbacks on the client
JavaScript const agent = useAgent({basePath: "user",onIdentity: (name, agentType) => console.log(`Connected to ${name}`),});TypeScript const agent = useAgent({basePath: "user",onIdentity: (name, agentType) => console.log(`Connected to ${name}`),});To update to the latest version:
Terminal window npm i agents@latestFor the complete Workflows API reference and patterns, see Run Workflows.
Local Uploads is now available in open beta. Enable it on your R2 bucket to improve upload performance when clients upload data from a different region than your bucket. With Local Uploads enabled, object data is written to storage infrastructure near the client, then asynchronously replicated to your bucket. The object is immediately accessible and remains strongly consistent throughout. Refer to How R2 works for details on how data is written to your bucket.
In our tests, we observed up to 75% reduction in Time to Last Byte (TTLB) for upload requests when Local Uploads is enabled.

This feature is ideal when:
- Your users are globally distributed
- Upload performance and reliability is critical to your application
- You want to optimize write performance without changing your bucket's primary location
To enable Local Uploads on your bucket, find Local Uploads in your bucket settings in the Cloudflare Dashboard ↗, or run:
Terminal window npx wrangler r2 bucket local-uploads enable <BUCKET_NAME>Enabling Local Uploads on a bucket is seamless: existing uploads will complete as expected and there’s no interruption to traffic. There is no additional cost to enable Local Uploads. Upload requests incur the standard Class A operation costs same as upload requests made without Local Uploads.
For more information, refer to Local Uploads.
Identifying threat actors can be challenging, because naming conventions often vary across the security industry. To simplify your research, Cloudflare Threat Events now include an Also known as field, providing a list of common aliases and industry-standard names for the groups we track.
This new field is available in both the Cloudflare dashboard and via the API. In the dashboard, you can view these aliases by expanding the event details side panel (under the Attacker field) or by adding it as a column in your configurable table view.
- Easily map Cloudflare-tracked actors to the naming conventions used by other vendors without manual cross-referencing.
- Quickly identify if a detected threat actor matches a group your team is already monitoring via other intelligence feeds.
For more information on how to access this data, refer to the Threat Events API documentation ↗.
We have updated the Monitoring page to provide a more streamlined and insightful experience for administrators, improving both data visualization and dashboard accessibility.
- Enhanced Visual Layout: Optimized contrast and the introduction of stacked bar charts for clearer data visualization and trend analysis.
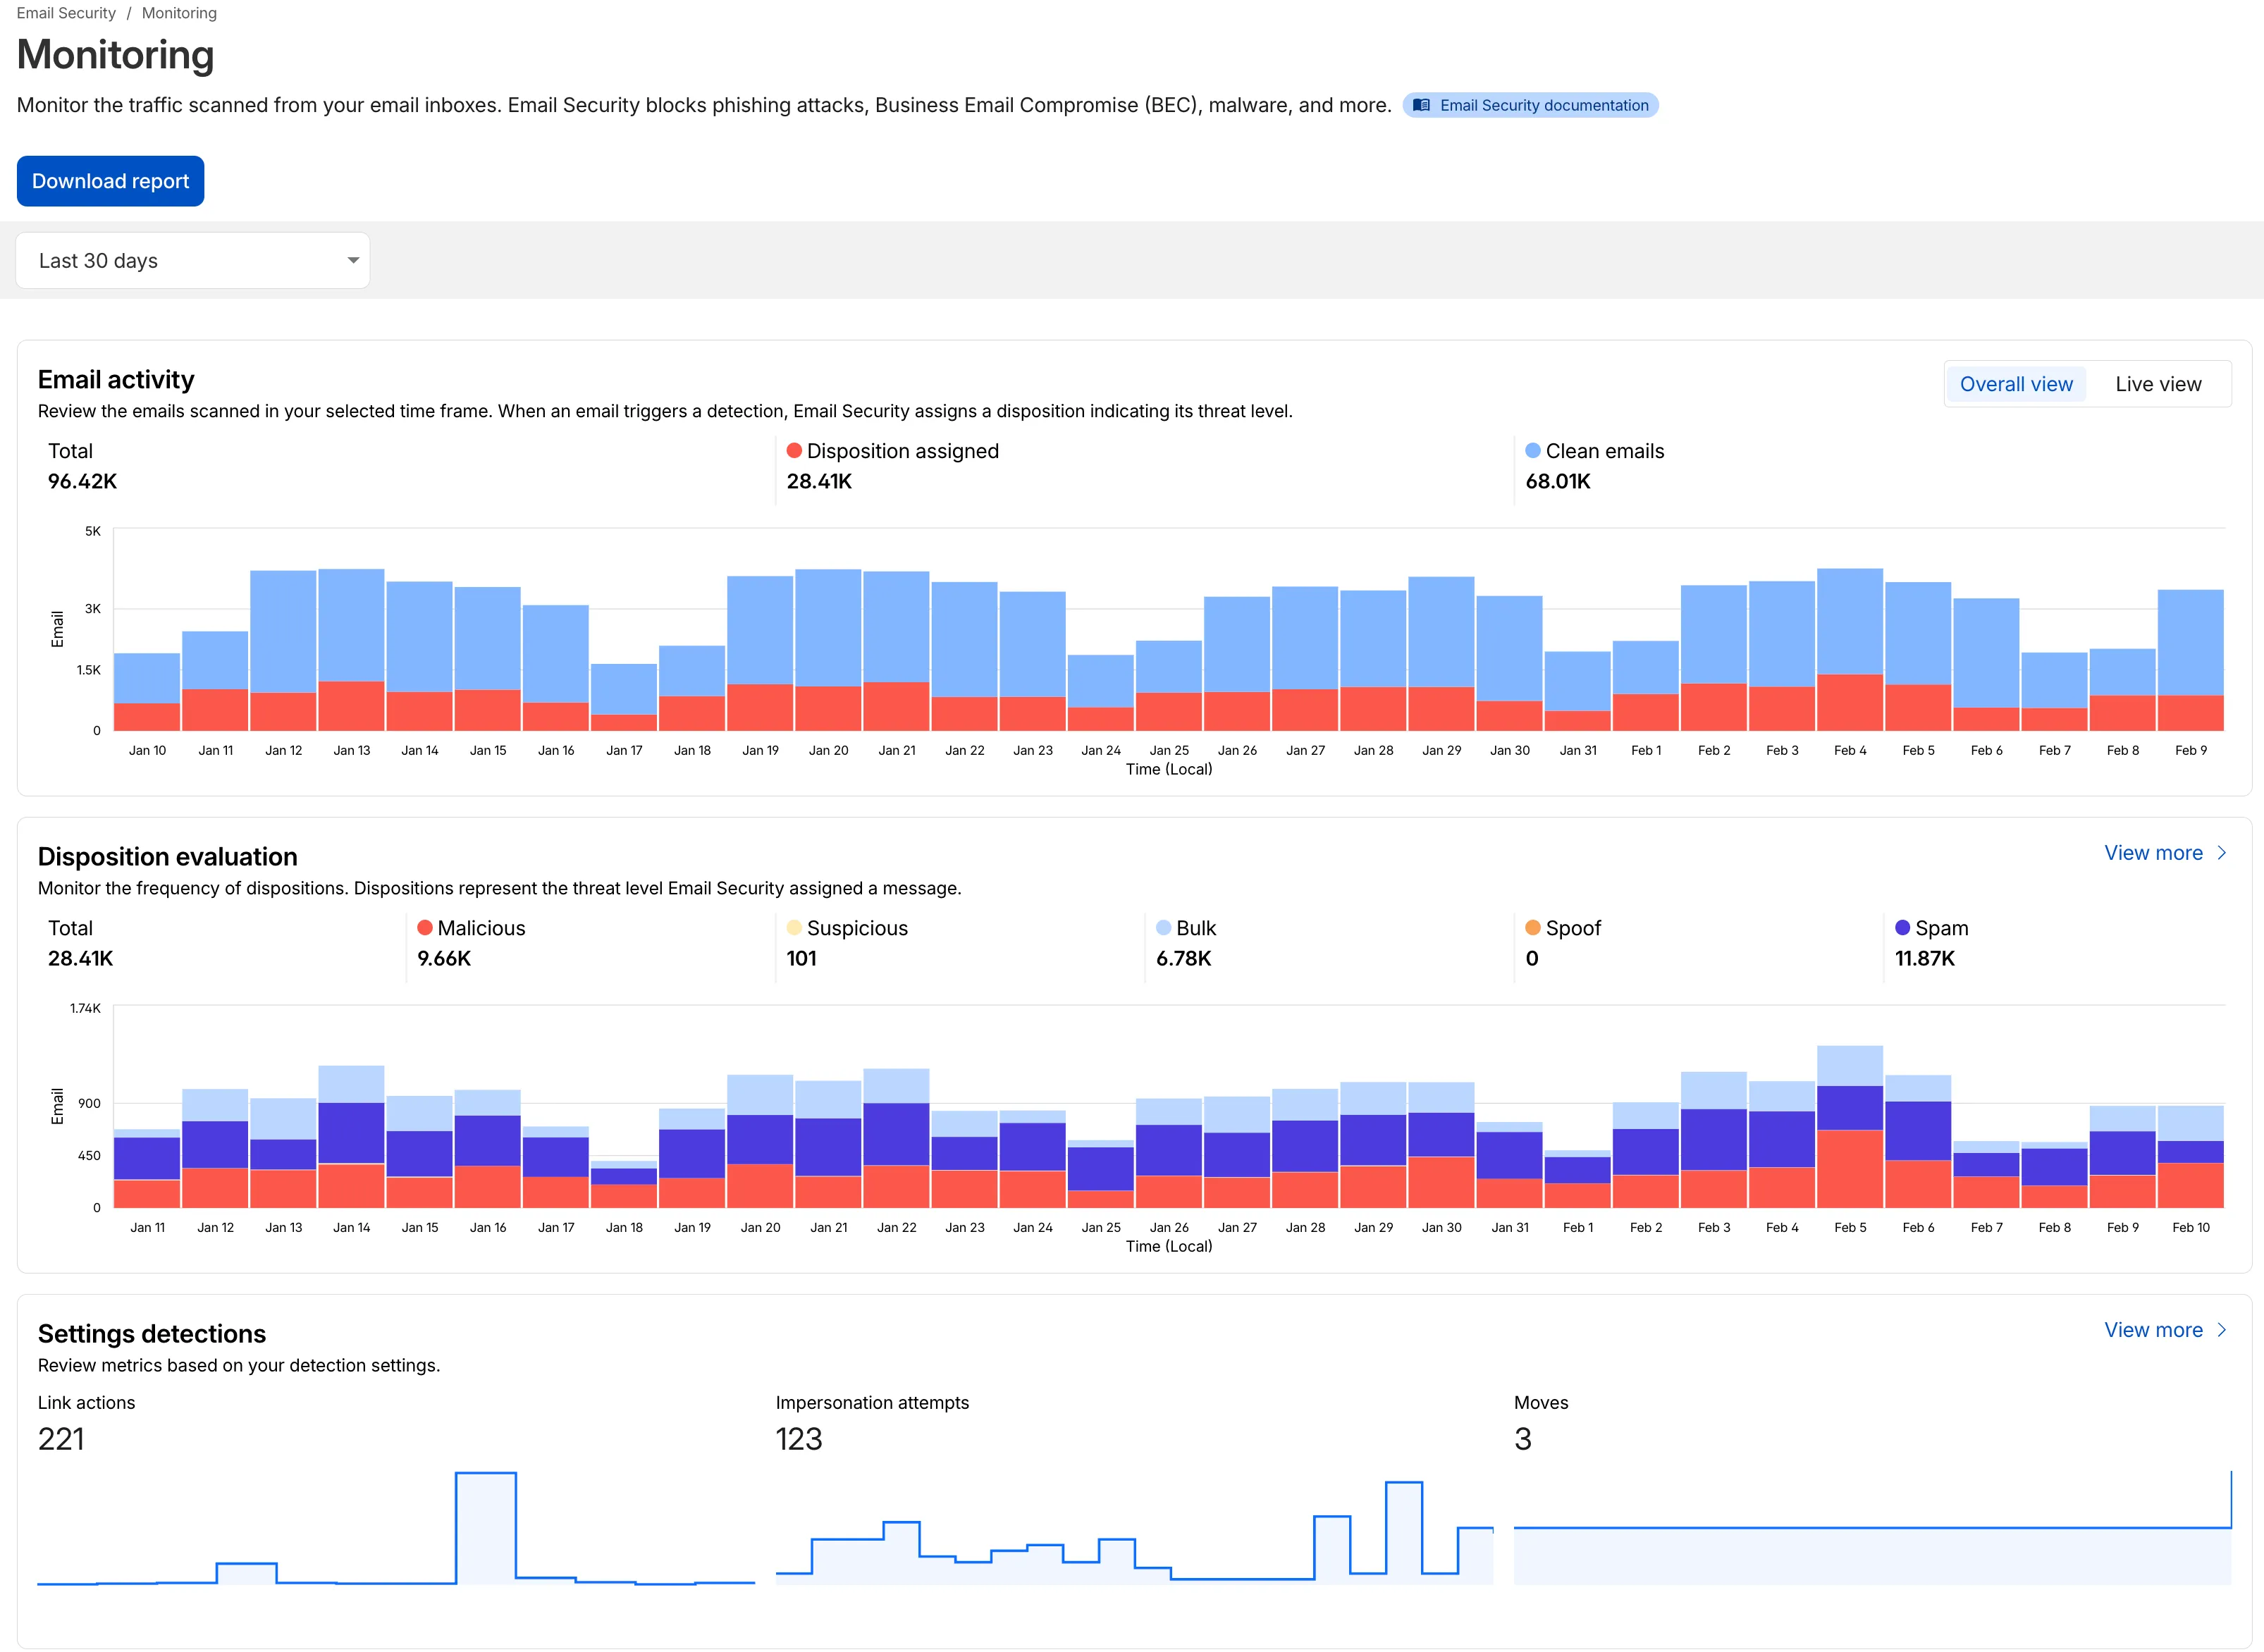
- Improved Accessibility & Usability:
- Widget Search: Added search functionality to multiple widgets, including Policies, Submitters, and Impersonation.
- Actionable UI: All available actions are now accessible via dedicated buttons.
- State Indicators: Improved UI states to clearly communicate loading, empty datasets, and error conditions.
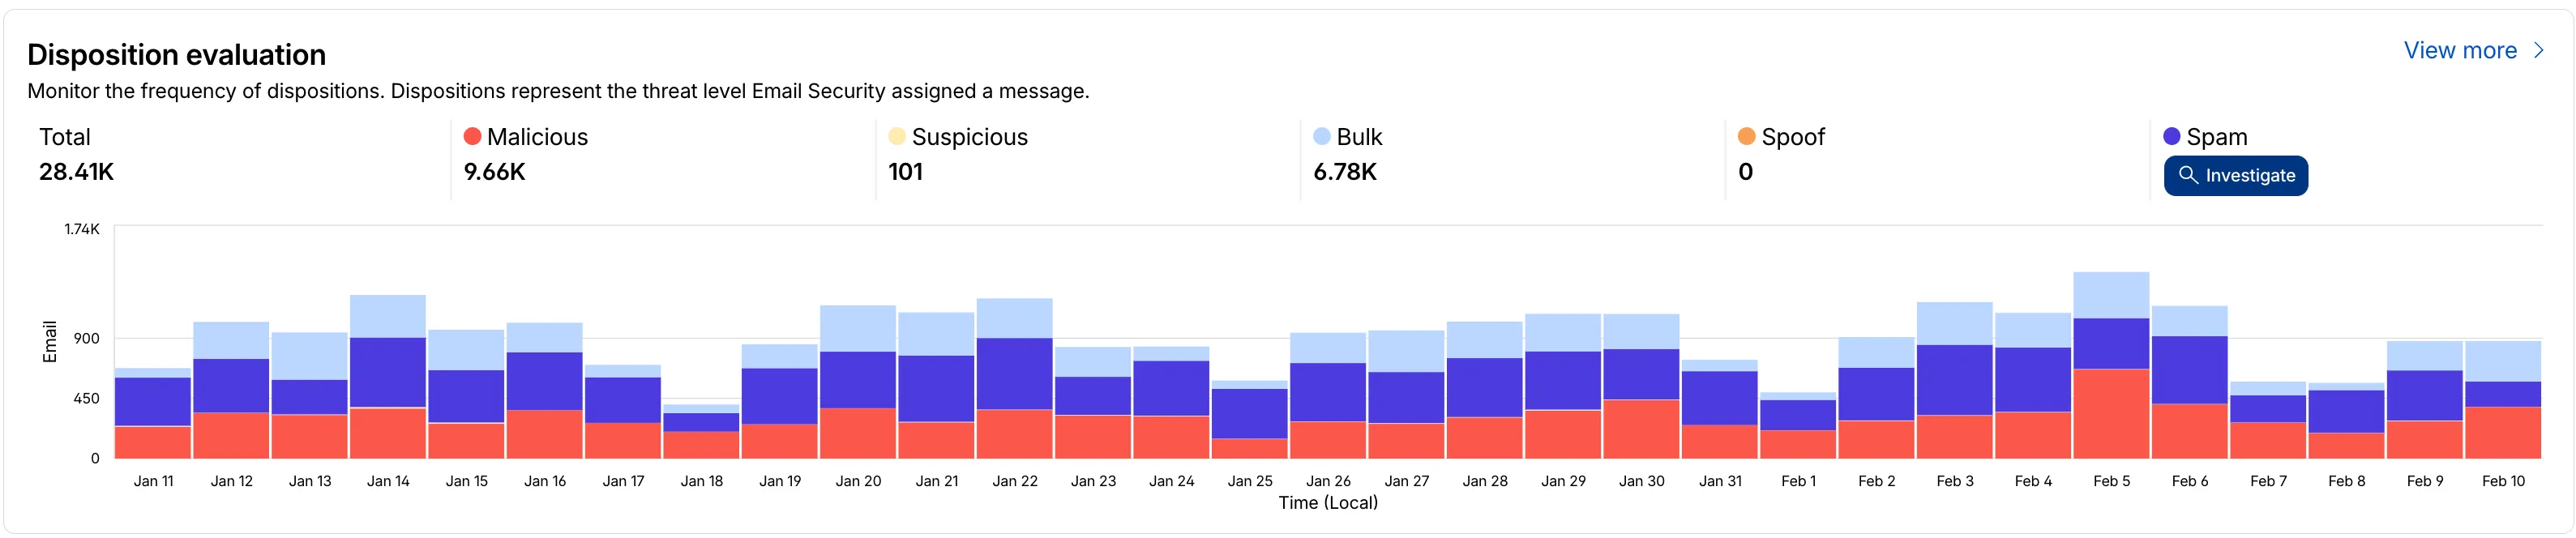
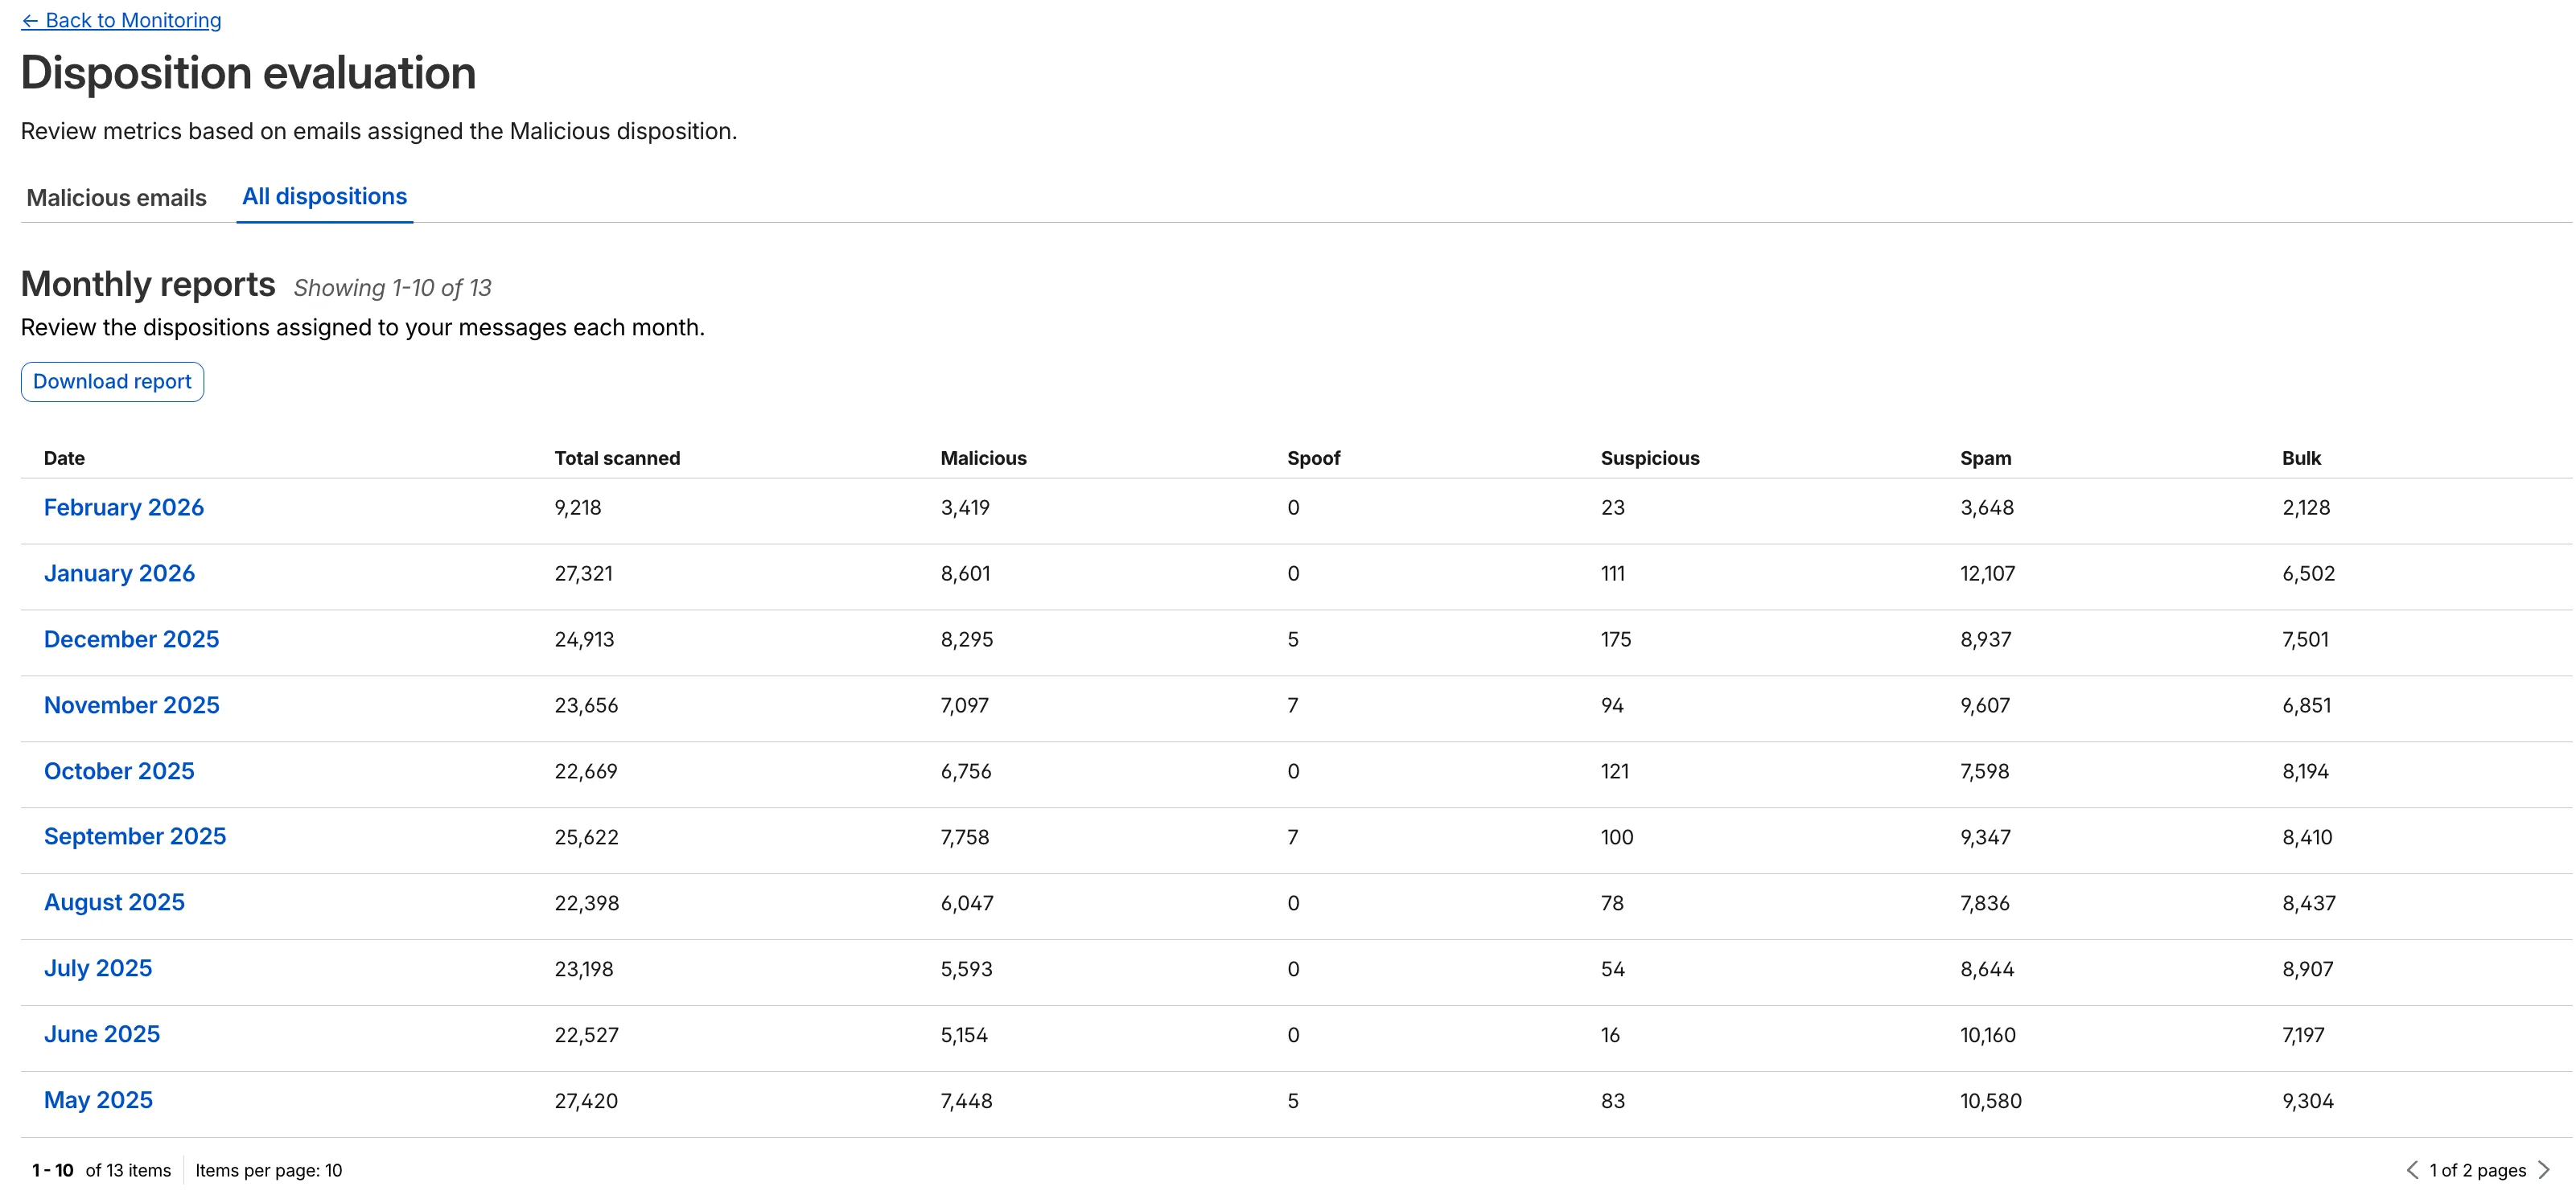
- Granular Data Breakdowns: New views for dispositions by month, malicious email details, link actions, and impersonations.
This applies to all Email Security packages:
- Advantage
- Enterprise
- Enterprise + PhishGuard
- Enhanced Visual Layout: Optimized contrast and the introduction of stacked bar charts for clearer data visualization and trend analysis.
This week’s release introduces new detections for CVE-2025-64459 and CVE-2025-24893.
Key Findings
- CVE-2025-64459: Django versions prior to 5.1.14, 5.2.8, and 4.2.26 are vulnerable to SQL injection via crafted dictionaries passed to QuerySet methods and the
Q()class. - CVE-2025-24893: XWiki allows unauthenticated remote code execution through crafted requests to the SolrSearch endpoint, affecting the entire installation.
Ruleset Rule ID Legacy Rule ID Description Previous Action New Action Comments Cloudflare Managed Ruleset N/A XWiki - Remote Code Execution - CVE:CVE-2025-24893 2 Log Block This is a new detection. Cloudflare Managed Ruleset N/A Django SQLI - CVE:CVE-2025-64459 Log Block This is a new detection. Cloudflare Managed Ruleset N/A NoSQL, MongoDB - SQLi - Comparison - 2 Block Block Rule metadata description refined. Detection unchanged. - CVE-2025-64459: Django versions prior to 5.1.14, 5.2.8, and 4.2.26 are vulnerable to SQL injection via crafted dictionaries passed to QuerySet methods and the
The minimum
cacheTtlparameter for Workers KV has been reduced from 60 seconds to 30 seconds. This change applies to bothget()andgetWithMetadata()methods.This reduction allows you to maintain more up-to-date cached data and have finer-grained control over cache behavior. Applications requiring faster data refresh rates can now configure cache durations as low as 30 seconds instead of the previous 60-second minimum.
The
cacheTtlparameter defines how long a KV result is cached at the global network location it is accessed from:JavaScript // Read with custom cache TTLconst value = await env.NAMESPACE.get("my-key", {cacheTtl: 30, // Cache for minimum 30 seconds (previously 60)});// getWithMetadata also supports the reduced cache TTLconst valueWithMetadata = await env.NAMESPACE.getWithMetadata("my-key", {cacheTtl: 30, // Cache for minimum 30 seconds});The default cache TTL remains unchanged at 60 seconds. Upgrade to the latest version of Wrangler to be able to use 30 seconds
cacheTtl.This change affects all KV read operations using the binding API. For more information, consult the Workers KV cache TTL documentation.
Magic WAN and Magic Transit customers can use the Cloudflare dashboard to configure and manage BGP peering between their networks and their Magic routing table when using IPsec and GRE tunnel on-ramps (beta).
Using BGP peering allows customers to:
- Automate the process of adding or removing networks and subnets.
- Take advantage of failure detection and session recovery features.
With this functionality, customers can:
- Establish an eBGP session between their devices and the Magic WAN / Magic Transit service when connected via IPsec and GRE tunnel on-ramps.
- Secure the session by MD5 authentication to prevent misconfigurations.
- Exchange routes dynamically between their devices and their Magic routing table.
For configuration details, refer to:
We have partnered with Black Forest Labs (BFL) again to bring their optimized FLUX.2 [klein] 9B model to Workers AI. This distilled model offers enhanced quality compared to the 4B variant, while maintaining cost-effective pricing. With a fixed 4-step inference process, Klein 9B is ideal for rapid prototyping and real-time applications where both speed and quality matter.
Read the BFL blog ↗ to learn more about the model itself, or try it out yourself on our multi modal playground ↗.
Pricing documentation is available on the model page or pricing page.
The model hosted on Workers AI is optimized for speed with a fixed 4-step inference process and supports up to 4 image inputs. Since this is a distilled model, the
stepsparameter is fixed at 4 and cannot be adjusted. Like FLUX.2 [dev] and FLUX.2 [klein] 4B, this image model uses multipart form data inputs, even if you just have a prompt.With the REST API, the multipart form data input looks like this:
Terminal window curl --request POST \--url 'https://api.cloudflare.com/client/v4/accounts/{ACCOUNT}/ai/run/@cf/black-forest-labs/flux-2-klein-9b' \--header 'Authorization: Bearer {TOKEN}' \--header 'Content-Type: multipart/form-data' \--form 'prompt=a sunset at the alps' \--form width=1024 \--form height=1024With the Workers AI binding, you can use it as such:
JavaScript const form = new FormData();form.append("prompt", "a sunset with a dog");form.append("width", "1024");form.append("height", "1024");// FormData doesn't expose its serialized body or boundary. Passing it to a// Request (or Response) constructor serializes it and generates the Content-Type// header with the boundary, which is required for the server to parse the multipart fields.const formResponse = new Response(form);const formStream = formResponse.body;const formContentType = formResponse.headers.get('content-type');const resp = await env.AI.run("@cf/black-forest-labs/flux-2-klein-9b", {multipart: {body: formStream,contentType: formContentType,},});The parameters you can send to the model are detailed here:
JSON Schema for Model
Required Parametersprompt(string) - Text description of the image to generate
Optional Parameters
input_image_0(string) - Binary imageinput_image_1(string) - Binary imageinput_image_2(string) - Binary imageinput_image_3(string) - Binary imageguidance(float) - Guidance scale for generation. Higher values follow the prompt more closelywidth(integer) - Width of the image, default1024Range: 256-1920height(integer) - Height of the image, default768Range: 256-1920seed(integer) - Seed for reproducibility
Note: Since this is a distilled model, the
stepsparameter is fixed at 4 and cannot be adjusted.The FLUX.2 klein-9b model supports generating images based on reference images, just like FLUX.2 [dev] and FLUX.2 [klein] 4B. You can use this feature to apply the style of one image to another, add a new character to an image, or iterate on past generated images. You would use it with the same multipart form data structure, with the input images in binary. The model supports up to 4 input images.
For the prompt, you can reference the images based on the index, like
take the subject of image 1 and style it like image 0or even use natural language likeplace the dog beside the woman.You must name the input parameter as
input_image_0,input_image_1,input_image_2,input_image_3for it to work correctly. All input images must be smaller than 512x512.Terminal window curl --request POST \--url 'https://api.cloudflare.com/client/v4/accounts/{ACCOUNT}/ai/run/@cf/black-forest-labs/flux-2-klein-9b' \--header 'Authorization: Bearer {TOKEN}' \--header 'Content-Type: multipart/form-data' \--form 'prompt=take the subject of image 1 and style it like image 0' \--form input_image_0=@/Users/johndoe/Desktop/icedoutkeanu.png \--form input_image_1=@/Users/johndoe/Desktop/me.png \--form width=1024 \--form height=1024Through Workers AI Binding:
JavaScript //helper function to convert ReadableStream to Blobasync function streamToBlob(stream: ReadableStream, contentType: string): Promise<Blob> {const reader = stream.getReader();const chunks = [];while (true) {const { done, value } = await reader.read();if (done) break;chunks.push(value);}return new Blob(chunks, { type: contentType });}const image0 = await fetch("http://image-url");const image1 = await fetch("http://image-url");const form = new FormData();const image_blob0 = await streamToBlob(image0.body, "image/png");const image_blob1 = await streamToBlob(image1.body, "image/png");form.append('input_image_0', image_blob0)form.append('input_image_1', image_blob1)form.append('prompt', 'take the subject of image 1 and style it like image 0')// FormData doesn't expose its serialized body or boundary. Passing it to a// Request (or Response) constructor serializes it and generates the Content-Type// header with the boundary, which is required for the server to parse the multipart fields.const formResponse = new Response(form);const formStream = formResponse.body;const formContentType = formResponse.headers.get('content-type');const resp = await env.AI.run("@cf/black-forest-labs/flux-2-klein-9b", {multipart: {body: formStream,contentType: formContentType}})
A new Beta release for the Windows WARP client is now available on the beta releases downloads page.
This release contains minor fixes, improvements, and new features.
Changes and improvements
- Improvements to multi-user mode. Fixed an issue where when switching from a pre-login registration to a user registration, Mobile Device Management (MDM) configuration association could be lost.
- Added a new feature to manage NetBIOS over TCP/IP functionality on the Windows client. NetBIOS over TCP/IP on the Windows client is now disabled by default and can be enabled in device profile settings.
- Fixed an issue causing failure of the local network exclusion feature when configured with a timeout of
0. - Improvement for the Windows client certificate posture check to ensure logged results are from checks that run once users log in.
- Improvement for more accurate reporting of device colocation information in the Cloudflare One dashboard.
Known issues
For Windows 11 24H2 users, Microsoft has confirmed a regression that may lead to performance issues like mouse lag, audio cracking, or other slowdowns. Cloudflare recommends users experiencing these issues upgrade to a minimum Windows 11 24H2 KB5062553 or higher for resolution.
Devices with KB5055523 installed may receive a warning about
Win32/ClickFix.ABAbeing present in the installer. To resolve this false positive, update Microsoft Security Intelligence to version 1.429.19.0 or later.DNS resolution may be broken when the following conditions are all true:
- WARP is in Secure Web Gateway without DNS filtering (tunnel-only) mode.
- A custom DNS server address is configured on the primary network adapter.
- The custom DNS server address on the primary network adapter is changed while WARP is connected.
To work around this issue, reconnect the WARP client by toggling off and back on.
A new Beta release for the macOS WARP client is now available on the beta releases downloads page.
This release contains minor fixes and improvements.
Changes and improvements
- Fixed an issue causing failure of the local network exclusion feature when configured with a timeout of
0. - Improvement for more accurate reporting of device colocation information in the Cloudflare One dashboard.
- Fixed an issue causing failure of the local network exclusion feature when configured with a timeout of
Cloudflare source IPs are the IP addresses used by Cloudflare services (such as Load Balancing, Gateway, and Browser Isolation) when sending traffic to your private networks.
For customers using legacy mode routing, traffic to private networks is sourced from public Cloudflare IPs, which may cause IP conflicts. For customers using Unified Routing mode (beta), traffic to private networks is sourced from dedicated, non-Internet-routable private IPv4 range to ensure:
- Symmetric routing over private network connections
- Proper firewall state preservation
- Private traffic stays on secure paths
Key details:
- IPv4: Sourced from
100.64.0.0/12by default, configurable to any/12CIDR - IPv6: Sourced from
2606:4700:cf1:5000::/64(not configurable) - Affected connectors: GRE, IPsec, CNI, WARP Connector, and WARP Client (Cloudflare Tunnel is not affected)
Configuring Cloudflare source IPs requires Unified Routing (beta) and the
Cloudflare One Networks Writepermission.For configuration details, refer to Configure Cloudflare source IPs.