---
title: Cloudflare Magic Transit
description: Magic Transit is a network security and performance solution that offers Distributed Denial of Service (DDoS) protection, traffic acceleration, and more for on-premises, cloud-hosted, and hybrid networks.
image: https://developers.cloudflare.com/core-services-preview.png
---
[Skip to content](#%5Ftop)
Was this helpful?
YesNo
[ Edit page ](https://github.com/cloudflare/cloudflare-docs/edit/production/src/content/docs/magic-transit/index.mdx) [ Report issue ](https://github.com/cloudflare/cloudflare-docs/issues/new/choose)
Copy page
# Cloudflare Magic Transit
Secure your network and improve performance at Cloudflare scale.
Enterprise-only
Magic Transit is a network security and performance solution that offers Distributed Denial of Service (DDoS) protection, traffic acceleration, and more for on-premises, cloud-hosted, and hybrid networks.
* **DDoS mitigation and protection**: Instead of relying on local infrastructure that large DDoS attacks can overwhelm, Magic Transit uses the [global Cloudflare Network ↗](https://www.cloudflare.com/network/) to ingest and mitigate attacks close to their source.
* **Traffic acceleration**: Magic Transit takes advantage of the Cloudflare global network to reduce latency and ensure that requests always have a data center nearby.
Learn more [about how Magic Transit works](https://developers.cloudflare.com/magic-transit/about/) and how to [get started](https://developers.cloudflare.com/magic-transit/get-started/).
---
## Features
### Tunnel health checks
Magic Transit sends health check probes to monitor network status and the health of specific network components.
[ Learn about health checks ](https://developers.cloudflare.com/magic-transit/reference/tunnel-health-checks/)
### Traffic steering
Magic Transit steers traffic along tunnel routes based on priorities you define during the onboarding process.
[ Learn about traffic steering ](https://developers.cloudflare.com/magic-transit/reference/traffic-steering/)
### Cloudflare IPs
Use Cloudflare-owned IP addresses if you want to protect a smaller network and do not meet Magic Transit's `/24` prefix length requirements.
[ Use Cloudflare IPs ](https://developers.cloudflare.com/magic-transit/cloudflare-ips/)
### BGP peering (beta)
Use BGP peering between your networks and Cloudflare to automate adding or removing networks and subnets, and take advantage of failure detection and session recovery features.
[ Use BGP peering (beta) ](https://developers.cloudflare.com/magic-transit/how-to/configure-routes/#configure-bgp-routes)
---
## Related products
**[Cloudflare Network Firewall](https://developers.cloudflare.com/cloudflare-network-firewall/)**
Cloudflare Network Firewall is a firewall-as-a-service (FWaaS) delivered from the Cloudflare global network to protect office networks and cloud infrastructure with advanced, scalable protection.
**[Cloudflare Network Interconnect](https://developers.cloudflare.com/network-interconnect/)**
Cloudflare Network Interconnect (CNI) allows you to connect your network infrastructure directly with Cloudflare instead of using the public Internet for a more reliable and secure experience.
**[DDoS Protection](https://developers.cloudflare.com/ddos-protection/)**
Cloudflare DDoS protection secures websites, applications, and entire networks without compromising legitimate traffic performance.
**[Bring Your Own IP (BYOIP)](https://developers.cloudflare.com/byoip/)**
Get Cloudflare's security and performance while using your own IPs. With Bring Your Own IP (BYOIP), Cloudflare announces your IPs in all Cloudflare locations.
---
## More resources
[Reference Architecture](https://developers.cloudflare.com/reference-architecture/architectures/magic-transit/)
Deep dive into the key architecture, functionalities, and network deployment options of Cloudflare Magic Transit.
```json
{"@context":"https://schema.org","@type":"BreadcrumbList","itemListElement":[{"@type":"ListItem","position":1,"item":{"@id":"/directory/","name":"Directory"}},{"@type":"ListItem","position":2,"item":{"@id":"/magic-transit/","name":"Magic Transit"}}]}
```
---
---
title: About
description: Magic Transit is a network security and performance solution that offers Distributed Denial of Service (DDoS) protection, traffic acceleration, and more for on-premise, cloud-hosted, and hybrid networks.
image: https://developers.cloudflare.com/core-services-preview.png
---
[Skip to content](#%5Ftop)
Was this helpful?
YesNo
[ Edit page ](https://github.com/cloudflare/cloudflare-docs/edit/production/src/content/docs/magic-transit/about.mdx) [ Report issue ](https://github.com/cloudflare/cloudflare-docs/issues/new/choose)
Copy page
# About
Magic Transit is a network security and performance solution that offers Distributed Denial of Service (DDoS) protection, traffic acceleration, and more for on-premise, cloud-hosted, and hybrid networks.
Magic Transit delivers its connectivity, security, and performance benefits by serving as the front door to your IP network. This means it accepts IP packets destined for your network, processes them, and then outputs them to your origin infrastructure.
The Cloudflare network uses [Border Gateway Protocol (BGP) ↗](https://www.cloudflare.com/learning/security/glossary/what-is-bgp/) to announce your company's IP address space, extending your network presence globally, and [anycast](https://www.cloudflare.com/learning/cdn/glossary/anycast-network/) to ingest your traffic. Today, Cloudflare's anycast global network spans [hundreds of cities worldwide ↗](https://www.cloudflare.com/network/).
Once [packets ↗](https://www.cloudflare.com/learning/network-layer/what-is-a-packet/) hit Cloudflare's network, Cloudflare inspects traffic for attacks, filters, steers, accelerates, and sends it to your origin. Magic Transit connects to your origin infrastructure using anycast Generic Routing Encapsulation (GRE) tunnels over the Internet or, with [Cloudflare Network Interconnect (CNI)](https://developers.cloudflare.com/network-interconnect/), through physical or virtual interconnect.
You have two options for your Magic Transit implementation: ingress traffic or ingress and [egress traffic](https://developers.cloudflare.com/magic-transit/reference/egress/). With an egress implementation, you must set up policy-based routing (PBR) or ensure default routing on your end forwards traffic to Cloudflare through tunnels.
flowchart LR
accTitle: Magic Transit
accDescr: Diagram showing how Magic Transit protects traffic on the customer's network.
A(DDoS
attack)
B[("Cloudflare global
anycast network
(DDoS protection +
network firewall)")]
C[Customer
network]
D((User))
E([BGP
announcement])
A --x B
E --- B
B-- Anycast
GRE tunnel ---C
B-- Cloudflare
Network
Interconnect ---C
C-- Egress through
Direct Server
Return --> D
D -- Ingress --> B
style A stroke: red,fill: red,color: white
style B stroke: orange,fill: orange,color: black
style C stroke: #ADD8E6,fill: #ADD8E6,color: black
style D stroke: blue,fill: blue,color: white
linkStyle 0 stroke-width:3px,stroke:red
linkStyle 1 stroke-width:2px,stroke:orange
linkStyle 2 stroke-width:2px,stroke:#ADD8E6
linkStyle 3 stroke-width:2px,stroke:gray
linkStyle 4 stroke-width:3px,stroke:green
Note
Cloudflare's China Network does not yet support Magic Transit.
For detailed information on Magic Transit architecture, refer to the [Reference section](https://developers.cloudflare.com/magic-transit/reference/).
```json
{"@context":"https://schema.org","@type":"BreadcrumbList","itemListElement":[{"@type":"ListItem","position":1,"item":{"@id":"/directory/","name":"Directory"}},{"@type":"ListItem","position":2,"item":{"@id":"/magic-transit/","name":"Magic Transit"}},{"@type":"ListItem","position":3,"item":{"@id":"/magic-transit/about/","name":"About"}}]}
```
---
---
title: Get started
description: Before you can begin using Magic Transit, complete the following onboarding steps. Cloudflare can significantly accelerate this timeline during active-attack scenarios.
image: https://developers.cloudflare.com/core-services-preview.png
---
[Skip to content](#%5Ftop)
Was this helpful?
YesNo
[ Edit page ](https://github.com/cloudflare/cloudflare-docs/edit/production/src/content/docs/magic-transit/get-started.mdx) [ Report issue ](https://github.com/cloudflare/cloudflare-docs/issues/new/choose)
Copy page
# Get started
Before you can begin using Magic Transit, complete the following onboarding steps. Cloudflare can significantly accelerate this timeline during active-attack scenarios.
## Scope your configuration
Magic Transit is not a self-serve product. Start by [engaging with our team ↗](https://www.cloudflare.com/network-services/products/magic-transit/) to assess your needs and implementation timeline. During this assessment, Cloudflare reviews specific requirements such as your prefix count and how fast you can go through the necessary steps to implement Magic Transit on your network.
## IPs
To use Magic Transit, you need to own a publicly routable IP address block with a minimum size of `/24`. If you do not own a `/24` address block, you can use Magic Transit with a Cloudflare-owned IP address. This option is helpful if you do not meet the `/24` prefix length requirements or want to protect a smaller network.
To protect your network with a Cloudflare IP address, contact your account manager. After you receive your IP address:
* [Create a tunnel](https://developers.cloudflare.com/magic-transit/how-to/configure-tunnel-endpoints/).
* [Set up static routes](https://developers.cloudflare.com/magic-transit/how-to/configure-routes/#configure-static-routes) or [BGP peering (beta)](https://developers.cloudflare.com/magic-transit/how-to/configure-routes/#configure-bgp-routes).
* [Configure health checks](https://developers.cloudflare.com/magic-transit/network-health/run-endpoint-health-checks/).
* Confirm you properly configured [tunnel](https://developers.cloudflare.com/magic-transit/network-health/update-tunnel-health-checks-frequency/) and endpoint health checks.
* Update your infrastructure at your own pace to use the allocated Cloudflare IPs.
When you use a Cloudflare-owned IP space, you do not need a Letter of Agency (LOA). When using Cloudflare-leased IPs, Cloudflare automatically enables [Magic Transit Egress](https://developers.cloudflare.com/magic-transit/reference/egress/), which routes your egress traffic to Cloudflare instead of the Internet. Set up policy-based routing on your end to ensure return traffic routes properly.
## Verify router compatibility
Magic Transit relies on anycast tunnels to transmit packets from Cloudflare's global network to your origin network.
The routers at your tunnel endpoints must meet the following requirements for Magic Transit compatibility.
* Support GRE tunnels (or IPsec if GRE is not available).
* Support at least one tunnel per Internet service provider (ISP).
* Support maximum segment size (MSS) clamping.
* Support asymmetric traffic flow (for ingress-only Magic Transit).
## Draft Letter of Agency
Draft a [Letter of Agency (LOA)](https://developers.cloudflare.com/byoip/concepts/loa/) that identifies the prefixes you want to advertise and authorizes Cloudflare to announce them. Our transit providers require the LOA so they can accept the routes we advertise on your behalf.
If you are an Internet service provider (ISP) and advertising prefixes on behalf of a customer, you need an LOA for the ISP and for the customer.
If you are using a [Cloudflare IP address](#ips), you do not need to submit an LOA.
Note
The LOA must be a PDF. Transit providers may reject the LOA if it is a JPG or PNG.
### Example of a Letter of Agency
Letter of Agency template
```
[COMPANY LETTERHEAD]
LETTER OF AGENCY ("LOA")
[DATE]
To whom it may concern:
[COMPANY NAME] (the "Company") authorizes Cloudflare, Inc. with AS13335 to advertise the following IP address blocks / originating ASNs:
- - - - - - - - - - - - - - - - - - -
[Subnet & Originating ASN]
[Subnet & Originating ASN]
[Subnet & Originating ASN]
- - - - - - - - - - - - - - - - - - -
As a representative of the Company that is the owner of the aforementioned IP address blocks / originating ASNs, I hereby declare that I am authorized to sign this LOA on the Company’s behalf.
Should you have any questions please email me at [E-MAIL ADDRESS], or call: [TELEPHONE NUMBER]
Regards,
[SIGNATURE]
[NAME TYPED]
[TITLE]
[COMPANY NAME]
[COMPANY ADDRESS]
[COMPANY STAMP]
```
## Verify IRR entries
Verify that your Internet Routing Registry (IRR) entries match your corresponding origin autonomous system numbers (ASNs) to ensure Magic Transit routes traffic to the correct autonomous systems (AS). For guidance, refer to [Verify IRR entries](https://developers.cloudflare.com/byoip/concepts/irr-entries/best-practices/#verify-an-irr-entry).
If you are using a [Cloudflare IP](#ips), you do not need to verify your IRR entries.
### Optional: RPKI check for prefix validation
You can also use the Resource Public Key Infrastructure (RPKI) as an additional option to validate your prefixes. RPKI is a [security framework method ↗](https://blog.cloudflare.com/rpki/) that associates a route with an autonomous system. It uses cryptography to validate the information before being passed to the routers.
If you operate a network (ISP, cloud provider, enterprise, and others), using RPKI ensures that routers correctly recognize your IP prefixes. This prevents service disruptions and protects your brand's reputation. Without RPKI, attackers could announce your IP space, misdirect your traffic, and potentially harm your business.
To check your prefixes, you can use [Cloudflare's RPKI Portal ↗](https://rpki.cloudflare.com/?view=validator).
## Set maximum segment size
Before enabling Magic Transit, you must make sure that you set up the maximum segment size on your network. Cloudflare Magic Transit uses tunnels to deliver [packets ↗](https://www.cloudflare.com/learning/network-layer/what-is-a-packet/) from our global network to your data centers. Cloudflare encapsulates these packets adding new headers. You must account for the space consumed by these headers when configuring the maximum transmission unit (MTU) and maximum segment size (MSS) values for your network.
### MSS clamping recommendations
#### GRE tunnels as off-ramp
The MSS value depends on how your network is set up.
* **Magic Transit ingress-only traffic (DSR):**
* **On your edge router transit ports**: Set a TCP MSS clamp to a maximum of 1,436 bytes.
* **On any IPsec/GRE tunnels with third parties on your Magic Transit prefix**: Apply the MSS clamp on the internal tunnel interface (most likely on a separate firewall behind the GRE-terminating router) to reduce the current value by 24 bytes.
* **For Magic Transit ingress + egress traffic:**
* **On the Magic Transit GRE tunnel internal interface**: Meaning where the Magic Transit egress traffic will traverse. Your devices may do this automatically once the tunnel is configured, but it depends on your devices. Set the TCP MSS clamp to 1,436 bytes maximum.
* **On any IPsec/GRE tunnels with third parties on your Magic Transit prefix**: On the internal tunnel interface (most likely on a separate firewall behind the GRE-terminating router) to reduce its current value by 24 bytes.
#### IPsec tunnels
For IPsec tunnels, the value you need to specify depends on how your network is set up. The MSS clamping value is lower than for GRE tunnels because the physical interface sees IPsec-encrypted [packets ↗](https://www.cloudflare.com/learning/network-layer/what-is-a-packet/), not TCP packets, and MSS clamping does not apply to those.
* **Magic Transit ingress-only traffic (DSR):**
* **On your edge router transit ports**: Set the TCP MSS clamp to 1,436 bytes maximum.
* **On any IPsec/GRE tunnels with third parties on your Magic Transit prefix**: On the internal tunnel interface (most likely on a separate firewall behind the GRE-terminating router) to reduce its current value by 140 bytes.
* **Magic Transit ingress + egress traffic:**
* **On your edge router**: Apply this on your Magic Transit IPsec tunnel internal interface (that is, where the Magic Transit egress traffic will traverse). Your devices may do this automatically once the tunnel is configured, but it depends on your devices. Set the TCP MSS clamp to 1,360 bytes maximum.
* **On any IPsec/GRE tunnels with third parties on your Magic Transit prefix**: On the internal tunnel interface (most likely on a separate firewall behind the IPsec-terminating device in your premises) to reduce its current value by 140 bytes.
Important
Refer to your device documentation to check if it sets IPsec MSS clamping automatically. If not and you are using IPsec inside GRE, you must set MSS clamp manually.
Refer to [Maximum transmission unit and maximum segment size](https://developers.cloudflare.com/magic-transit/reference/mtu-mss/) for more details.
#### Clear Do not fragment (DF)
If you are unable to set the MSS on your physical interfaces to a value lower than 1500 bytes, you can clear the `do not fragment` bit in the IP header. When this option is enabled, Cloudflare fragments [packets ↗](https://www.cloudflare.com/learning/network-layer/what-is-a-packet/) greater than 1500 bytes, and the packets are reassembled on your infrastructure after decapsulation. In most environments, enabling this option does not have a significant impact on traffic throughput.
To enable this option for your network, contact your account team.
Refer to [Maximum transmission unit and maximum segment size](https://developers.cloudflare.com/magic-transit/reference/mtu-mss/) for more details.
## Follow router vendor guidelines
Instructions to adjust MSS by applying MSS clamps vary depending on the vendor of your router.
The following table lists several commonly used router vendors with links to MSS clamping instructions:
| Router device | URL |
| ------------- | ------------------------------------------------------------------------------------------------------------------------------------------------------------------------------------------------------ |
| Cisco | [TCP IP Adjust MSS ↗](https://www.cisco.com/en/US/docs/ios-xml/ios/ipapp/command/ip%5Ftcp%5Fadjust-mss%5Fthrough%5Fip%5Fwccp%5Fweb-cache%5Faccelerated.html#GUID-68044D35-A53E-42C1-A7AB-9236333DA8C4) |
| Juniper | [TCP MSS - Edit System ↗](https://www.juniper.net/documentation/en%5FUS/junos/topics/reference/configuration-statement/tcp-mss-edit-system.html) |
## Configure tunnels
[Configure the tunnels](https://developers.cloudflare.com/magic-transit/how-to/configure-tunnel-endpoints/) on both the Cloudflare side and your router side to connect to your origin infrastructure.
## Configure static routes or BGP peering (beta)
Configure [static routes](https://developers.cloudflare.com/magic-transit/how-to/configure-routes/#configure-static-routes) or [BGP peering](https://developers.cloudflare.com/magic-transit/how-to/configure-routes/#configure-bgp-routes) to route traffic from Cloudflare's global network to your locations.
## Run pre-flight checks
After setting up your tunnels and routes, Cloudflare validates:
* Tunnel connectivity
* Tunnel and endpoint [health checks](https://developers.cloudflare.com/magic-transit/reference/tunnel-health-checks/#tunnel-health-checks)
* Letter of Agency (LOA)
* Internet Routing Registry (IRR)
* Maximum segment size (MSS) configurations
Cloudflare applies configurations to the global network, which takes around one day to roll out.
## Advertise prefixes
Once pre-flight checks are completed, Cloudflare unlocks your prefixes for you to [advertise via the dashboard, API or BGP](https://developers.cloudflare.com/magic-transit/how-to/advertise-prefixes/) at a time of your choosing. Refer to [Dynamic advertisement best practices](https://developers.cloudflare.com/byoip/concepts/dynamic-advertisement/best-practices/) to learn more about advertising prefixes.
If you are using a Cloudflare IP, you do not need to advertise your prefixes.
Warning
You must [put the appropriate MSS clamps](#set-maximum-segment-size) in place before [routing ↗](https://www.cloudflare.com/learning/network-layer/what-is-routing/) changes are made. Failure to apply an MSS clamp can result in dropped packets and hard-to-debug connectivity issues.
Also, when using [Cloudflare Network Interconnect](https://developers.cloudflare.com/magic-transit/network-interconnect/) with Magic Transit you must set the following MSS clamp sizes to accommodate additional overhead:
* GRE tunnels over CNI with Dataplane v1: 1476 bytes
* CNI with Dataplane v2 / CNI with Dataplane v1 with a maximum transmission unit (MTU) size of 1500 bytes handoff does not require an MSS clamp.
MSS clamps are used to backhaul data from the data center where traffic is ingested (close to the end user) to the facility with the CNI link.
```json
{"@context":"https://schema.org","@type":"BreadcrumbList","itemListElement":[{"@type":"ListItem","position":1,"item":{"@id":"/directory/","name":"Directory"}},{"@type":"ListItem","position":2,"item":{"@id":"/magic-transit/","name":"Magic Transit"}},{"@type":"ListItem","position":3,"item":{"@id":"/magic-transit/get-started/","name":"Get started"}}]}
```
---
---
title: Network health
description: Magic Transit uses health check probes to determine the status of tunnels. Cloudflare uses this information to steer traffic through the best available route and warn you about potential issues with a tunnel. Service-level indicators (SLIs) and service-level objectives (SLOs) combine to determine when Cloudflare sends you tunnel health alerts. Refer to How Cloudflare calculates tunnel health alerts for more information about SLIs and SLOs.
image: https://developers.cloudflare.com/core-services-preview.png
---
[Skip to content](#%5Ftop)
Was this helpful?
YesNo
[ Edit page ](https://github.com/cloudflare/cloudflare-docs/edit/production/src/content/docs/magic-transit/network-health/index.mdx) [ Report issue ](https://github.com/cloudflare/cloudflare-docs/issues/new/choose)
Copy page
# Network health
Magic Transit uses health check probes to determine the status of tunnels. Cloudflare uses this information to steer traffic through the best available route and warn you about potential issues with a tunnel. Service-level indicators (SLIs) and service-level objectives (SLOs) combine to determine when Cloudflare sends you tunnel health alerts. Refer to [How Cloudflare calculates tunnel health alerts](https://developers.cloudflare.com/magic-transit/reference/how-cloudflare-calculates-tunnel-health-alerts/) for more information about SLIs and SLOs.
There are two types of health checks available: endpoint and tunnel health checks.
* Endpoint health checks evaluate connectivity from Cloudflare distributed data centers to your origin network. Endpoint probes flow over available tunnels to provide a broad picture of Internet health and do not inform tunnel selection or steering logic.
Cloudflare global network servers issue endpoint health checks outside of customer network namespaces and typically target endpoints beyond the tunnel-terminating border router.
During onboarding, you specify IP addresses to configure endpoint health checks.
* Tunnel health checks monitor the status of the tunnels that route traffic from Cloudflare to your origin network. Magic Transit relies on health checks to steer traffic to the best available routes.
During onboarding, you specify the tunnel endpoints or tunnel health check targets that the tunnel probes from Cloudflare's global network will monitor.
You can access tunnel health check results through the API. Cloudflare aggregates these results from individual health check results on Cloudflare servers.
Refer to [Tunnel health checks](https://developers.cloudflare.com/magic-transit/reference/tunnel-health-checks/) for a deep dive into the different types of health checks, what they do, and how they work.
Note
Magic Transit customers with [Customer Metadata Boundary](https://developers.cloudflare.com/data-localization/metadata-boundary/) enabled for the European Union can access GRE, IPsec, and CNI (Cloudflare Network Interconnect) health check and traffic volume data in the Cloudflare dashboard and through the API. This ensures that customers who need to be General Data Protection Regulation (GDPR) compliant can access all Magic Transit features.
Refer to the following pages for details on how to use the various network health checks available.
* [ Run endpoint health checks (beta) ](https://developers.cloudflare.com/magic-transit/network-health/run-endpoint-health-checks/)
* [ Check tunnel health in the dashboard ](https://developers.cloudflare.com/magic-transit/network-health/check-tunnel-health-dashboard/)
* [ Update tunnel health checks frequency ](https://developers.cloudflare.com/magic-transit/network-health/update-tunnel-health-checks-frequency/)
* [ Configure tunnel health alerts ](https://developers.cloudflare.com/magic-transit/network-health/configure-tunnel-health-alerts/)
* [ How Cloudflare calculates tunnel health alerts ](https://developers.cloudflare.com/magic-transit/reference/how-cloudflare-calculates-tunnel-health-alerts/)
```json
{"@context":"https://schema.org","@type":"BreadcrumbList","itemListElement":[{"@type":"ListItem","position":1,"item":{"@id":"/directory/","name":"Directory"}},{"@type":"ListItem","position":2,"item":{"@id":"/magic-transit/","name":"Magic Transit"}},{"@type":"ListItem","position":3,"item":{"@id":"/magic-transit/network-health/","name":"Network health"}}]}
```
---
---
title: Check tunnel health in the dashboard
description: The Cloudflare dashboard monitors the health of all anycast tunnels on your account that route traffic from Cloudflare to your origin network.
image: https://developers.cloudflare.com/core-services-preview.png
---
[Skip to content](#%5Ftop)
Was this helpful?
YesNo
[ Edit page ](https://github.com/cloudflare/cloudflare-docs/edit/production/src/content/docs/magic-transit/network-health/check-tunnel-health-dashboard.mdx) [ Report issue ](https://github.com/cloudflare/cloudflare-docs/issues/new/choose)
Copy page
# Check tunnel health in the dashboard
The Cloudflare dashboard monitors the health of all anycast tunnels on your account that route traffic from Cloudflare to your origin network.
The dashboard shows the global view of tunnel health as measured from all Cloudflare locations. If the tunnels are healthy on your side, you will see the majority of servers reporting an **up** status. It is normal for a subset of these locations to report tunnel status as degraded or unhealthy, since the Internet is not homogeneous and intermediary path issues between Cloudflare and your network can cause interruptions for specific paths.
Note
To access more than one hour of tunnel health data, you should use the [GraphQL API](https://developers.cloudflare.com/magic-transit/analytics/query-tunnel-health/).
Not all data centers are relevant to you at all times. You can refer to the **Traffic volume (1 hour)** column to understand if a given data center is receiving traffic for your network, and if its health status is relevant to you.
## Check tunnel health
1. Go to the **Network health** page.
[ Go to **Network health** ](https://dash.cloudflare.com/?to=/:account/networking-insights/health)
1. Select the **Connector health** tab.
2. In this view you can access a list of your tunnels and their current health status. You can also check the amount of health checks passed in the last hour as well as traffic volume for each tunnel.
3. Find the tunnel you want to inspect, select the three dots next to it, and select:
* **Create alert**: Opens the [notifications wizard](https://developers.cloudflare.com/magic-transit/network-health/configure-tunnel-health-alerts/) so you can create specific alerts for that tunnel when specific conditions are met.
* **Network Analytics**: Opens the Analytics section of the dash, prefiltered with the tunnel you want to inspect.
4. Alternatively, from the list of tunnels, select the tunnel you want to inspect to access details about it.
## Check tunnel health for a specific tunnel
You can drill down into a specific tunnel to check its health status and other information.
1. Go to the **Network health** page.
[ Go to **Network health** ](https://dash.cloudflare.com/?to=/:account/networking-insights/health)
1. Select the **Connector health** tab.
1. Find and select the tunnel you want to inspect.
The next view displays detailed information about the tunnel, including:
* Status information
* Up: More than 80% of health checks pass.
* Degraded: More than 40% of health checks pass.
* Down: Less than 40% of health checks pass.
* Health checks passed in the last hour
* Traffic volume in the last hour
If you select the three dots in front of the tunnel you want to inspect, you have access to the following tools:
* Packet captures: Collect [packet level data for your traffic](https://developers.cloudflare.com/cloudflare-network-firewall/packet-captures/)
* Network Analytics: Leverage real-time insights into [network analytics](https://developers.cloudflare.com/magic-transit/analytics/network-analytics/).
Note
Magic Transit customers with [Customer Metadata Boundary](https://developers.cloudflare.com/data-localization/metadata-boundary/) enabled for the European Union can access GRE, IPsec, and CNI (Cloudflare Network Interconnect) health check and traffic volume data in the Cloudflare dashboard and through the API. This ensures that customers who need to be General Data Protection Regulation (GDPR) compliant can access all Magic Transit features.
## Troubleshooting
If you received a tunnel health alert but are unsure whether it affects your traffic, refer to [Troubleshoot connectivity](https://developers.cloudflare.com/magic-transit/troubleshooting/connectivity/) to determine whether the alert is relevant.
If your tunnels show as unhealthy or degraded, refer to [Troubleshoot tunnel health](https://developers.cloudflare.com/magic-transit/troubleshooting/tunnel-health/) for common issues and solutions.
```json
{"@context":"https://schema.org","@type":"BreadcrumbList","itemListElement":[{"@type":"ListItem","position":1,"item":{"@id":"/directory/","name":"Directory"}},{"@type":"ListItem","position":2,"item":{"@id":"/magic-transit/","name":"Magic Transit"}},{"@type":"ListItem","position":3,"item":{"@id":"/magic-transit/network-health/","name":"Network health"}},{"@type":"ListItem","position":4,"item":{"@id":"/magic-transit/network-health/check-tunnel-health-dashboard/","name":"Check tunnel health in the dashboard"}}]}
```
---
---
title: Configure tunnel health alerts
description: Set up and configure tunnel health alerts
image: https://developers.cloudflare.com/core-services-preview.png
---
[Skip to content](#%5Ftop)
Was this helpful?
YesNo
[ Edit page ](https://github.com/cloudflare/cloudflare-docs/edit/production/src/content/docs/magic-transit/network-health/configure-tunnel-health-alerts.mdx) [ Report issue ](https://github.com/cloudflare/cloudflare-docs/issues/new/choose)
Copy page
# Configure tunnel health alerts
You can configure Tunnel Health Alerts (formerly Magic Tunnel health alerts) to receive email, webhook, and PagerDuty notifications when the percentage of successful health checks for an IPsec/GRE tunnel drops below the selected [service-level objective (SLO)](https://developers.cloudflare.com/magic-transit/reference/how-cloudflare-calculates-tunnel-health-alerts/).
Tunnel health alerts monitor the health check success rate of each IPsec/GRE tunnel included in the alert that has actively transferred customer traffic (excluding health check traffic) over the past six hours. You can define an SLO threshold for the percentage of health checks that must be successful for each IPsec/GRE tunnel. If the number of successful health checks for the IPsec/GRE tunnel(s) included in the alert drops below the SLO threshold, an alert fires.
## Alert data
When a Tunnel health alert fires, you receive the following data in the email, webhook, and PagerDuty notification:
* Cloudflare account name
* Cloudflare account ID
* Alert type
* Tunnel name
* Tunnel ID
* Tunnel status
* Alert SLO
* Timestamp
## SLO thresholds
Currently, there are seven SLO threshold values that you can configure through the Cloudflare dashboard. For a more granular approach, use the [API](#set-up-tunnel-health-alerts).
The SLO threshold for Tunnel health alerts is the percentage of successful health checks for each IPsec/GRE tunnel in the alert:
| Alert Sensitivity Level | SLO threshold |
| ----------------------- | ------------- |
| Minimum | 95.0 |
| Very low | 96.0 |
| Low | 97.0 |
| Medium | 98.0 |
| High | 99.0 |
| Very high | 99.5 |
| Maximum | 99.9 |
The time it takes to receive alerts depends on the sensitivity level you configure for your SLO thresholds. Higher sensitivity levels notify you faster when a tunnel's health degrades, but they may also trigger alerts for brief or minor disruptions. Lower sensitivity levels reduce the chance of false alarms but may delay notifications for less severe issues.
While the underlying detection timing remains consistent across sensitivity levels, the speed of notification depends on how significantly the tunnel's health has dropped and the sensitivity you have chosen. Cloudflare recommends that you [test SLO thresholds](#test-slos) to determine which one better serves your use case.
For details, refer to [How Cloudflare calculates Tunnel health alerts](https://developers.cloudflare.com/magic-transit/reference/how-cloudflare-calculates-tunnel-health-alerts/).
## Set up Tunnel Health Alerts
* [ Dashboard ](#tab-panel-5405)
* [ API ](#tab-panel-5406)
1. Go to the **Notifications** page.
[ Go to **Notifications** ](https://dash.cloudflare.com/?to=/:account/notifications)
2. Select **Add**.
3. From the **Product** drop-down menu, select **Magic Transit**.
4. Select **Tunnel Health Check Alert** \> **Select** to add a notification. You can add alerts by tunnel or by data center (beta).
Alert by tunnel
1. Select **Alert by tunnel**.
2. Enter a name and description for the notification.
3. Add webhooks or an email address for the person who should receive the notification, and select **Next**.
4. Select the **Alert Sensitivity Level** threshold from the drop-down menu. The threshold defaults to _Medium (98.0)_. You can choose from options between _Minimum (95.0)_ and _Maximum (99.9)_. For details, refer to [How Cloudflare calculates Tunnel health alerts](https://developers.cloudflare.com/magic-transit/reference/how-cloudflare-calculates-tunnel-health-alerts/).
5. From the **Alert interval** drop-down menu, set the minimum amount of time that must pass before Cloudflare sends you a duplicate alert. Options range from five minutes to seven days.
6. Enable **Set as default alert for any new tunnels created in the future** if you want the alert sensitivity level you chose to be automatically applied to all new tunnels you create.
7. Select **Next**.
8. Choose the tunnels you want to receive alerts for. You can search by specific tunnel names, or filter them by type (Generic Routing Encapsulation (GRE), Internet Protocol Security (IPsec), and CNI (Cloudflare Network Interconnect)). Select **Next**.
9. Review the details of your alert. If these details are correct, select **Create alert**.
Alert by data center (beta)
1. Select **Alert by data center**.
2. Enter a name and description for the notification.
3. Add webhooks or an email address for the person who should receive the notification, and select **Next**.
4. Select the **Alert Sensitivity Level** threshold from the drop-down menu. The threshold defaults to _Medium (98.0)_. You can choose from options between _Minimum (95.0)_ and _Maximum (99.9)_. For details, refer to [How Cloudflare calculates Tunnel health alerts](https://developers.cloudflare.com/magic-transit/reference/how-cloudflare-calculates-tunnel-health-alerts/).
5. From the **Alert interval** drop-down menu, set the minimum amount of time that must pass before Cloudflare sends you a duplicate alert. Options range from five minutes to seven days.
6. Choose the data centers you want to receive alerts for, and select **Next**.
7. Choose the tunnels you want to receive alerts for. You can search by specific tunnel names, or filter them by type (GRE, IPsec, and CNI (Cloudflare Network Interconnect)). Select **Next**.
8. Review the details of your alert. If these details are correct, select **Create alert**.
Note
For details on specific permissions, refer to the [documentation for Notifications](https://developers.cloudflare.com/notifications/get-started/).
Send a [POST request](https://developers.cloudflare.com/api/resources/alerting/subresources/policies/methods/create/) to create a tunnel health alert. You can set tunnel health alerts with any SLO value between `0` and `99.99`.
Required API token permissions
At least one of the following [token permissions](https://developers.cloudflare.com/fundamentals/api/reference/permissions/)is required:
* `Notifications Write`
* `Account Settings Write`
Create a Notification policy
```
curl "https://api.cloudflare.com/client/v4/accounts/$ACCOUNT_ID/alerting/v3/policies" \
--request POST \
--header "Authorization: Bearer $CLOUDFLARE_API_TOKEN" \
--json '{
"alert_type": "magic_tunnel_health_check_event",
"description": "",
"enabled": true,
"filters": {
"slo": [
"99.9"
]
},
"mechanisms": {
"email": [
{
"id": "EMAIL_ADDRESS"
}
]
},
"name": ""
}'
```
```
{
"result": [
{
"id": "f174e90a-fafe-4643-bbbc-4a0ed4fc8415",
"name": "",
"description": "",
"enabled": true,
"alert_type": "magic_tunnel_health_check_event",
"mechanisms": {
"email": [
{
"id": ""
}
]
},
"created": "2024-09-11T14:13:29.585658Z",
"modified": "2024-09-11T14:13:29.585658Z",
"conditions": {
"and": [
{
"or": [
{
"<=": [
{
"var": "slo"
},
"99.9"
]
}
]
}
]
},
"filters": {
"slo": ["99.9"]
}
}
],
"success": true,
"errors": [],
"messages": []
}
```
## Test SLOs
To test whether a specific alert sensitivity level works for your use case:
1. [Create an alert](#set-up-tunnel-health-alerts) with a specific sensitivity level for a tunnel with active traffic within the past six hours. If you are unsure which tunnels to choose, refer to [Network Analytics](https://developers.cloudflare.com/magic-transit/analytics/network-analytics/) for real-time and historical data about your network.
2. Disable the tunnel you are testing, so there is 100% [health check failure](https://developers.cloudflare.com/magic-transit/reference/tunnel-health-checks/).
3. The time it takes for Cloudflare to send you an alert depends on the sensitivity you chose for your alerts.
```json
{"@context":"https://schema.org","@type":"BreadcrumbList","itemListElement":[{"@type":"ListItem","position":1,"item":{"@id":"/directory/","name":"Directory"}},{"@type":"ListItem","position":2,"item":{"@id":"/magic-transit/","name":"Magic Transit"}},{"@type":"ListItem","position":3,"item":{"@id":"/magic-transit/network-health/","name":"Network health"}},{"@type":"ListItem","position":4,"item":{"@id":"/magic-transit/network-health/configure-tunnel-health-alerts/","name":"Configure tunnel health alerts"}}]}
```
---
---
title: How Cloudflare calculates tunnel health alerts
image: https://developers.cloudflare.com/core-services-preview.png
---
[Skip to content](#%5Ftop)
Was this helpful?
YesNo
[ Edit page ](https://github.com/cloudflare/cloudflare-docs/edit/production/src/content/docs/magic-transit/network-health/magic-tunnel-health-check-calculation.mdx) [ Report issue ](https://github.com/cloudflare/cloudflare-docs/issues/new/choose)
Copy page
# How Cloudflare calculates tunnel health alerts
```json
{"@context":"https://schema.org","@type":"BreadcrumbList","itemListElement":[{"@type":"ListItem","position":1,"item":{"@id":"/directory/","name":"Directory"}},{"@type":"ListItem","position":2,"item":{"@id":"/magic-transit/","name":"Magic Transit"}},{"@type":"ListItem","position":3,"item":{"@id":"/magic-transit/network-health/","name":"Network health"}},{"@type":"ListItem","position":4,"item":{"@id":"/magic-transit/network-health/magic-tunnel-health-check-calculation/","name":"How Cloudflare calculates tunnel health alerts"}}]}
```
---
---
title: Run endpoint health checks (beta)
description: Magic Transit uses endpoint health checks to determine the overall health of your inter-network connections. Probes originate from Cloudflare infrastructure, outside customer network namespaces, and target IP addresses deep within your network, beyond the tunnel-terminating border router. These "long distance" probes are purely diagnostic.
image: https://developers.cloudflare.com/core-services-preview.png
---
[Skip to content](#%5Ftop)
Was this helpful?
YesNo
[ Edit page ](https://github.com/cloudflare/cloudflare-docs/edit/production/src/content/docs/magic-transit/network-health/run-endpoint-health-checks.mdx) [ Report issue ](https://github.com/cloudflare/cloudflare-docs/issues/new/choose)
Copy page
# Run endpoint health checks (beta)
Magic Transit uses endpoint health checks to determine the overall health of your [inter-network connections](https://developers.cloudflare.com/magic-transit/reference/gre-ipsec-tunnels/). Probes originate from Cloudflare infrastructure, outside customer network namespaces, and target IP addresses deep within your network, beyond the tunnel-terminating border router. These "long distance" probes are purely diagnostic.
When choosing which endpoint IP addresses to monitor with health checks, use these guidelines:
* Provide one IP address for each of the prefixes Cloudflare advertises.
* Redundant IPs routed through the same ISP (Internet Service Provider) and infrastructure are not necessary but are useful when troubleshooting.
Cloudflare pings health check IPs from within the [published Cloudflare IP range ↗](https://www.cloudflare.com/ips/), which is also available through the [Cloudflare API](https://developers.cloudflare.com/api/resources/ips/methods/list/).
When configuring an endpoint health check for an IP prefix, select an IP address within the range of that IP prefix. Refer to the table for an example of an endpoint health check configuration.
| Prefix | Endpoint IP address |
| --------------- | ------------------- |
| 103.21.244.0/24 | 103.21.244.100 |
| 103.21.245.0/24 | 103.21.245.100 |
Refer to [Tunnel health checks](https://developers.cloudflare.com/magic-transit/reference/tunnel-health-checks/) for more information.
## Configure endpoint health checks (beta)
You can only configure endpoint health checks through the Cloudflare API. They are not available in the dashboard. Currently, configuring health checks is a beta feature.
Refer to the [API documentation](https://developers.cloudflare.com/api/resources/diagnostics/subresources/endpoint-healthchecks/) to learn how to create, list, and delete endpoint health checks. The following example creates a new endpoint health check.
Note
You will need your [account ID](https://developers.cloudflare.com/fundamentals/account/find-account-and-zone-ids/) and [API token](https://developers.cloudflare.com/fundamentals/api/get-started/account-owned-tokens/) to use the API.
Terminal window
```
curl "https://api.cloudflare.com/client/v4/accounts/account_id/diagnostics/endpoint-healthcheck" \
--request POST \
--json '{
"check_type": "icmp",
"endpoint": "8.31.160.1",
"name": "Datacenter 1 - primary"
}'
```
```
{
"result": {
"id": "",
"check_type": "icmp",
"endpoint": "8.31.160.1",
"name": "Datacenter 1 - primary"
},
"success": true,
"errors": [],
"messages": []
}
```
## Query endpoint health checks with GraphQL
Use the [GraphQL Analytics API](https://developers.cloudflare.com/analytics/graphql-api/) to query endpoint health check results for your account. The `magicEndpointHealthCheckAdaptiveGroups` dataset returns probe results aggregated by the dimensions and time interval you specify.
Send all GraphQL queries as HTTP `POST` requests to `https://api.cloudflare.com/client/v4/graphql`.
### Prerequisites
You need the following to query endpoint health check data:
* Your [account ID](https://developers.cloudflare.com/fundamentals/account/find-account-and-zone-ids/).
* An [API token](https://developers.cloudflare.com/fundamentals/api/get-started/create-token/) with `Account > Account Analytics > Read` permissions. For details, refer to [Configure an Analytics API token](https://developers.cloudflare.com/analytics/graphql-api/getting-started/authentication/api-token-auth/).
### Query parameters
The following parameters are some of the most common ones in the `filter` object:
| Parameter | Description |
| ------------- | ------------------------------------------------------------------------------------------------------------------------------------------------------------------------------------------------------------------------------------------------- |
| date\_geq | Start date for the query in YYYY-MM-DD format (for example, 2026-01-01). When used with a date-based truncation dimension, returns results from this date onward. You can also use a full ISO 8601 timestamp (for example, 2026-01-01T00:00:00Z). |
| date\_leq | _(Optional)_ End date for the query. Uses the same format as date\_geq. |
| datetime\_geq | _(Optional)_ Start timestamp in ISO 8601 format (for example, 2026-01-01T00:00:00Z). Use instead of date\_geq for time-based truncation dimensions. |
| datetime\_leq | _(Optional)_ End timestamp in ISO 8601 format. |
| limit | Maximum number of result groups to return. |
You can also filter on any dimension listed in the [Available dimensions](#available-dimensions) table. Append an operator suffix to the dimension name to create a filter — for example, `endpoint_in` to filter by a list of endpoints, or `checkType_neq` to exclude a specific check type. Using a dimension name without a suffix filters for equality. For the full list of supported operators, refer to [Filtering](https://developers.cloudflare.com/analytics/graphql-api/features/filtering/).
### Available dimensions
You can query the following dimensions in the `dimensions` field:
| Dimension | Description |
| ---------------------- | -------------------------------------------------------------------------------- |
| checkId | The unique ID of the configured health check. |
| checkType | The type of health check (for example, icmp). |
| endpoint | The IP address of the endpoint being checked. |
| name | The name assigned to the health check when configured (may be empty if not set). |
| date | Event timestamp truncated to the day. |
| datetime | Full event timestamp. |
| datetimeMinute | Event timestamp truncated to the minute. |
| datetimeFiveMinutes | Event timestamp truncated to five-minute intervals. |
| datetimeFifteenMinutes | Event timestamp truncated to 15-minute intervals. |
| datetimeHalfOfHour | Event timestamp truncated to 30-minute intervals. |
| datetimeHour | Event timestamp truncated to the hour. |
### Available metrics
| Metric | Description |
| ------------------ | ------------------------------------------------- |
| count | Total number of health check events in the group. |
| sum.total | Total number of health check probes sent. |
| sum.failures | Number of failed health check probes. |
| avg.lossPercentage | Average calculated loss percentage (0-100). |
### API call
The following example queries endpoint health check results for a specific account, returning probe counts aggregated in five-minute intervals. Replace `` with your [account ID](https://developers.cloudflare.com/fundamentals/account/find-account-and-zone-ids/) and `` with your [API token](https://developers.cloudflare.com/analytics/graphql-api/getting-started/authentication/api-token-auth/).
Terminal window
```
echo '{ "query":
"query GetEndpointHealthCheckResults($accountTag: string, $datetimeStart: string) {
viewer {
accounts(filter: {accountTag: $accountTag}) {
magicEndpointHealthCheckAdaptiveGroups(
filter: {
datetime_geq: $datetimeStart
}
limit: 10
) {
count
dimensions {
checkId
checkType
endpoint
datetimeFiveMinutes
}
sum {
failures
total
}
}
}
}
}",
"variables": {
"accountTag": "",
"datetimeStart": "2026-01-21T00:00:00Z"
}
}' | tr -d '\n' | curl --silent \
https://api.cloudflare.com/client/v4/graphql \
--header "Authorization: Bearer " \
--header "Accept: application/json" \
--header "Content-Type: application/json" \
--data @-
```
Pipe the output to `jq` to format the JSON response for easier reading:
Terminal window
```
... | curl --silent \
https://api.cloudflare.com/client/v4/graphql \
--header "Authorization: Bearer " \
--header "Accept: application/json" \
--header "Content-Type: application/json" \
--data @- | jq .
```
### Example response
```
{
"data": {
"viewer": {
"accounts": [
{
"magicEndpointHealthCheckAdaptiveGroups": [
{
"count": 288,
"dimensions": {
"checkId": "90b478c7-bb51-4640-b94b-2c3050e9fa00",
"checkType": "icmp",
"datetimeFiveMinutes": "2026-01-21T12:00:00Z",
"endpoint": "103.21.244.100"
},
"sum": {
"failures": 0,
"total": 288
}
},
{
"count": 288,
"dimensions": {
"checkId": "90b478c7-bb51-4640-b94b-2c3050e9fa00",
"checkType": "icmp",
"datetimeFiveMinutes": "2026-01-21T12:05:00Z",
"endpoint": "103.21.244.100"
},
"sum": {
"failures": 2,
"total": 288
}
}
]
}
]
}
},
"errors": null
}
```
In this response, `sum.total` is the number of probes sent during the interval and `sum.failures` is the number that did not receive a reply. A `failures` value of `0` indicates the endpoint was fully reachable during that period.
## Configure alerts for endpoint health checks
You can set up alerts to be notified when the state of your endpoint's health is below a threshold defined by you.
1. Make a `GET` request to get a list of IDs for all of the endpoint health checks configured:
Terminal window
```
curl "https://api.cloudflare.com/client/v4/accounts/account_id/diagnostics/endpoint-healthcheck" \
--request GET
```
```
{
"result": [
{
"id": "",
"check_type": "icmp",
"endpoint": "8.31.160.1",
"name": "Datacenter 1 - primary"
}
],
"success": true,
"errors": [],
"messages": []
}
```
1. Take note of the `id` value for the endpoint you want to get alerts for.
2. In the Cloudflare dashboard, go to the **Notifications** page.
[ Go to **Notifications** ](https://dash.cloudflare.com/?to=/:account/notifications)
1. Select **Add**.
2. From the drop-down menu, select _Magic Transit_.
3. Select **Magic Endpoint Health Check Alert**.
4. Provide a name for your new notification and optionally provide a description.
5. In the _Service Level Objective (SLO)_ drop-down menu, select the SLO threshold for your notification. The SLO defines the percentage of endpoint health checks that must pass. If the number of passing endpoint health checks falls below the SLO, Cloudflare generates an alert:
* **High** \- 99%
* **Medium** \- 98%
* **Low** \- 97%
6. In the drop-down menu below SLOs, select the `id` value that matches the `id` you got through the API in step 1\. This `id` should match the endpoint health check you want to get notifications for.
7. Select your preferred notification method (such as email or webhooks).
8. Select **Save**.
You will now receive notifications through your preferred method whenever the SLO for your endpoint health checks falls below your chosen threshold.
```json
{"@context":"https://schema.org","@type":"BreadcrumbList","itemListElement":[{"@type":"ListItem","position":1,"item":{"@id":"/directory/","name":"Directory"}},{"@type":"ListItem","position":2,"item":{"@id":"/magic-transit/","name":"Magic Transit"}},{"@type":"ListItem","position":3,"item":{"@id":"/magic-transit/network-health/","name":"Network health"}},{"@type":"ListItem","position":4,"item":{"@id":"/magic-transit/network-health/run-endpoint-health-checks/","name":"Run endpoint health checks (beta)"}}]}
```
---
---
title: Update tunnel health checks frequency
description: By default, Cloudflare servers send health checks to each GRE, Cloudflare Network Interconnect (CNI), or IPsec tunnel endpoint you configure to receive traffic from Magic Transit.
image: https://developers.cloudflare.com/core-services-preview.png
---
[Skip to content](#%5Ftop)
Was this helpful?
YesNo
[ Edit page ](https://github.com/cloudflare/cloudflare-docs/edit/production/src/content/docs/magic-transit/network-health/update-tunnel-health-checks-frequency.mdx) [ Report issue ](https://github.com/cloudflare/cloudflare-docs/issues/new/choose)
Copy page
# Update tunnel health checks frequency
By default, Cloudflare servers send [health checks](https://developers.cloudflare.com/magic-transit/reference/tunnel-health-checks/) to each GRE, Cloudflare Network Interconnect (CNI), or IPsec tunnel endpoint you configure to receive traffic from Magic Transit.
You can configure the health check frequency through the dashboard or [the API](https://developers.cloudflare.com/api/resources/magic%5Ftransit/subresources/gre%5Ftunnels/methods/update/) to suit your use case. For example, if you are connecting a lower-traffic site that does not need immediate failover and you prefer a lower volume of health check traffic, set the frequency to `low`. On the other hand, if you are connecting a site that is extremely sensitive to any issues and you want proactive failover at the earliest sign of a potential problem, set this to `high`.
Available options are `low`, `mid`, and `high`.
* [ Dashboard ](#tab-panel-5407)
* [ API ](#tab-panel-5408)
1. To create or edit your tunnel, refer to [Add tunnels](https://developers.cloudflare.com/magic-transit/how-to/configure-tunnel-endpoints/#add-tunnels).
2. Change the **Health check rate** to your desired rate. For example, _Low_.
3. Save your changes.
You can adjust the health check frequency by updating your [GRE](https://developers.cloudflare.com/api/resources/magic%5Ftransit/subresources/gre%5Ftunnels/methods/update/), [IPsec](https://developers.cloudflare.com/api/resources/magic%5Ftransit/subresources/ipsec%5Ftunnels/methods/update/), or [CNI](https://developers.cloudflare.com/api/resources/magic%5Ftransit/subresources/cf%5Finterconnects/methods/update/) tunnels.
The following example adjusts tunnel health check frequency to `low`. Note that this command applies to GRE, IPsec and CNI tunnels:
Terminal window
```
curl "https://api.cloudflare.com/client/v4/accounts/%7Baccount_id%7D/magic/ipsec_tunnels/%7Bipsec_tunnel_id%7D" \
--request PUT \
--json '{
"health_check": {
"rate": "low"
}
}'
```
Note
Magic Transit customers with [Customer Metadata Boundary](https://developers.cloudflare.com/data-localization/metadata-boundary/) enabled for the European Union can access GRE, IPsec, and CNI (Cloudflare Network Interconnect) health check and traffic volume data in the Cloudflare dashboard and through the API. This ensures that customers who need to be General Data Protection Regulation (GDPR) compliant can access all Magic Transit features.
```json
{"@context":"https://schema.org","@type":"BreadcrumbList","itemListElement":[{"@type":"ListItem","position":1,"item":{"@id":"/directory/","name":"Directory"}},{"@type":"ListItem","position":2,"item":{"@id":"/magic-transit/","name":"Magic Transit"}},{"@type":"ListItem","position":3,"item":{"@id":"/magic-transit/network-health/","name":"Network health"}},{"@type":"ListItem","position":4,"item":{"@id":"/magic-transit/network-health/update-tunnel-health-checks-frequency/","name":"Update tunnel health checks frequency"}}]}
```
---
---
title: DDoS protection
description: Cloudflare DDoS protection automatically detects and mitigates Distributed Denial of Service (DDoS) attacks using its Autonomous Edge. With Magic Transit, you have access to additional Advanced DDoS mitigation systems, such as:
image: https://developers.cloudflare.com/core-services-preview.png
---
[Skip to content](#%5Ftop)
Was this helpful?
YesNo
[ Edit page ](https://github.com/cloudflare/cloudflare-docs/edit/production/src/content/docs/magic-transit/ddos.mdx) [ Report issue ](https://github.com/cloudflare/cloudflare-docs/issues/new/choose)
Copy page
# DDoS protection
Cloudflare DDoS protection automatically detects and mitigates Distributed Denial of Service (DDoS) attacks using its [Autonomous Edge](https://developers.cloudflare.com/ddos-protection/about/components/#autonomous-edge). With Magic Transit, you have access to additional [Advanced DDoS mitigation systems](https://developers.cloudflare.com/ddos-protection/advanced-ddos-systems/overview/), such as:
* [Advanced TCP protection](https://developers.cloudflare.com/ddos-protection/advanced-ddos-systems/overview/advanced-tcp-protection/)
* [Advanced DNS protection](https://developers.cloudflare.com/ddos-protection/advanced-ddos-systems/overview/advanced-dns-protection/)
Refer to [Cloudflare DDoS documentation](https://developers.cloudflare.com/ddos-protection/) for more information.
---
## Execution order
Magic Transit executes mitigation systems in the following order:
1. [DDoS managed rulesets](https://developers.cloudflare.com/ddos-protection/managed-rulesets/)
2. [Advanced TCP Protection](https://developers.cloudflare.com/ddos-protection/advanced-ddos-systems/overview/advanced-tcp-protection/)
3. [Advanced DNS Protection](https://developers.cloudflare.com/ddos-protection/advanced-ddos-systems/overview/advanced-dns-protection/)
4. [Cloudflare Network Firewall](https://developers.cloudflare.com/cloudflare-network-firewall/)
```json
{"@context":"https://schema.org","@type":"BreadcrumbList","itemListElement":[{"@type":"ListItem","position":1,"item":{"@id":"/directory/","name":"Directory"}},{"@type":"ListItem","position":2,"item":{"@id":"/magic-transit/","name":"Magic Transit"}},{"@type":"ListItem","position":3,"item":{"@id":"/magic-transit/ddos/","name":"DDoS protection"}}]}
```
---
---
title: Analytics
description: Use Magic Transit analytics to monitor network performance and troubleshoot potential issues.
image: https://developers.cloudflare.com/core-services-preview.png
---
[Skip to content](#%5Ftop)
Was this helpful?
YesNo
[ Edit page ](https://github.com/cloudflare/cloudflare-docs/edit/production/src/content/docs/magic-transit/analytics/index.mdx) [ Report issue ](https://github.com/cloudflare/cloudflare-docs/issues/new/choose)
Copy page
# Analytics
Use these options to gather information at the start of your troubleshooting workflow. Then, use more detailed network data collection and analysis to identify the root cause.
* Analyze network traffic over time in [Network Analytics](#network-analytics)
* Perform more detailed troubleshooting with:
* [Traceroutes](#traceroutes)
* [Packet captures](#packet-captures)
## Network Analytics
Network Analytics provides detailed analytics on your Magic Transit traffic over time. You can filter data by traffic characteristics and review traffic trends over time.
For details, refer to [Magic Transit Network Analytics](https://developers.cloudflare.com/magic-transit/analytics/network-analytics/).
## Traceroutes
Traceroutes provide a hop-by-hop breakdown of the Internet path network traffic follows from Cloudflare's network to your network.
For details, refer to [Traceroutes](https://developers.cloudflare.com/magic-transit/analytics/traceroutes/).
## Packet captures
Packet captures allow you to analyze the raw packet data your network sends to and receives from Cloudflare's network.
For details, refer to [packet captures](https://developers.cloudflare.com/cloudflare-network-firewall/packet-captures/).
## Query analytics with GraphQL
GraphQL Analytics provides a GraphQL API to query raw JSON data for your Magic Transit traffic analytics. You can ingest this data into a Security Information and Event Management (SIEM) tool or another platform for further analysis.
* [Querying Magic Transit tunnel bandwidth analytics with GraphQL](https://developers.cloudflare.com/magic-transit/analytics/query-bandwidth/)
* [Querying Magic Transit tunnel health check results with GraphQL](https://developers.cloudflare.com/magic-transit/analytics/query-tunnel-health/)
```json
{"@context":"https://schema.org","@type":"BreadcrumbList","itemListElement":[{"@type":"ListItem","position":1,"item":{"@id":"/directory/","name":"Directory"}},{"@type":"ListItem","position":2,"item":{"@id":"/magic-transit/","name":"Magic Transit"}},{"@type":"ListItem","position":3,"item":{"@id":"/magic-transit/analytics/","name":"Analytics"}}]}
```
---
---
title: Network Analytics
description: Network Analytics provides real-time insights into Magic Transit traffic that enters and leaves Cloudflare's network through GRE or IPsec tunnels.
image: https://developers.cloudflare.com/core-services-preview.png
---
[Skip to content](#%5Ftop)
Was this helpful?
YesNo
[ Edit page ](https://github.com/cloudflare/cloudflare-docs/edit/production/src/content/docs/magic-transit/analytics/network-analytics.mdx) [ Report issue ](https://github.com/cloudflare/cloudflare-docs/issues/new/choose)
Copy page
# Network Analytics
[Network Analytics](https://developers.cloudflare.com/analytics/network-analytics/) provides real-time insights into Magic Transit traffic that enters and leaves Cloudflare's network through GRE or IPsec tunnels.
Data is aggregated into time intervals that vary based on the selected zoom level. For example, a daily view shows 24-hour averages, which can flatten short-term traffic spikes. As a result, longer time intervals display lower peak bandwidth values compared to more granular views like five-minute intervals.
For details, refer to the [Network Analytics](https://developers.cloudflare.com/analytics/network-analytics/) documentation.
## Network traffic data filters
With Magic Transit, you can account for traffic flows that enter Cloudflare's network, are blocked by DDoS rules or Cloudflare Network Firewall, and leave Cloudflare's network. This insight lets you track the total packets and bytes that traverse Cloudflare's network and are ultimately destined for your network. It also provides increased insight into traffic flows that are unaccounted for.
The complete list of filters includes:
* A list of your top tunnels by traffic volume.
* Traffic source and destination by traffic type, on-ramps and off-ramps, IP addresses, and ports.
* Destination IP ranges and ASNs.
* Protocols and packet sizes.
* Samples of all GRE or IPsec tunnel traffic entering or leaving Cloudflare's network.
* Mitigations applied (such as DDoS and Cloudflare Network Firewall) to traffic entering Cloudflare's network.
For instructions, refer to [Access tunnel traffic analytics](#access-tunnel-traffic-analytics).
## Access tunnel traffic analytics
1. Go to the **Network Analytics** page.
[ Go to **Network analytics** ](https://dash.cloudflare.com/?to=/:account/networking-insights/analytics/network-analytics/transport-analytics)
1. In the **All Traffic** tab, scroll to **Top Insights** to access network traffic filters. By default, the dashboard displays five items, but you can display up to 25 items at once. To change the number of items, select the drop-down menu.
2. (Optional) Hover over a traffic type. You can then filter for that traffic or exclude it from the results.
3. To adjust the scope of information, scroll to **All traffic** \> **Add filter**.
4. In the **New filter** popover, select the data type from the left drop-down menu, an operator from the middle drop-down menu, and an action from the right drop-down menu. For example:
```
| _equals_ |
```
This lets you examine traffic from specific Source tunnels and/or Destination tunnels.
## Feature notes
* For Magic Transit, `Non-Tunnel traffic` often represents traffic from the public Internet or traffic via [CNIs](https://developers.cloudflare.com/network-interconnect/).
The label `Non-Tunnel traffic` is a placeholder, and Cloudflare will apply more specific labels to this category of traffic in the future.
```json
{"@context":"https://schema.org","@type":"BreadcrumbList","itemListElement":[{"@type":"ListItem","position":1,"item":{"@id":"/directory/","name":"Directory"}},{"@type":"ListItem","position":2,"item":{"@id":"/magic-transit/","name":"Magic Transit"}},{"@type":"ListItem","position":3,"item":{"@id":"/magic-transit/analytics/","name":"Analytics"}},{"@type":"ListItem","position":4,"item":{"@id":"/magic-transit/analytics/network-analytics/","name":"Network Analytics"}}]}
```
---
---
title: Packet captures
image: https://developers.cloudflare.com/core-services-preview.png
---
[Skip to content](#%5Ftop)
Was this helpful?
YesNo
[ Edit page ](https://github.com/cloudflare/cloudflare-docs/edit/production/src/content/docs/magic-transit/analytics/packet-captures.mdx) [ Report issue ](https://github.com/cloudflare/cloudflare-docs/issues/new/choose)
Copy page
# Packet captures
```json
{"@context":"https://schema.org","@type":"BreadcrumbList","itemListElement":[{"@type":"ListItem","position":1,"item":{"@id":"/directory/","name":"Directory"}},{"@type":"ListItem","position":2,"item":{"@id":"/magic-transit/","name":"Magic Transit"}},{"@type":"ListItem","position":3,"item":{"@id":"/magic-transit/analytics/","name":"Analytics"}},{"@type":"ListItem","position":4,"item":{"@id":"/magic-transit/analytics/packet-captures/","name":"Packet captures"}}]}
```
---
---
title: Query Magic Transit tunnel bandwidth analytics with GraphQL
description: This example uses the GraphQL Analytics API to query Magic Transit ingress tunnel traffic over a specified time period.
image: https://developers.cloudflare.com/core-services-preview.png
---
[Skip to content](#%5Ftop)
Was this helpful?
YesNo
[ Edit page ](https://github.com/cloudflare/cloudflare-docs/edit/production/src/content/docs/magic-transit/analytics/query-bandwidth.mdx) [ Report issue ](https://github.com/cloudflare/cloudflare-docs/issues/new/choose)
Copy page
# Query Magic Transit tunnel bandwidth analytics with GraphQL
This example uses the GraphQL Analytics API to query Magic Transit ingress tunnel traffic over a specified time period.
The following API call requests Magic Transit ingress tunnel traffic over a one-hour period and outputs the requested fields. Replace `` with your account ID, ``, ``[1](#user-content-fn-1) (legacy), or ``[2](#user-content-fn-2) (preferred) with your API credentials, and adjust the `datetime_geq` and `datetime_leq` values as needed.
The example queries for ingress traffic. To query for egress traffic, change the value in the `direction` filter.
## API Call
Terminal window
```
PAYLOAD='{ "query":
"query GetTunnelHealthCheckResults($accountTag: string, $datetimeStart: string, $datetimeEnd: string) {
viewer {
accounts(filter: {accountTag: $accountTag}) {
magicTransitTunnelTrafficAdaptiveGroups(
limit: 100,
filter: {
datetime_geq: $datetimeStart,
datetime_lt: $datetimeEnd,
direction: $direction
}
) {
avg {
bitRateFiveMinutes
}
dimensions {
tunnelName
datetimeFiveMinutes
}
}
}
}
}",
"variables": {
"accountTag": "",
"direction": "ingress",
"datetimeStart": "2022-05-04T11:00:00.000Z",
"datetimeEnd": "2022-05-04T12:00:00.000Z"
}
}
}'
# curl with Legacy API Key
curl https://api.cloudflare.com/client/v4/graphql \
--header "X-Auth-Email: " \
--header "X-Auth-Key: " \
--header "Accept: application/json" \
--header "Content-Type: application/json" \
--data "$(echo $PAYLOAD)"
# curl with API Token
curl https://api.cloudflare.com/client/v4/graphql \
--header "Authorization: Bearer " \
--header "Accept: application/json" \
--header "Content-Type: application/json" \
--data "$(echo $PAYLOAD)"
```
The returned values represent the total bandwidth in bits per second during the five-minute interval for a particular tunnel. To use aggregations other than five minutes, use the same time window for both your metric and datetime. For example, to analyze hourly groups, use `bitRateHour` and `datetimeHour`.
The result is in JSON (as requested), so piping the output to `jq` formats it for easier parsing, as in the following example:
Terminal window
```
curl https://api.cloudflare.com/client/v4/graphql \
--header "Authorization: Bearer " \
--header "Accept: application/json" \
--header "Content-Type: application/json" \
--data "$(echo $PAYLOAD)" | jq .
## Example response:
#=> {
#=> "data": {
#=> "viewer": {
#=> "accounts": [
#=> {
#=> "magicTransitTunnelTrafficAdaptiveGroups": [
#=> {
#=> avg: { bitRateFiveMinutes: 327680 },
#=> dimensions: {
#=> datetimeFiveMinute: '2021-05-12T22:00-00:00',
#=> tunnelName: 'tunnel_name'
#=> }
#=> },
#=> {
#=> avg: { bitRateFiveMinutes: 627213680 },
#=> dimensions: {
#=> datetimeFiveMinute: '2021-05-12T22:05-00:00',
#=> tunnelName: 'another_tunnel'
#=> }
#=> }
#=> ]
#=> }
#=> ]
#=> }
#=> },
#=> "errors": null
#=> }
```
## Footnotes
1. For details, refer to [Authenticate with a Cloudflare API key](https://developers.cloudflare.com/analytics/graphql-api/getting-started/authentication/api-key-auth/). [↩](#user-content-fnref-1)
2. For details, refer to [Configure an Analytics API token](https://developers.cloudflare.com/analytics/graphql-api/getting-started/authentication/api-token-auth/). [↩](#user-content-fnref-2)
```json
{"@context":"https://schema.org","@type":"BreadcrumbList","itemListElement":[{"@type":"ListItem","position":1,"item":{"@id":"/directory/","name":"Directory"}},{"@type":"ListItem","position":2,"item":{"@id":"/magic-transit/","name":"Magic Transit"}},{"@type":"ListItem","position":3,"item":{"@id":"/magic-transit/analytics/","name":"Analytics"}},{"@type":"ListItem","position":4,"item":{"@id":"/magic-transit/analytics/query-bandwidth/","name":"Query Magic Transit tunnel bandwidth analytics with GraphQL"}}]}
```
---
---
title: Query Magic Transit tunnel health check results with GraphQL
description: This example uses the GraphQL Analytics API to query Magic Transit tunnel health check results. These results are aggregated from individual health checks that Cloudflare servers perform against the tunnels you configured in your account. You can query up to one week of data for dates up to three months in the past.
image: https://developers.cloudflare.com/core-services-preview.png
---
[Skip to content](#%5Ftop)
Was this helpful?
YesNo
[ Edit page ](https://github.com/cloudflare/cloudflare-docs/edit/production/src/content/docs/magic-transit/analytics/query-tunnel-health.mdx) [ Report issue ](https://github.com/cloudflare/cloudflare-docs/issues/new/choose)
Copy page
# Query Magic Transit tunnel health check results with GraphQL
This example uses the GraphQL Analytics API to query Magic Transit tunnel health check results. These results are aggregated from individual health checks that Cloudflare servers perform against the tunnels you configured in your account. You can query up to one week of data for dates up to three months in the past.
The following API call requests tunnel health checks for a specific account over a one-day period for a specific Cloudflare data center and outputs the requested fields. Replace `` and ``[1](#user-content-fn-1) with your API credentials, and adjust the `datetimeStart` and `datetimeEnd` variables as needed.
The API call returns tunnel health check results by Cloudflare data center. Cloudflare aggregates each data center's result from health checks conducted on individual servers. The `tunnelState` field represents the state of the tunnel. Magic Transit uses these states for routing. A `tunnelState` value of `0` represents a down tunnel, `0.5` represents a degraded tunnel, and `1` represents a healthy tunnel.
## API Call
Terminal window
```
echo '{ "query":
"query GetTunnelHealthCheckResults($accountTag: string, $datetimeStart: string, $datetimeEnd: string) {
viewer {
accounts(filter: {accountTag: $accountTag}) {
magicTransitTunnelHealthChecksAdaptiveGroups(
limit: 100,
filter: {
datetime_geq: $datetimeStart,
datetime_lt: $datetimeEnd,
}
) {
avg {
tunnelState
}
dimensions {
tunnelName
edgeColoName
}
}
}
}
}",
"variables": {
"accountTag": "",
"datetimeStart": "2022-08-04T00:00:00.000Z",
"datetimeEnd": "2022-08-04T01:00:00.000Z"
}
}' | tr -d '\n' | curl --silent \
https://api.cloudflare.com/client/v4/graphql \
--header "Authorization: Bearer " \
--header "Accept: application/json" \
--header "Content-Type: application/json" \
--data @-
```
The results are returned in JSON (as requested), so piping the output to `jq` formats them for easier parsing, as in the following example:
Terminal window
```
... | curl --silent \
https://api.cloudflare.com/client/v4/graphql \
--header "Authorization: Bearer " \
--header "Accept: application/json" \
--header "Content-Type: application/json" \
--data @- | jq .
## Example response:
#=> {
#=> "data": {
#=> "viewer": {
#=> "accounts": [
#=> {
#=> "conduitEdgeTunnelHealthChecks": [
#=> {
#=> {
#=> "avg": {
#=> "tunnelState": 1
#=> },
#=> "dimensions": {
#=> "edgeColoName": "mel01",
#=> "tunnelName": "tunnel_01",
#=> "tunnelState": 0.5
#=> }
#=> },
#=> {
#=> "avg": {
#=> "tunnelState": 0.5
#=> },
#=> "count": 310,
#=> "dimensions": {
#=> "edgeColoName": "mel01",
#=> "tunnelName": "tunnel_02",
#=> "tunnelState": 0.5
#=> }
#=> }
#=> ]
#=> }
#=> ]
#=> }
#=> },
#=> "errors": null
#=> }
```
## Footnotes
1. For details, refer to [Configure an Analytics API token](https://developers.cloudflare.com/analytics/graphql-api/getting-started/authentication/api-token-auth/). [↩](#user-content-fnref-1)
```json
{"@context":"https://schema.org","@type":"BreadcrumbList","itemListElement":[{"@type":"ListItem","position":1,"item":{"@id":"/directory/","name":"Directory"}},{"@type":"ListItem","position":2,"item":{"@id":"/magic-transit/","name":"Magic Transit"}},{"@type":"ListItem","position":3,"item":{"@id":"/magic-transit/analytics/","name":"Analytics"}},{"@type":"ListItem","position":4,"item":{"@id":"/magic-transit/analytics/query-tunnel-health/","name":"Query Magic Transit tunnel health check results with GraphQL"}}]}
```
---
---
title: Traceroutes
description: You can run traceroutes to analyze the hop-by-hop Internet path and latency between Cloudflare's network and your network.
image: https://developers.cloudflare.com/core-services-preview.png
---
[Skip to content](#%5Ftop)
Was this helpful?
YesNo
[ Edit page ](https://github.com/cloudflare/cloudflare-docs/edit/production/src/content/docs/magic-transit/analytics/traceroutes.mdx) [ Report issue ](https://github.com/cloudflare/cloudflare-docs/issues/new/choose)
Copy page
# Traceroutes
You can run traceroutes to analyze the hop-by-hop Internet path and latency between Cloudflare's network and your network.
To run a traceroute from a specific Cloudflare data center to your network:
1. Go to the **Network health** page.
[ Go to **Network health** ](https://dash.cloudflare.com/?to=/:account/networking-insights/health)
1. Select **Connector health**.
2. Select the tunnel for the traceroute.
3. Select the three dots > **Traceroute details**.
You can access detailed data from the traceroute, including:
* Time to live (TTL) and host
* Autonomous system (AS) number
* [Packets ↗](https://www.cloudflare.com/learning/network-layer/what-is-a-packet/) sent in the traceroute
* Average, minimum, and maximum latency
* Standard deviation of latency
```json
{"@context":"https://schema.org","@type":"BreadcrumbList","itemListElement":[{"@type":"ListItem","position":1,"item":{"@id":"/directory/","name":"Directory"}},{"@type":"ListItem","position":2,"item":{"@id":"/magic-transit/","name":"Magic Transit"}},{"@type":"ListItem","position":3,"item":{"@id":"/magic-transit/analytics/","name":"Analytics"}},{"@type":"ListItem","position":4,"item":{"@id":"/magic-transit/analytics/traceroutes/","name":"Traceroutes"}}]}
```
---
---
title: Network Flow
description: Magic Transit On Demand allows you to keep Magic Transit disabled during normal operations and activate it only when you need DDoS protection. Network Flow monitors your traffic while Magic Transit is off and detects attacks. When an attack is detected, you can enable Magic Transit automatically or manually.
image: https://developers.cloudflare.com/core-services-preview.png
---
[Skip to content](#%5Ftop)
Was this helpful?
YesNo
[ Edit page ](https://github.com/cloudflare/cloudflare-docs/edit/production/src/content/docs/magic-transit/network-flow.mdx) [ Report issue ](https://github.com/cloudflare/cloudflare-docs/issues/new/choose)
Copy page
# Network Flow
[Magic Transit On Demand](https://developers.cloudflare.com/magic-transit/on-demand/) allows you to keep Magic Transit disabled during normal operations and activate it only when you need DDoS protection. Network Flow monitors your traffic while Magic Transit is off and detects attacks. When an attack is detected, you can enable Magic Transit automatically or manually.
You can create Network Flow rules that monitor specific IP prefixes for DDoS attacks. When an attack is detected, Cloudflare notifies you by email, [webhook](https://developers.cloudflare.com/notifications/get-started/configure-webhooks/), or [PagerDuty](https://developers.cloudflare.com/notifications/get-started/configure-pagerduty/).
If you enable [auto-advertisement](#activate-ip-auto-advertisement) on a rule, Magic Transit activates automatically to protect the targeted prefixes. You can enable auto-advertisement for individual Network Flow rules through the dashboard or API.
After Magic Transit activates and your traffic flows through Cloudflare, Cloudflare blocks malicious DDoS traffic. Your origin servers receive only clean traffic through IPsec or GRE tunnels.
The following diagrams illustrate this process:
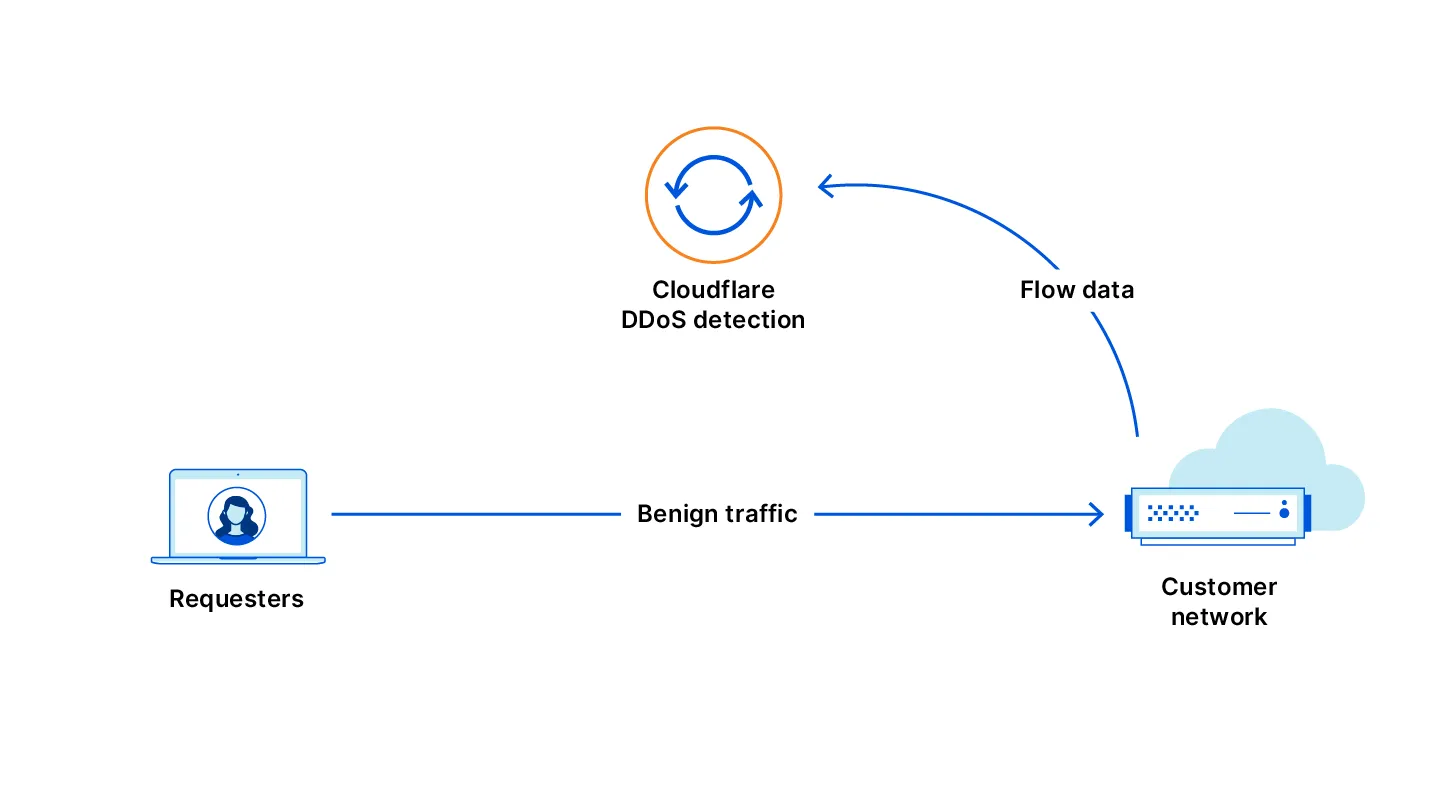
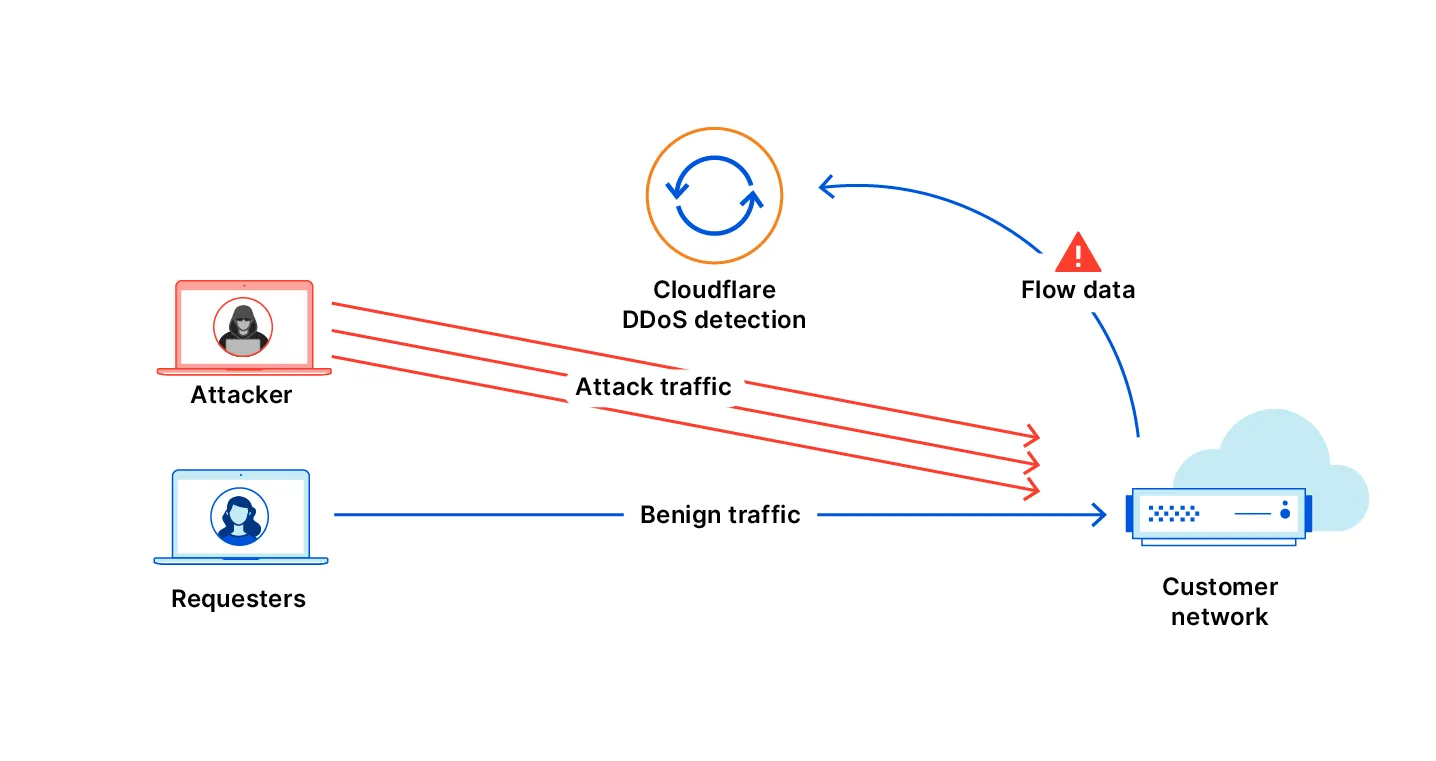
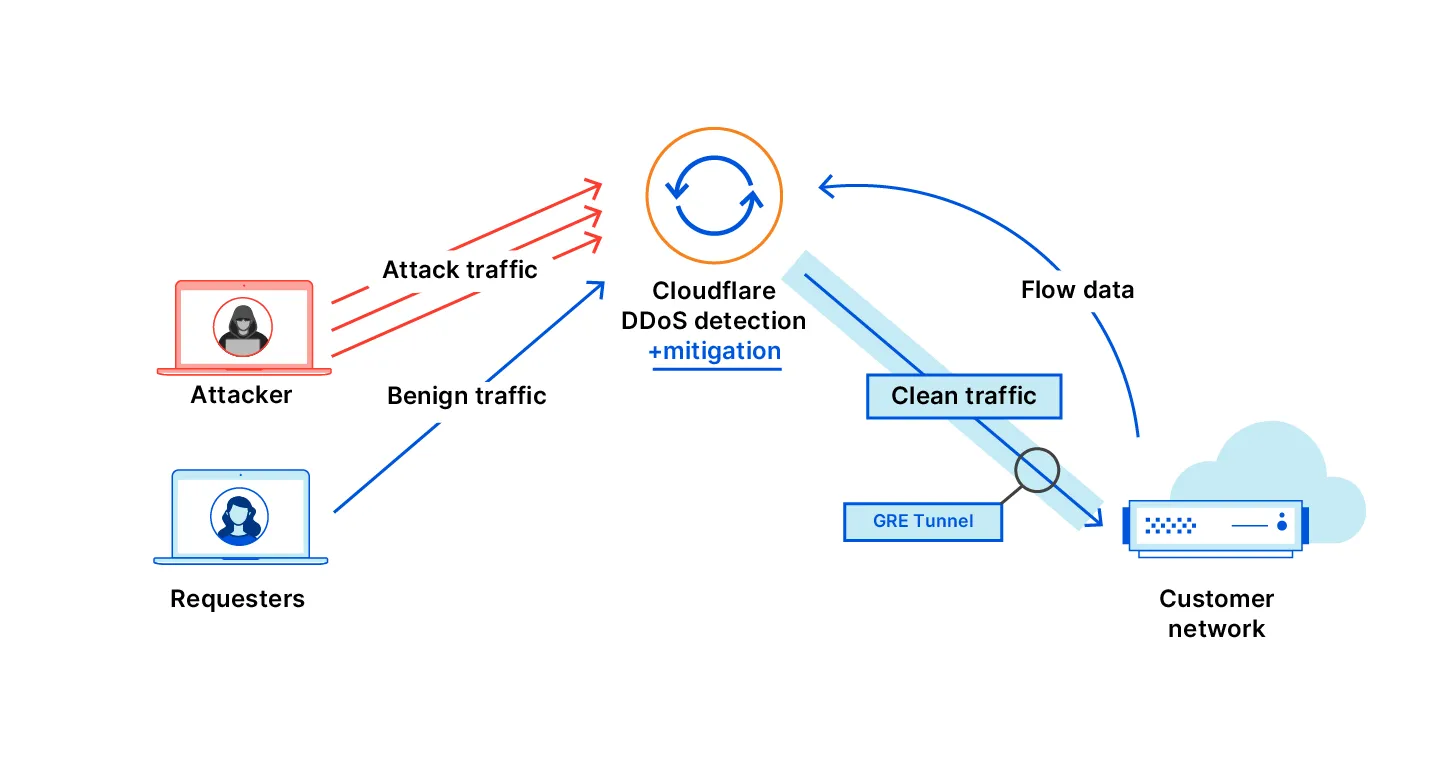
## Activate IP auto-advertisement
Before a rule can automatically activate Magic Transit, you must enable IP advertisement for the relevant prefixes. You can do this through the dashboard or the API.
### Dashboard
To activate IP advertisement through the Cloudflare dashboard, refer to [Configure dynamic advertisement](https://developers.cloudflare.com/byoip/concepts/dynamic-advertisement/best-practices/#configure-dynamic-advertisement).
### API
To activate IP advertisement through the API, refer to the [IP Address Management Dynamic Advertisement API](https://developers.cloudflare.com/api/resources/addressing/subresources/prefixes/subresources/advertisement%5Fstatus/methods/edit/).
## Network Flow rules
To create Network Flow rules with auto-advertisement, refer to [Rule Auto-Advertisement](https://developers.cloudflare.com/network-flow/rules/#rule-auto-advertisement).
```json
{"@context":"https://schema.org","@type":"BreadcrumbList","itemListElement":[{"@type":"ListItem","position":1,"item":{"@id":"/directory/","name":"Directory"}},{"@type":"ListItem","position":2,"item":{"@id":"/magic-transit/","name":"Magic Transit"}},{"@type":"ListItem","position":3,"item":{"@id":"/magic-transit/network-flow/","name":"Network Flow"}}]}
```
---
---
title: Cloudflare IPs
description: To use Magic Transit, you need to own a publicly routable IP address block with a minimum size of /24. If you do not own a /24 address block, you can use Magic Transit with a Cloudflare-owned IP address. This option is helpful if you do not meet the /24 prefix length requirements or want to protect a smaller network.
image: https://developers.cloudflare.com/core-services-preview.png
---
[Skip to content](#%5Ftop)
Was this helpful?
YesNo
[ Edit page ](https://github.com/cloudflare/cloudflare-docs/edit/production/src/content/docs/magic-transit/cloudflare-ips.mdx) [ Report issue ](https://github.com/cloudflare/cloudflare-docs/issues/new/choose)
Copy page
# Cloudflare IPs
To use Magic Transit, you need to own a publicly routable IP address block with a minimum size of `/24`. If you do not own a `/24` address block, you can use Magic Transit with a Cloudflare-owned IP address. This option is helpful if you do not meet the `/24` prefix length requirements or want to protect a smaller network.
To protect your network with a Cloudflare IP address, contact your account manager. After you receive your IP address:
* [Create a tunnel](https://developers.cloudflare.com/magic-transit/how-to/configure-tunnel-endpoints/).
* [Set up static routes](https://developers.cloudflare.com/magic-transit/how-to/configure-routes/#configure-static-routes) or [BGP peering (beta)](https://developers.cloudflare.com/magic-transit/how-to/configure-routes/#configure-bgp-routes).
* [Configure health checks](https://developers.cloudflare.com/magic-transit/network-health/run-endpoint-health-checks/).
* Confirm you properly configured [tunnel](https://developers.cloudflare.com/magic-transit/network-health/update-tunnel-health-checks-frequency/) and endpoint health checks.
* Update your infrastructure at your own pace to use the allocated Cloudflare IPs.
When you use a Cloudflare-owned IP space, you do not need a Letter of Agency (LOA). When using Cloudflare-leased IPs, Cloudflare automatically enables [Magic Transit Egress](https://developers.cloudflare.com/magic-transit/reference/egress/), which routes your egress traffic to Cloudflare instead of the Internet. Set up policy-based routing on your end to ensure return traffic routes properly.
## Check your Cloudflare IPs
You can find your leased Anycast IPs for Magic Transit on the dashboard under [**Address space** \> **Leased IPs** ↗](https://dash.cloudflare.com/?to=/:account/ip-addresses/address-space).
```json
{"@context":"https://schema.org","@type":"BreadcrumbList","itemListElement":[{"@type":"ListItem","position":1,"item":{"@id":"/directory/","name":"Directory"}},{"@type":"ListItem","position":2,"item":{"@id":"/magic-transit/","name":"Magic Transit"}},{"@type":"ListItem","position":3,"item":{"@id":"/magic-transit/cloudflare-ips/","name":"Cloudflare IPs"}}]}
```
---
---
title: Magic Transit on-demand
description: If you have access to the Magic Transit on-demand option, you can configure prefix advertisement from the IP Prefixes page in your Cloudflare account home or through the Cloudflare API.
image: https://developers.cloudflare.com/core-services-preview.png
---
[Skip to content](#%5Ftop)
Was this helpful?
YesNo
[ Edit page ](https://github.com/cloudflare/cloudflare-docs/edit/production/src/content/docs/magic-transit/on-demand.mdx) [ Report issue ](https://github.com/cloudflare/cloudflare-docs/issues/new/choose)
Copy page
# Magic Transit on-demand
If you have access to the Magic Transit on-demand option, you can [configure prefix advertisement](https://developers.cloudflare.com/byoip/concepts/dynamic-advertisement/best-practices/#configure-dynamic-advertisement) from the **IP Prefixes** page in your Cloudflare account home or through the [Cloudflare API](https://developers.cloudflare.com/api/resources/addressing/subresources/prefixes/subresources/advertisement%5Fstatus/methods/edit/).
A common workflow is to enable prefix advertisement during an attack so that you can take advantage of Cloudflare protection and then disable advertisement once the incident is resolved. Dynamic advertisement (through the dashboard or API) does not support prefixes using BGP-controlled advertisements. Specify your preferred on-demand advertisement method during prefix onboarding.
To ensure smooth operation and simplify the advertisement process during an attack scenario, refer to [Dynamic advertisement: Best practices](https://developers.cloudflare.com/byoip/concepts/dynamic-advertisement/best-practices/).
Note
You cannot use Magic Transit on-demand with Cloudflare leased IPs.
```json
{"@context":"https://schema.org","@type":"BreadcrumbList","itemListElement":[{"@type":"ListItem","position":1,"item":{"@id":"/directory/","name":"Directory"}},{"@type":"ListItem","position":2,"item":{"@id":"/magic-transit/","name":"Magic Transit"}},{"@type":"ListItem","position":3,"item":{"@id":"/magic-transit/on-demand/","name":"Magic Transit on-demand"}}]}
```
---
---
title: Network Interconnect (CNI)
description: Cloudflare Network Interconnect (CNI) provides a private, dedicated connection between your network and Cloudflare — bypassing the public Internet entirely. This is useful when you need consistent latency, higher throughput, or an additional layer of security that public Internet paths cannot guarantee.
image: https://developers.cloudflare.com/core-services-preview.png
---
[Skip to content](#%5Ftop)
Was this helpful?
YesNo
[ Edit page ](https://github.com/cloudflare/cloudflare-docs/edit/production/src/content/docs/magic-transit/network-interconnect.mdx) [ Report issue ](https://github.com/cloudflare/cloudflare-docs/issues/new/choose)
Copy page
# Network Interconnect (CNI)
Cloudflare Network Interconnect (CNI) provides a private, dedicated connection between your network and Cloudflare — bypassing the public Internet entirely. This is useful when you need consistent latency, higher throughput, or an additional layer of security that public Internet paths cannot guarantee.
With CNI, you get the same Cloudflare network services (firewall, routing, traffic management) applied to your traffic, but over a connection that does not traverse shared Internet infrastructure.
For more information about Network Interconnect, refer to the [Cloudflare Network Interconnect documentation](https://developers.cloudflare.com/network-interconnect/).
```json
{"@context":"https://schema.org","@type":"BreadcrumbList","itemListElement":[{"@type":"ListItem","position":1,"item":{"@id":"/directory/","name":"Directory"}},{"@type":"ListItem","position":2,"item":{"@id":"/magic-transit/","name":"Magic Transit"}},{"@type":"ListItem","position":3,"item":{"@id":"/magic-transit/network-interconnect/","name":"Network Interconnect (CNI)"}}]}
```
---
---
title: Alerts
description: You can configure alerts to receive notifications for changes in your network.
image: https://developers.cloudflare.com/core-services-preview.png
---
[Skip to content](#%5Ftop)
Was this helpful?
YesNo
[ Edit page ](https://github.com/cloudflare/cloudflare-docs/edit/production/src/content/docs/magic-transit/alerts.mdx) [ Report issue ](https://github.com/cloudflare/cloudflare-docs/issues/new/choose)
Copy page
# Alerts
You can configure alerts to receive notifications for changes in your network.
Network Flow - Auto Advertisement
**Who is it for?**
[Magic Transit on-demand](https://developers.cloudflare.com/magic-transit/on-demand/) customers who use Flow-Based Monitoring and want alerts when Magic Transit is automatically enabled.
**Other options / filters**
None.
**Included with**
Purchase of Magic Transit.
**What should you do if you receive one?**
No action is needed. You can go to the [Cloudflare dashboard](https://dash.cloudflare.com/?to=/:account/magic-transit) to review the health and status of your tunnels.
Network Flow - DDoS Attack
**Who is it for?**
[BYOIP](https://developers.cloudflare.com/byoip/) and [Spectrum](https://developers.cloudflare.com/spectrum/) customers with [Network Analytics](https://developers.cloudflare.com/analytics/network-analytics/) who want to receive a notification when Cloudflare has mitigated attacks that generate an average of at least 12,000 packets per second over a five-second period, with a duration of one minute or more.
**Other options / filters**
None.
**Included with**
Purchase of Magic Transit and/or BYOIP.
**What should you do if you receive one?**
No action needed. Refer to [DDoS alerts](https://developers.cloudflare.com/ddos-protection/reference/alerts/) for more information.
Network Flow - Volumetric Attack
**Who is it for?**
[Magic Transit on-demand](https://developers.cloudflare.com/magic-transit/on-demand/) customers who are using Flow-Based Monitoring to detect attacks when Magic Transit is disabled.
**Other options / filters**
None.
**Included with**
Purchase of Magic Transit.
**What should you do if you receive one?**
If you do not have auto advertisement enabled, you need to advertise your IP prefixes to enable Magic Transit. For more information, refer to [Dynamic advertisement](https://developers.cloudflare.com/byoip/concepts/dynamic-advertisement/).
Magic Tunnel Health Check Alert
**Who is it for?**
Magic Transit and Cloudflare WAN customers who wish to receive alerts when the percentage of tunnel states meeting the selected service-level objective (SLO) drops below the defined threshold for a Magic Tunnel.
**Other options / filters**
* Notification Name: A custom name for the notification.
* Description (optional): A custom description for the notification.
* Notification Email (can be multiple emails): The email address of recipient for the notification.
* Webhooks
* Tunnels: Choose one or more tunnels to monitor.
* SLO: Define SLO threshold for Magic Tunnel health alerts. Available options are _High_, _Medium_, and _Low_.
**Included with**
Purchase of Magic Transit and Cloudflare WAN.
**What should you do if you receive one?**
Refer to the [Magic Transit tunnel health](https://developers.cloudflare.com/magic-transit/network-health/check-tunnel-health-dashboard/) or [Cloudflare WAN IPsec/GRE tunnel health](https://developers.cloudflare.com/cloudflare-wan/configuration/common-settings/check-tunnel-health-dashboard/) for more information on what the issue might be.
Refer to [Cloudflare Notifications](https://developers.cloudflare.com/notifications/get-started/) for more information on how to set up an alert.
```json
{"@context":"https://schema.org","@type":"BreadcrumbList","itemListElement":[{"@type":"ListItem","position":1,"item":{"@id":"/directory/","name":"Directory"}},{"@type":"ListItem","position":2,"item":{"@id":"/magic-transit/","name":"Magic Transit"}},{"@type":"ListItem","position":3,"item":{"@id":"/magic-transit/alerts/","name":"Alerts"}}]}
```
---
---
title: Changelog
description: Review recent changes to Magic Transit.
image: https://developers.cloudflare.com/core-services-preview.png
---
[Skip to content](#%5Ftop)
Was this helpful?
YesNo
[ Edit page ](https://github.com/cloudflare/cloudflare-docs/edit/production/src/content/docs/magic-transit/changelog.mdx) [ Report issue ](https://github.com/cloudflare/cloudflare-docs/issues/new/choose)
Copy page
# Changelog
[ Subscribe to RSS ](https://developers.cloudflare.com/changelog/rss/magic-transit.xml)
## 2026-01-30
**BGP over GRE and IPsec tunnels**
Magic WAN and Magic Transit customers can use the Cloudflare dashboard to configure and manage BGP peering between their networks and their Magic routing table when using IPsec and GRE tunnel on-ramps (beta).
Using BGP peering allows customers to:
* Automate the process of adding or removing networks and subnets.
* Take advantage of failure detection and session recovery features.
With this functionality, customers can:
* Establish an eBGP session between their devices and the Magic WAN / Magic Transit service when connected via IPsec and GRE tunnel on-ramps.
* Secure the session by MD5 authentication to prevent misconfigurations.
* Exchange routes dynamically between their devices and their Magic routing table.
For configuration details, refer to:
* [Configure BGP routes for Magic WAN](https://developers.cloudflare.com/cloudflare-wan/configuration/manually/how-to/configure-routes/#configure-bgp-routes)
* [Configure BGP routes for Magic Transit](https://developers.cloudflare.com/magic-transit/how-to/configure-routes/#configure-bgp-routes)
## 2026-01-15
**Network Services navigation update**
The Network Services menu structure in Cloudflare's dashboard has been updated to reflect solutions and capabilities instead of product names. This will make it easier for you to find what you need and better reflects how our services work together.
Your existing configurations will remain the same, and you will have access to all of the same features and functionality.
The changes visible in your dashboard may vary based on the products you use. Overall, changes relate to [Magic Transit ↗](https://developers.cloudflare.com/magic-transit/), [Magic WAN ↗](https://developers.cloudflare.com/magic-wan/), and [Magic Firewall ↗](https://developers.cloudflare.com/cloudflare-network-firewall/).
**Summary of changes:**
* A new **Overview** page provides access to the most common tasks across Magic Transit and Magic WAN.
* Product names have been removed from top-level navigation.
* Magic Transit and Magic WAN configuration is now organized under **Routes** and **Connectors**. For example, you will find IP Prefixes under **Routes**, and your GRE/IPsec Tunnels under **Connectors.**
* Magic Firewall policies are now called **Firewall Policies.**
* Magic WAN Connectors and Connector On-Ramps are now referenced in the dashboard as **Appliances** and **Appliance profiles.** They can be found under **Connectors > Appliances.**
* Network analytics, network health, and real-time analytics are now available under **Insights.**
* Packet Captures are found under **Insights > Diagnostics.**
* You can manage your Sites from **Insights > Network health.**
* You can find Magic Network Monitoring under **Insights > Network flow**.
If you would like to provide feedback, complete [this form ↗](https://forms.gle/htWyjRsTjw1usdis5). You can also find these details in the January 7, 2026 email titled **\[FYI\] Upcoming Network Services Dashboard Navigation Update**.
## 2025-07-30
**Magic Transit and Magic WAN health check data is fully compatible with the CMB EU setting.**
Today, we are excited to announce that all Magic Transit and Magic WAN customers with CMB EU ([Customer Metadata Boundary - Europe](https://developers.cloudflare.com/data-localization/metadata-boundary/)) enabled in their account will be able to access GRE, IPsec, and CNI health check and traffic volume data in the Cloudflare dashboard and via API.
This ensures that all Magic Transit and Magic WAN customers with CMB EU enabled will be able to access all Magic Transit and Magic WAN features.
Specifically, these two GraphQL endpoints are now compatible with CMB EU:
* `magicTransitTunnelHealthChecksAdaptiveGroups`
* `magicTransitTunnelTrafficAdaptiveGroups`
## 2025-06-30
**Graceful withdrawal of BYOIP prefixes**
Magic Transit customers can now configure AS prepending on their BYOIP prefixes advertised at the Cloudflare edge. This allows for smoother traffic migration and minimizes packet loss when changing providers.
AS prepending makes the Cloudflare route less preferred by increasing the AS path length. You can use this to gradually shift traffic away from Cloudflare before withdrawing a prefix, avoiding abrupt routing changes.
Prepending can be configured via the API or through BGP community values when peering with the Magic Transit routing table. For more information, refer to [Advertise prefixes](https://developers.cloudflare.com/magic-transit/how-to/advertise-prefixes/).
## 2024-12-17
**Establish BGP peering over Direct CNI circuits**
Magic WAN and Magic Transit customers can use the Cloudflare dashboard to configure and manage BGP peering between their networks and their Magic routing table when using a Direct CNI on-ramp.
Using BGP peering allows customers to:
* Automate the process of adding or removing networks and subnets.
* Take advantage of failure detection and session recovery features.
With this functionality, customers can:
* Establish an eBGP session between their devices and the Magic WAN / Magic Transit service when connected via CNI.
* Secure the session by MD5 authentication to prevent misconfigurations.
* Exchange routes dynamically between their devices and their Magic routing table.
Refer to [Magic WAN BGP peering](https://developers.cloudflare.com/cloudflare-wan/configuration/manually/how-to/configure-routes/#configure-bgp-routes) or [Magic Transit BGP peering](https://developers.cloudflare.com/magic-transit/how-to/configure-routes/#configure-bgp-routes) to learn more about this feature and how to set it up.
## 2024-10-01
**Early access testing for BGP on CNI 2.0 circuits**
Customers can exchange routes dynamically with their Magic virtual network overlay through Direct CNI or Cloud CNI based connectivity.
```json
{"@context":"https://schema.org","@type":"BreadcrumbList","itemListElement":[{"@type":"ListItem","position":1,"item":{"@id":"/directory/","name":"Directory"}},{"@type":"ListItem","position":2,"item":{"@id":"/magic-transit/","name":"Magic Transit"}},{"@type":"ListItem","position":3,"item":{"@id":"/magic-transit/changelog/","name":"Changelog"}}]}
```
---
---
title: Glossary
description: Review the definitions for terms used across Cloudflare's Magic Transit documentation.
image: https://developers.cloudflare.com/core-services-preview.png
---
[Skip to content](#%5Ftop)
Was this helpful?
YesNo
[ Edit page ](https://github.com/cloudflare/cloudflare-docs/edit/production/src/content/docs/magic-transit/glossary.mdx) [ Report issue ](https://github.com/cloudflare/cloudflare-docs/issues/new/choose)
Copy page
# Glossary
Review the definitions for terms used across Cloudflare's Magic Transit documentation.
| Term | Definition |
| -------------------- | -------------------------------------------------------------------------------------------------------------------------------------------------------------------------------------------------------------------------------------------------------------------------------------------------------------------------------------------------------- |
| letter of agency | Sometimes referred to as a Letter of Authorization. A document that authorizes Cloudflare to advertise your prefixes. This is required so transit providers can accept the routes Cloudflare advertises on your behalf. |
| policy-based routing | Policy-based routing (PBR) is a technique used to make routing decisions based on policies set by your administrador. |
| prefix | A number that identifies the network portion of an IP address. It tells devices if an IP address is on the same network or not. It is shown as a number after a slash (for example, /31) at the end of the IP address. Using an analogy, the prefix is like a street address. If an IP is in the same street, it belongs to the same network of devices. |
```json
{"@context":"https://schema.org","@type":"BreadcrumbList","itemListElement":[{"@type":"ListItem","position":1,"item":{"@id":"/directory/","name":"Directory"}},{"@type":"ListItem","position":2,"item":{"@id":"/magic-transit/","name":"Magic Transit"}},{"@type":"ListItem","position":3,"item":{"@id":"/magic-transit/glossary/","name":"Glossary"}}]}
```
---
---
title: Advertise prefixes
description: You can bring your own public IP addresses to Cloudflare to use with Magic Transit. This is also known as bring your own IP (BYOIP). This process involves two distinct types of prefixes:
image: https://developers.cloudflare.com/core-services-preview.png
---
[Skip to content](#%5Ftop)
Was this helpful?
YesNo
[ Edit page ](https://github.com/cloudflare/cloudflare-docs/edit/production/src/content/docs/magic-transit/how-to/advertise-prefixes.mdx) [ Report issue ](https://github.com/cloudflare/cloudflare-docs/issues/new/choose)
Copy page
# Advertise prefixes
## Onboard prefixes
You can bring your own public IP addresses to Cloudflare to use with Magic Transit. This is also known as bring your own IP (BYOIP). This process involves two distinct types of prefixes:
1. **IP prefixes**: Each IP address block you bring to Cloudflare requires an IP prefix entry. The IP prefix includes the permission (Letter of Agency (LOA)) that allows Cloudflare to announce the network or its subnets. You can also define your optional [Autonomous System Number (ASN) ↗](https://www.cloudflare.com/learning/network-layer/what-is-an-autonomous-system/) to be included in our advertised AS path.
2. **BGP prefixes**: These control which prefixes Cloudflare announces from its global network. By default, each IP prefix has one matching BGP prefix. You can configure additional, more-specific BGP prefixes (subnets of the IP prefix), up to a maximum prefix length of `/24`.
### IP prefixes
Cloudflare measures the Magic Transit prefix count based on the number of BGP prefixes you define. Each prefix is billed separately, even if they overlap. For example, both a `/16` and any `/24` within it are counted individually. Onboarding a larger aggregate prefix does not automatically include its smaller subnets for announcement or billing purposes.
There is no billing limit on the accepted prefix sizes. However, only prefixes up to `/24` are accepted for onboarding because longer prefixes (like `/25`, `/26`) are not globally routable.
Provide all IP prefixes you plan to onboard, along with the ASNs from which you will advertise them. When specifying prefixes, observe these guidelines:
* Prefixes must include at least 256 IP addresses (`/24` in CIDR ([Classless Inter-Domain Routing ↗](https://www.cloudflare.com/learning/network-layer/what-is-routing/)) notation). If you do not meet the `/24` prefix length requirement, refer to [Use a Cloudflare IP](https://developers.cloudflare.com/magic-transit/cloudflare-ips/).
* Internet Routing Registry entries and LOA must match the prefixes and originating prefixes you submit to Cloudflare.
* When using contiguous prefixes, specify aggregate prefixes where possible.
* When using Route Origin Authorizations (ROAs) to sign routes for [resource public key infrastructure (RPKI) ↗](https://tools.ietf.org/html/rfc8210), the prefix and originating ASN must match the onboarding submission.
* If you do not own an ASN, you can use the Cloudflare Customer ASN (AS13335).
#### Cloudflare ASN vs. your own ASN
As part of your IP prefix onboarding process, you need to decide which ASN Cloudflare will use to announce your prefixes. If you supply your own ASN, Cloudflare prepends the main Cloudflare ASN (AS13335) to the BGP `AS_PATH`. For example, if your ASN is `AS64496`, anyone directly peering with Cloudflare sees the path as `13335 64496`.
If you do not have an ASN or do not want to bring your ASN to Cloudflare, you can use the Cloudflare Customer ASN (AS13335).
Note
For all future onboardings, you must use AS13335\. If you already use Cloudflare's AS209242, you do not need to make changes and can continue using that ASN.
### BGP prefixes
BGP prefixes represent the prefix that Cloudflare will announce through anycast from Cloudflare's global network. By default, there is always at least one BGP prefix that is identical to the onboarded IP prefix.
For example, if you onboard a `/20` IP prefix to Magic Transit, it can only be announced as a `/20` because there is only the default `/20` BGP prefix. Smaller sub-prefixes (such as `/24s`) within that `/20` cannot be announced individually unless they are configured as separate BGP prefixes.
### BGP prefix advertisement control methods
Cloudflare offers multiple mechanisms to control the announcement and withdrawal of on-demand prefixes. Each method serves different deployment scenarios:
* **Addressing API**: Manually control prefix advertisements through API calls. Refer to [Advertise or withdraw a BGP prefix](#advertise-or-withdraw-a-bgp-prefix).
* **BGP peering with route reflectors**: Control advertisements through BGP sessions to Cloudflare's globally distributed route reflectors, either over the Internet or over a CNI connection with Dataplane v1\. Contact your Cloudflare account team if you need this option. Refer to [BGP control with Cloudflare Route Reflectors](#bgp-control-with-cloudflare-route-reflectors).
* **Network Flow**: Automatically announce prefixes based on user-defined traffic thresholds observed in your network. Refer to [Network Flow](https://developers.cloudflare.com/network-flow/) (formerly Magic Network Monitoring).
* **BGP peering with Magic Transit Virtual Network routing table**: Automatically control prefix advertisements based on BGP routes learned through CNI with Dataplane v2, or GRE and IPsec tunnels (beta, requires [Unified Routing](https://developers.cloudflare.com/magic-transit/reference/traffic-steering/#unified-routing-mode-beta)). Refer to [BGP control to Magic Transit Virtual Network routing table](#bgp-control-to-magic-transit-virtual-network-routing-table).
Important
You should only use one control method per prefix at any given time. Mixing multiple control planes can lead to conflicting advertisement states, causing unpredictable routing behavior.
## Manage BGP prefixes
### Add a BGP prefix
Create a [POST request](https://developers.cloudflare.com/api/resources/addressing/subresources/prefixes/subresources/bgp%5Fprefixes/methods/create/) to add a BGP prefix. For example:
Create BGP Prefix
```
curl "https://api.cloudflare.com/client/v4/accounts/$ACCOUNT_ID/addressing/prefixes/$PREFIX_ID/bgp/prefixes" \
--request POST \
--header "X-Auth-Email: $CLOUDFLARE_EMAIL" \
--header "X-Auth-Key: $CLOUDFLARE_API_KEY" \
--json '{
"cidr": "192.0.2.0/24"
}'
```
### Advertise or withdraw a BGP prefix
* [ Dashboard ](#tab-panel-5395)
* [ API ](#tab-panel-5396)
Note
You can only advertise your prefix after running pre-flight checks with Cloudflare. If your prefix status is grayed out and shows a _Withdrawn_ status, Cloudflare locks your prefix. Contact your account team to close the pre-flight checks phase and unlock your prefixes.
Currently, only the default BGP prefix (that matches the IP prefix) can be controlled through the Cloudflare dashboard.
1. Go to the **Routes** page.
[ Go to **Routes** ](https://dash.cloudflare.com/?to=/:account/magic-networks/routes)
1. From the **IP prefixes** tab, select the prefix you want to modify > **Edit**.
2. From the **Status** drop-down menu, select _Advertised_ or _Withdrawn_.
3. (Optional) Edit the description for your prefix.
4. Select **Edit IP Prefix** to save your changes.
Any configured BGP prefix can be controlled through the API using a [PATCH request](https://developers.cloudflare.com/api/resources/addressing/subresources/prefixes/subresources/bgp%5Fprefixes/methods/edit/). For example:
Required API token permissions
At least one of the following [token permissions](https://developers.cloudflare.com/fundamentals/api/reference/permissions/)is required:
* `Magic Transit Write`
* `IP Prefixes: Write`
* `IP Prefixes: BGP On Demand Write`
Update BGP Prefix
```
curl "https://api.cloudflare.com/client/v4/accounts/$ACCOUNT_ID/addressing/prefixes/$PREFIX_ID/bgp/prefixes/$BGP_PREFIX_ID" \
--request PATCH \
--header "X-Auth-Email: $CLOUDFLARE_EMAIL" \
--header "X-Auth-Key: $CLOUDFLARE_API_KEY" \
--json '{
"on_demand": {
"advertised": true
}
}'
```
Warning: ISP route refresh delays may impact traffic
Announcing or withdrawing a prefix means Cloudflare will begin or stop advertising routes, impacting traffic flow to or from that IP range. Changes propagate across Cloudflare's global network almost instantly, typically taking effect within minutes. However, Cloudflare has no control over how quickly ISPs refresh their routes.
Refer to [Safely withdraw a BYOIP prefix](#safely-withdraw-a-byoip-prefix) for more information on how to prevent blackholing during prefix withdrawals.
### Delete an IP prefix
You can only delete a prefix with an _Unapproved_ status. To delete prefixes with a different status, contact your administrator or account manager.
1. Go to the **Routes** page.
[ Go to **Routes** ](https://dash.cloudflare.com/?to=/:account/magic-networks/routes)
1. From the **IP Prefixes** tab, locate the prefix you want to modify and select **Delete**.
2. Confirm your choice from the modal by selecting **Delete**.
### Use the API to set AS prepends on a BGP prefix
Use the [Addressing API](https://developers.cloudflare.com/api/resources/addressing/subresources/prefixes/subresources/bgp%5Fprefixes/methods/edit/) to control the number of times Cloudflare prepends its Autonomous System Number (ASN) to a prefix. You can prepend AS13335 up to three times in the `AS_PATH` of BGP updates for your prefixes.
Warning
BGP has different mechanisms to control route priorities which are set by the peered network, not by Cloudflare. As such, this is a best-effort feature. Cloudflare cannot guarantee that peers will honor AS prepends on Cloudflare's transit and peering connections.
Refer to the following example for how to prepend AS13335 three times to a BGP prefix:
Required API token permissions
At least one of the following [token permissions](https://developers.cloudflare.com/fundamentals/api/reference/permissions/)is required:
* `Magic Transit Write`
* `IP Prefixes: Write`
* `IP Prefixes: BGP On Demand Write`
Update BGP Prefix
```
curl "https://api.cloudflare.com/client/v4/accounts/$ACCOUNT_ID/addressing/prefixes/$PREFIX_ID/bgp/prefixes/$BGP_PREFIX_ID" \
--request PATCH \
--header "X-Auth-Email: $CLOUDFLARE_EMAIL" \
--header "X-Auth-Key: $CLOUDFLARE_API_KEY" \
--json '{
"asn_prepend_count": 3
}'
```
AS prepending helps you gracefully transition traffic between network providers. By adding prepends to Cloudflare's advertisement, you make the route through Cloudflare less preferred for some Internet network providers. This allows you to simultaneously advertise the same prefix from an alternate provider with a shorter, more desirable `AS_PATH`. Advertising from both providers at once provides a smoother traffic migration and minimizes packet loss during a change of provider.
The `"asn_prepend_count"` parameter accepts values from `0` to `3`. A higher value makes the route less preferred. You can also change this parameter using BGP. Refer to [Use communities to set AS prepends on an anycast prefix](#use-communities-to-set-as-prepends-on-an-anycast-prefix).
When you use AS prepending to migrate traffic away from Magic Transit, the typical sequence of events is as follows:
* **Initial state**: Cloudflare advertises your prefix with the default priority (`"asn_prepend_count": 0`). Cloudflare routes all traffic to your network through the Cloudflare global network.
* **Deprioritize Cloudflare**: You update the prefix through the API to set an AS prepend count (for example, `"asn_prepend_count": 3`). Cloudflare now advertises your prefix with a longer `AS_PATH`. External networks will update their BGP tables to recognize the Cloudflare path has the new, longer `AS_PATH`.
* **Introduce new provider**: You begin advertising the same prefix from your alternate provider with a standard (shorter) `AS_PATH`.
* **Final state**: External networks now receive two advertisements: the prepended route through Cloudflare and the non-prepended route through your new provider. The external network will select a path based on its BGP policy rules.
Warning
Cloudflare's internal network enforces local preference for traffic delivery to Magic Transit, even if a more specific or shorter path route is available on the public Internet. Withdraw the prefix from Cloudflare to avoid delivery of Cloudflare-sourced traffic over Magic Transit. This preference is local to our internal network and does not impact the route decision process of other networks.
For example, if you have a CDN zone with a Magic Transit-protected origin that is part of a Cloudflare-advertised `/22` prefix, and you later advertise a more specific `/24` prefix route directly from your network, Cloudflare's servers will continue to route proxied CDN traffic to your Magic Transit network. The traffic will follow configured routes to your tunnel(s). This behavior is specific to Cloudflare services. Traffic from other sources will converge to the direct route as expected by BGP.
## Safely withdraw a BYOIP prefix
### Mitigating stuck BGP routes
When you prepare to remove traffic for a [Bring Your Own IP (BYOIP)](https://developers.cloudflare.com/byoip/) prefix from the Cloudflare edge, a direct BGP withdrawal action carries the risk of a stuck BGP route. This state occurs when a route becomes stuck in the Internet's [Default-Free Zone (DFZ) ↗](https://en.wikipedia.org/wiki/Default-free%5Fzone). Core routers that missed the withdrawal announcement continue forwarding traffic to a now-inactive next-hop (what is known as a blackhole). You can read more about this in our blog post [BGP zombies and excessive path hunting ↗](https://blog.cloudflare.com/going-bgp-zombie-hunting).
This risk is especially evident in the use case where the global routing table relies on more-specific to less-specific prefix routing fallback. Since this fallback mechanism is highly prone to route instability, Cloudflare recommends a multi-step draining process.
### Multi-step BYOIP withdrawal process
When draining traffic, use the same prefix length on Cloudflare and on your ISP (Internet Service Provider), since matching prefix lengths gives the most effective and deterministic behavior.
The following steps outline the recommended multi-step draining process to achieve a clean traffic cutover and prevent blackholing.
1. **Initiate advertisement from your origin network**: Begin announcing the exact same-length prefix (for example, `192.0.2.0/24`) from your local infrastructure to your upstream Internet Service Providers (ISPs). This action introduces a competing route of the same length into the global routing table. BGP best path selection will favor your native route based on other metrics (for example, shorter AS path length or local preference), allowing traffic to begin draining away from the Cloudflare edge. Note that some of your traffic may not route as expected, since this depends on how your ISP prefers routes (for example, the Cloudflare route may be treated as a less-preferred path if not fully withdrawn).
2. **Wait for global BGP convergence**: Allow a period of time (typically five to ten minutes) for the new native advertisement to propagate fully across the global routing table, and for routes to converge. This passive waiting period ensures that the majority of traffic has shifted to your local network before the next step.
3. **Signal BGP withdrawal from the Cloudflare edge**: Once you have verified that traffic has successfully drained, use one of the BGP control methods to stop the advertisement of the prefix from the Cloudflare edge.
ISP route refresh delays may impact traffic
Cloudflare's action to withdraw the route is near-instantaneous across our global network. However, Cloudflare has no control over how quickly external ISPs refresh their BGP tables after the withdrawal.
4. The draining process is complete.
## BGP control to Magic Transit Virtual Network routing table
### Automatically announce and withdraw anycast-based Magic BGP routes
If you use CNI with Dataplane v2, GRE or IPsec tunnels, you can:
* Automatically withdraw your prefixes from Cloudflare's global edge infrastructure when you withdraw all matching BGP learned prefixes from the Magic Transit Virtual Network routing table.
* Automatically advertise your prefixes through Cloudflare's global edge infrastructure when you have at least one matching BGP learned prefix in the Magic Transit Virtual Network routing table.
To enable automatic global announcement and withdrawal, enable this feature on the BGP prefix using the [Addressing API](https://developers.cloudflare.com/api/resources/addressing/subresources/prefixes/subresources/bgp%5Fprefixes/methods/edit/). For example:
Required API token permissions
At least one of the following [token permissions](https://developers.cloudflare.com/fundamentals/api/reference/permissions/)is required:
* `Magic Transit Write`
* `IP Prefixes: Write`
* `IP Prefixes: BGP On Demand Write`
Update BGP Prefix
```
curl "https://api.cloudflare.com/client/v4/accounts/$ACCOUNT_ID/addressing/prefixes/$PREFIX_ID/bgp/prefixes/$BGP_PREFIX_ID" \
--request PATCH \
--header "X-Auth-Email: $CLOUDFLARE_EMAIL" \
--header "X-Auth-Key: $CLOUDFLARE_API_KEY" \
--json '{
"auto_advertise_withdraw": true
}'
```
Once you configure this for a BGP prefix, Cloudflare applies the following logic:
* If there are no BGP routes in the Magic Transit Virtual Network routing table exactly matching the BGP prefix, Cloudflare withdraws the BGP prefix.
* If there is at least one BGP route in the Magic Transit Virtual Network routing table exactly matching the BGP prefix, Cloudflare announces the BGP prefix.
The Addressing API BGP prefix and the Magic Transit Virtual Network routing table BGP route must match exactly (same IP prefix and CIDR prefix length). If there is a valid route to a subnet or supernet, Cloudflare withdraws the BGP prefix when there are no exactly matching Magic Transit Virtual Network BGP routes.
Note
When you withdraw a prefix using BGP, you must ensure you withdraw all matching BGP learned prefixes from the Magic Transit Virtual Network routing table. Otherwise, your prefix will not be withdrawn from Cloudflare's global network.
### Use communities to set AS prepends on an anycast prefix
As an alternative to setting [AS prepends on an anycast prefix with the API](#use-the-api-to-set-as-prepends-on-a-bgp-prefix), you can use BGP communities to control the number of AS prepends that Cloudflare announces from its edge for your prefix. The community values are:
* `13335:50101`: Prepends one time with the 13335 ASN
* `13335:50102`: Prepends two times with the 13335 ASN
* `13335:50103`: Prepends three times with the 13335 ASN
If you need to switch to your alternate service provider, you can prepend Cloudflare's ASN multiple times. The intent is typically to make the route less preferred and allow for a graceful transition to the new provider. The higher the prepend count, the less preferred Cloudflare's connection will be if there are no other prioritization rules in place.
Refer to the [caution about AS prepends](#use-the-api-to-set-as-prepends-on-a-bgp-prefix) for important information about peer behavior with this feature.
## BGP control with Cloudflare Route Reflectors
Optionally, you can use BGP to control the advertisement status of your prefix — advertised or withdrawn — from Cloudflare's global network for on-demand deployment scenarios. BGP control works by establishing BGP sessions to Cloudflare's globally distributed Route Reflectors, which initiate propagation of your prefix advertisement across Cloudflare's global network. You can peer with Cloudflare's Route Reflectors through Internet or CNI. CNI peering is available through your account team.
You can advertise prefixes from Cloudflare's network in a supported on-demand method such as BGP control, or dynamically through the UI, API, or [Network Flow](https://developers.cloudflare.com/magic-transit/network-flow/). During the onboarding of your on-demand prefixes, specify whether you want BGP-controlled advertisement or dynamic advertisement (through dashboard/API/Network Flow).
Our network architecture utilizes multiple, redundant Route Reflectors. The failure of any single reflector does not impact overall network resiliency or traffic forwarding. For maximum resiliency, we recommend peering with all three of Cloudflare's redundant Route Reflectors.
To begin using BGP control, contact your account team with the following information:
* BGP endpoint IP addresses
* Prefixes you want to use with BGP control
* Your ASN for the BGP session
After receiving your information, Cloudflare will update firewall filters to establish the BGP session and provide you with the BGP endpoints to control your prefixes.
Note
When you withdraw a prefix using BGP, you must ensure the prefix is withdrawn across all BGP sessions on all route reflectors. Otherwise, Cloudflare will not withdraw your prefix from the global network.
### Example router configurations
The following examples show peering configurations for [Cisco IOS ↗](https://www.cisco.com/c/en/us/td/docs/ios/fundamentals/command/reference/cf%5Fbook.html) and [Juniper Junos OS ↗](https://www.juniper.net/documentation/us/en/software/junos/cli/index.html) for on-demand deployments leveraging BGP control. The IP addresses used are from Cloudflare's route reflectors and should be left as is.
#### Cisco IOS
```
ip route {{ }} Null0
ip prefix-list magic-transit-prefix seq 5 permit {{ }}
route-map cloudflare-magic-transit-out permit 1
match ip address prefix-list magic-transit-prefix
!
route-map cloudflare-magic-transit-out deny 99
route-map reject-all deny 99
router bgp {{ }}
neighbor 141.101.67.22 remote-as 13335
neighbor 141.101.67.22 ebgp-multihop 64
neighbor 141.101.67.22 timers 60 900
neighbor 162.158.160.22 remote-as 13335
neighbor 162.158.160.22 ebgp-multihop 64
neighbor 162.158.160.22 timers 60 900
neighbor 173.245.63.66 remote-as 13335
neighbor 173.245.63.66 ebgp-multihop 64
neighbor 173.245.63.66 timers 60 900
!
address-family ipv4 unicast
redistribute static
neighbor 141.101.67.22 route-map cloudflare-magic-transit-out out
neighbor 141.101.67.22 route-map reject-all in
neighbor 162.158.160.22 route-map cloudflare-magic-transit-out out
neighbor 162.158.160.22 route-map reject-all in
neighbor 173.245.63.66 route-map cloudflare-magic-transit-out out
neighbor 173.245.63.66 route-map reject-all in
exit-address-family
```
#### Juniper MX (Junos OS set commands)
```
set protocols bgp group CF_ROUTE_REFLECTORS neighbor 162.158.160.22 description "CF RR#1 SIN"
set protocols bgp group CF_ROUTE_REFLECTORS neighbor 173.245.63.66 description "CF RR#2 IAD"
set protocols bgp group CF_ROUTE_REFLECTORS neighbor 141.101.67.22 description "CF RR#3 CDG"
set protocols bgp group CF_ROUTE_REFLECTORS peer-as 13335
set protocols bgp group CF_ROUTE_REFLECTORS import REJECT-ALL
set protocols bgp group CF_ROUTE_REFLECTORS export BGP-CONTROL-OUT
set policy-options policy-statement REJECT-ALL then reject
set policy-options policy-statement BGP-CONTROL-OUT term from route-filter 104.245.62.0/24 exact
set policy-options policy-statement BGP-CONTROL-OUT term from protocol static
set policy-options policy-statement BGP-CONTROL-OUT term from route-type internal
set policy-options policy-statement BGP-CONTROL-OUT term then accept
set policy-options policy-statement BGP-CONTROL-OUT then reject
```
#### Juniper MX (Junos OS XML format)
```
@rtr01> show configuration routing-instances STAGE protocols bgp group CF_ROUTE_REFLECTORS
type external;
multihop {
ttl 64;
}
local-address {{customer router IP}}
import NONE;
export NONE;
peer-as 13335;
local-as {{customer AS}} loops 2;
neighbor 162.158.160.22 {
description "CF RR#1 SIN";
}
neighbor 173.245.63.66 {
description "CF RR#2 IAD";
}
neighbor 141.101.67.22 {
description "CF RR#3 CDG";
}
```
## BGP peering
If you use CNI with Dataplane v2, GRE or IPsec tunnels to on-ramp your network traffic to Magic Transit, refer to [BGP information](https://developers.cloudflare.com/magic-transit/reference/traffic-steering/#bgp-information) to learn how to use BGP to handle traffic routing between Cloudflare and your network. Note that this is a different option to using BGP as a means to control the advertisement status of your prefix.
## Regional settings
Magic Transit supports both static routing and BGP to steer traffic from Cloudflare's network to your configured off-ramps (GRE tunnels, IPsec tunnels, or CNI). Cloudflare does not currently support advertisement of routes for traffic engineering purposes. As a best practice to reduce last-hop latency, consider scoping your routes regionally.
Cloudflare has nine geographic regions:
| Region code | Region |
| ----------- | --------------------- |
| AFR | Africa |
| APAC | Asia Pacific |
| EEUR | Eastern Europe |
| ENAM | Eastern North America |
| ME | Middle East |
| OC | Oceania |
| SAM | South America |
| WEUR | Western Europe |
| WNAM | Western North America |
The default setting for static route regions is **All Regions**. Configure scoping for your traffic in the **Region code** section when [adding](https://developers.cloudflare.com/magic-transit/how-to/configure-routes/#create-a-static-route) or [editing](https://developers.cloudflare.com/magic-transit/how-to/configure-routes/#edit-a-static-route) a static route.
Refer to [Scoping routes to specific regions](https://developers.cloudflare.com/magic-transit/reference/traffic-steering/#scoping-routes-to-specific-regions) for more information.
```json
{"@context":"https://schema.org","@type":"BreadcrumbList","itemListElement":[{"@type":"ListItem","position":1,"item":{"@id":"/directory/","name":"Directory"}},{"@type":"ListItem","position":2,"item":{"@id":"/magic-transit/","name":"Magic Transit"}},{"@type":"ListItem","position":3,"item":{"@id":"/magic-transit/how-to/","name":"How to"}},{"@type":"ListItem","position":4,"item":{"@id":"/magic-transit/how-to/advertise-prefixes/","name":"Advertise prefixes"}}]}
```
---
---
title: Configure routes
description: Magic Transit uses a static configuration to route your traffic through anycast tunnels from Cloudflare's global network to your locations. If you are connected through CNI with Dataplane v2, you also have access to BGP peering (beta).
image: https://developers.cloudflare.com/core-services-preview.png
---
[Skip to content](#%5Ftop)
Was this helpful?
YesNo
[ Edit page ](https://github.com/cloudflare/cloudflare-docs/edit/production/src/content/docs/magic-transit/how-to/configure-routes.mdx) [ Report issue ](https://github.com/cloudflare/cloudflare-docs/issues/new/choose)
Copy page
# Configure routes
Magic Transit Virtual Network uses a routing table to steer your traffic from Cloudflare's global network to your connected networks via next-hop. You can add entries to the Magic Transit Virtual Network routing table through static route configuration or routes learned from BGP peering (beta) (available over CNI with Dataplane v2, as well as IPsec and GRE tunnels).
Refer to [Traffic Steering](https://developers.cloudflare.com/magic-transit/reference/traffic-steering/) for more information about all the technical aspects related to:
* Routes' priorities and weights
* Regional scoping of traffic to reduce latency
* BGP peering (beta)
Anycast routing
Cloudflare uses anycast to route traffic. Anycast is a network addressing and routing method that routes incoming requests to different locations. Traffic can arrive at a different geographic location than expected. Not all requests go to the closest data center because Internet routing and peering relationships are complex, and Cloudflare optimizes for performance and reliability.
## Configure static routes
### Create a static route
* [ Dashboard ](#tab-panel-5399)
* [ API ](#tab-panel-5400)
1. Go to **Routes** page.
[ Go to **Routes** ](https://dash.cloudflare.com/?to=/:account/magic-networks/routes)
1. From the **Routes** tab, select **Create static route** to add a new route.
1. Enter a descriptive name for your route in **Description**.
2. In **Prefix**, enter your range of IP addresses. For example, `10.10.10.100/24`.
3. In **Tunnel/Next hop**, select a tunnel for your route from the tunnels you created in [Configure tunnel endpoints](https://developers.cloudflare.com/magic-transit/how-to/configure-tunnel-endpoints/).
4. Choose the **Priority** for your route. Lower numbers have higher priorities.
Note
Cloudflare routing applies longest-prefix match. A more specific static route (like `/30`) always takes precedence over a less specific one (like `/29`), regardless of tunnel priority — unless you remove the more specific route.
Keep this in mind when configuring priorities for your routes. Refer to [Route prioritization](https://developers.cloudflare.com/magic-transit/reference/traffic-steering/#route-prioritization) for more information.
5. (Optional) Choose a **Weight** for your route. Refer to [Set priority and weights for static routes](https://developers.cloudflare.com/magic-transit/reference/traffic-steering/#set-priority-and-weights-for-static-routes) for examples.
6. (Optional) If you need to scope your route to a specific region, you can do it in **Region code**.
7. (Optional) We highly recommend testing your route before adding it by selecting **Test routes**.
8. Select **Add routes**.
Note
You will need your [account ID](https://developers.cloudflare.com/fundamentals/account/find-account-and-zone-ids/) and [API token](https://developers.cloudflare.com/fundamentals/api/get-started/account-owned-tokens/) to use the API.
Create a `POST` request [using the API](https://developers.cloudflare.com/api/resources/magic%5Ftransit/subresources/routes/methods/create/) to create one or more static routes.
Example:
Required API token permissions
At least one of the following [token permissions](https://developers.cloudflare.com/fundamentals/api/reference/permissions/)is required:
* `Magic WAN Write`
* `Magic Transit Write`
Create a Route
```
curl "https://api.cloudflare.com/client/v4/accounts/$ACCOUNT_ID/magic/routes" \
--request POST \
--header "Authorization: Bearer $CLOUDFLARE_API_TOKEN" \
--json '{
"nexthop": "",
"prefix": "",
"priority": 0,
"id": "023e105f4ecef8ad9ca31a8372d0c353",
"description": "",
"scope": {
"colo_names": [
"den01"
],
"colo_regions": [
"APAC"
]
},
"weight": 0
}'
```
```
{
"errors": [
{
"code": 1000,
"message": "message"
}
],
"messages": [
{
"code": 1000,
"message": "message"
}
],
"result": {
"routes": [
{
"nexthop": "203.0.113.1",
"prefix": "192.0.2.0/24",
"priority": 0,
"id": "023e105f4ecef8ad9ca31a8372d0c353",
"description": "New route for new prefix 203.0.113.1",
"scope": {
"colo_names": [
"den01"
],
"colo_regions": [
"APAC"
]
},
"weight": 0
}
]
},
"success": true
}
```
### Edit a static route
* [ Dashboard ](#tab-panel-5401)
* [ API ](#tab-panel-5402)
1. From the **Routes** tab, locate the route to modify.
2. Select the three dots next to it > **Edit**.
1. Enter the updated route information.
2. (Optional) We highly recommend testing your route before adding it by selecting **Test routes**.
3. Select **Edit routes**.
Note
You will need your [account ID](https://developers.cloudflare.com/fundamentals/account/find-account-and-zone-ids/) and [API token](https://developers.cloudflare.com/fundamentals/api/get-started/account-owned-tokens/) to use the API.
Create a `PUT` request [using the API](https://developers.cloudflare.com/api/resources/magic%5Ftransit/subresources/routes/methods/update/) to update one or more static routes.
Example:
Required API token permissions
At least one of the following [token permissions](https://developers.cloudflare.com/fundamentals/api/reference/permissions/)is required:
* `Magic WAN Write`
* `Magic Transit Write`
Update Route
```
curl "https://api.cloudflare.com/client/v4/accounts/$ACCOUNT_ID/magic/routes/$ROUTE_ID" \
--request PUT \
--header "Authorization: Bearer $CLOUDFLARE_API_TOKEN" \
--json '{
"nexthop": "",
"prefix": "",
"priority": 0,
"id": "023e105f4ecef8ad9ca31a8372d0c353",
"description": "",
"scope": {
"colo_names": [
"den01"
],
"colo_regions": [
"APAC"
]
},
"weight": 0
}'
```
```
{
"errors": [
{
"code": 1000,
"message": "message"
}
],
"messages": [
{
"code": 1000,
"message": "message"
}
],
"result": {
"modified": true,
"modified_route": {
"nexthop": "203.0.113.1",
"prefix": "192.0.2.0/24",
"priority": 0,
"id": "023e105f4ecef8ad9ca31a8372d0c353",
"description": "New route for new prefix 203.0.113.1",
"scope": {
"colo_names": [
"den01"
],
"colo_regions": [
"APAC"
]
},
"weight": 0
}
},
"success": true
}
```
### Delete static route
* [ Dashboard ](#tab-panel-5397)
* [ API ](#tab-panel-5398)
1. From the **Routes** tab, locate the static route to delete.
2. Select the three dots next to it > **Delete**.
1. Confirm the action by selecting the checkbox and select **Delete**.
Note
You will need your [account ID](https://developers.cloudflare.com/fundamentals/account/find-account-and-zone-ids/) and [API token](https://developers.cloudflare.com/fundamentals/api/get-started/account-owned-tokens/) to use the API.
Create a `DELETE` request [using the API](https://developers.cloudflare.com/api/resources/magic%5Ftransit/subresources/routes/methods/delete/) to delete a static route.
Example:
Required API token permissions
At least one of the following [token permissions](https://developers.cloudflare.com/fundamentals/api/reference/permissions/)is required:
* `Magic WAN Write`
* `Magic Transit Write`
Delete Route
```
curl "https://api.cloudflare.com/client/v4/accounts/$ACCOUNT_ID/magic/routes/$ROUTE_ID" \
--request DELETE \
--header "Authorization: Bearer $CLOUDFLARE_API_TOKEN"
```
```
{
"errors": [
{
"code": 1000,
"message": "message"
}
],
"messages": [
{
"code": 1000,
"message": "message"
}
],
"result": {
"deleted": true,
"deleted_route": {
"nexthop": "203.0.113.1",
"prefix": "192.0.2.0/24",
"priority": 0,
"id": "023e105f4ecef8ad9ca31a8372d0c353",
"description": "New route for new prefix 203.0.113.1",
"scope": {
"colo_names": [
"den01"
],
"colo_regions": [
"APAC"
]
},
"weight": 0
}
},
"success": true
}
```
## Configure BGP routes
BGP peering is available when using the following on-ramps:
* [CNI with Dataplane v2](https://developers.cloudflare.com/network-interconnect/).
* [IPsec and GRE tunnels (beta)](https://developers.cloudflare.com/magic-transit/how-to/configure-tunnel-endpoints/). Requires [Unified Routing (beta)](https://developers.cloudflare.com/magic-transit/reference/traffic-steering/#unified-routing-mode-beta).
### Choose an ASN for BGP peering
The Magic Transit Virtual Network routing table is managed by the customer. You can select both the Cloudflare-side ASN (Autonomous System Number) and the ASN for your customer device. The customer device ASN can be 2-byte or 4-byte. [Public ASNs used for Magic Transit](https://developers.cloudflare.com/magic-transit/how-to/advertise-prefixes/#cloudflare-asn-vs-your-own-asn) are verified during the onboarding process.
By default, each BGP peering session uses the same Cloudflare-side ASN to represent peering with the Magic Transit Virtual Network routing table. This ASN is called the **CF Account ASN** and is set to `13335`. You can configure this to a private 2-byte ASN (any value between `64512` and `65534`, such as `65000`).
Note
If you are setting up BGP over IPsec or GRE tunnels you cannot change this value.
To set this ASN:
1. Go to the Routes page.
[ Go to **Routes** ](https://dash.cloudflare.com/?to=/:account/magic-networks/routes)
1. Select **WAN configuration**.
2. In **CF Account ASN**, enter Cloudflare's ASN.
3. Select **Update**.
Magic Transit customers should also be aware of the following:
* The Cloudflare side ASN will never be exposed in `AS_PATH` of anycast announcements from the Cloudflare edge. In those announcements, Cloudflare will always use the Cloudflare ASN of `13335` optionally prepended with a bring-your-own ASN as described in [Cloudflare ASN vs. your own ASN](https://developers.cloudflare.com/magic-transit/how-to/advertise-prefixes/#cloudflare-asn-vs-your-own-asn).
* The customer device ASN can be a private ASN or the ASN they are using for Magic Transit anycast announcements at the edge: this has no impact on the ASN for the anycast announced prefix at the edge of the Cloudflare global network.
### Set up BGP peering
You need to configure two ASNs:
* The Cloudflare [account-scoped ASN](#choose-an-asn-for-bgp-peering) named **CF Account ASN**.
* One ASN for each on-ramp you want to configure with BGP.
If you have already set up your Cloudflare account ASN, skip steps two and three below.
#### Set up BGP for an interconnect
Note
BGP over CNI is in closed beta and is not currently available to new customers. If you are interested in BGP peering over CNI, contact your account team.
1. Go to the Routes page.
[ Go to **Routes** ](https://dash.cloudflare.com/?to=/:account/magic-networks/routes)
1. Select **WAN configuration**.
2. In **CF Account ASN**, enter Cloudflare's ASN, and select **Update**.
3. Go to **Interconnects**.
[ Go to **Interconnects** ](https://dash.cloudflare.com/?to=/:account/magic-networks/connections/cni-tunnels)
1. Locate the CNI interconnect with Dataplane v2 to configure with BGP > select the **three dots** next to it > **Configure BGP**.
2. In **Customer device ASN**, enter the ASN for your network.
3. In **MD5 key**, you can optionally enter the key for your network. Note that this is meant to prevent accidental misconfigurations and is not a security mechanism.
4. (Optional) In **Additional Advertised prefix list**, input any additional prefixes you want to advertise alongside your existing routes. Leave this blank if you do not want to advertise extra routes. Typical prefixes to configure here include:
* A route to `0.0.0.0/0`, the default route — to attract all Internet-bound traffic if using Magic Transit with Egress.
* A route to `100.96.0.0/12`, the portion of CGNAT space [used by default with Cloudflare One Clients](https://developers.cloudflare.com/cloudflare-one/networks/connectors/cloudflare-tunnel/private-net/warp-connector/user-to-site/#add-ip-route-to-router).
5. Select **Save**.
#### Set up BGP for IPsec/GRE tunnels
1. Go to the Routes page.
[ Go to **Routes** ](https://dash.cloudflare.com/?to=/:account/magic-networks/routes)
1. Select **WAN configuration**.
2. In **CF Account ASN**, enter Cloudflare's ASN, and select **Update**.
3. Go to **Connectors**.
[ Go to **Connectors** ](https://dash.cloudflare.com/?to=/:account/magic-networks/connections)
1. In **IPsec/GRE tunnels**, locate the tunnel you want to configure with BGP > select the **three dots** next to it > **Configure BGP**.
2. In **Customer device ASN**, enter the ASN for your network.
3. In **MD5 key**, you can optionally enter the key for your network. Note that this is meant to prevent accidental misconfigurations and is not a security mechanism.
4. (Optional) In **Additional Advertised prefix list**, input any additional prefixes you want to advertise alongside your existing routes. Leave this blank if you do not want to advertise extra routes. Typical prefixes to configure here include:
* A route to `0.0.0.0/0`, the default route — to attract all Internet-bound traffic if using Magic Transit with Egress.
* A route to `100.96.0.0/12`, the portion of CGNAT space [used by default with Cloudflare One Clients](https://developers.cloudflare.com/cloudflare-one/networks/connectors/cloudflare-tunnel/private-net/warp-connector/user-to-site/#add-ip-route-to-router).
5. Select **Save**.
### Important remarks for GRE/IPsec tunnels
If you are configuring BGP peering for a tunnel (GRE or IPsec) you must be aware of the following:
* Your Customer Premises Equipment (CPE) must initiate the BGP peering session. Cloudflare will not initiate.
* Your BGP speaker must peer with the tunnel's IPv4 interface address. Your CPE may use any IPv4 address for its side of the peering connection; it does not need to use the other address from the `/31` or `/30` interface subnet.
Warning
If the tunnel is to an Azure VPN gateway, the tunnel interface address must not be in the link-local range. Azure will not initiate BGP sessions to peers using link-local addresses. Use an RFC 1918 address for your tunnel interface address instead.
* Hold time must be greater than 0 seconds (BGP `KEEPALIVE` messages are required). Cloudflare recommends at least 45 seconds. Cloudflare advertises a hold time of 90 seconds for GRE/IPsec tunnels. If you set a value greater than 90 seconds, the negotiated hold time will be 90 seconds, according to the standard way BGP has of negotiating hold times.
* Connect retry time should be low (for example, five or 10 seconds).
* Your CPE may advertise up to 5,000 prefixes on one BGP session.
* MD5 authentication is optional. You can use a maximum of 80 characters. Supported characters include `` a-zA-Z0-9'!@#$%^&*()+[]{}<>/.,;:_-~`= \\| ``
Warning
MD5 authentication is not a security measure nor is it a valid security mechanism. The MD5 key is not treated as a secret value. This is only supported for preventing misconfiguration, not for defending against malicious attacks.
```json
{"@context":"https://schema.org","@type":"BreadcrumbList","itemListElement":[{"@type":"ListItem","position":1,"item":{"@id":"/directory/","name":"Directory"}},{"@type":"ListItem","position":2,"item":{"@id":"/magic-transit/","name":"Magic Transit"}},{"@type":"ListItem","position":3,"item":{"@id":"/magic-transit/how-to/","name":"How to"}},{"@type":"ListItem","position":4,"item":{"@id":"/magic-transit/how-to/configure-routes/","name":"Configure routes"}}]}
```
---
---
title: Configure tunnel endpoints
description: Cloudflare recommends two tunnels for each ISP and network location router combination, one per Cloudflare endpoint. Learn how to configure IPsec or GRE tunnels.
image: https://developers.cloudflare.com/core-services-preview.png
---
[Skip to content](#%5Ftop)
Was this helpful?
YesNo
[ Edit page ](https://github.com/cloudflare/cloudflare-docs/edit/production/src/content/docs/magic-transit/how-to/configure-tunnel-endpoints.mdx) [ Report issue ](https://github.com/cloudflare/cloudflare-docs/issues/new/choose)
Copy page
# Configure tunnel endpoints
Cloudflare recommends two tunnels for each ISP and network location router combination, one per Cloudflare endpoint. Cloudflare assigns two endpoint addresses to your account that you can use as the tunnel destinations on your network location's routers/endpoints. You can find these addresses in the Cloudflare dashboard under **Address Space** \> [**Leased IPs** ↗](https://dash.cloudflare.com/?to=/:account/ip-addresses/address-space).
## Before you begin
Before creating a tunnel, make sure you have the following information:
* **Cloudflare endpoint addresses**: The anycast IP addresses assigned to your account. You can find them in the Cloudflare dashboard under **Address Space** \> [**Leased IPs** ↗](https://dash.cloudflare.com/?to=/:account/ip-addresses/address-space).
* **Customer endpoint IP**: A public Internet routable IP address outside of the prefixes Cloudflare will advertise on your behalf (typically provided by your ISP). Not required if using [Cloudflare Network Interconnect](https://developers.cloudflare.com/network-interconnect/) or for IPsec tunnels (unless your router uses an IKE ID of type `ID_IPV4_ADDR`).
* **Interface address**: A `/31` (recommended) or `/30` subnet from RFC 1918 private IP space (`10.0.0.0/8`, `172.16.0.0/12`, `192.168.0.0/16`) or `169.254.240.0/20`.
Warning
Make sure the interface address prefixes are always within the allowed Cloudflare ranges, especially for cloud service providers that might automatically generate prefixes for you. Otherwise, the tunnel will not work.
## Ways to onboard traffic to Cloudflare
### GRE and IPsec tunnels
You can use GRE or IPsec tunnels to onboard your traffic to Magic Transit, and set them up through the Cloudflare dashboard or the API. If you use the API, you need your [account ID](https://developers.cloudflare.com/fundamentals/account/find-account-and-zone-ids/) and [API key](https://developers.cloudflare.com/fundamentals/api/get-started/keys/#view-your-global-api-key).
Anycast routing
Cloudflare uses anycast to route traffic. Anycast is a network addressing and routing method that routes incoming requests to different locations. Traffic can arrive at a different geographic location than expected. Not all requests go to the closest data center because Internet routing and peering relationships are complex, and Cloudflare optimizes for performance and reliability.
#### Choose between GRE and IPsec
| Feature | GRE | IPsec |
| ---------------- | --------------------------------- | ------------------------------------------------ |
| Encryption | No | Yes |
| Authentication | No | Pre-shared key (PSK) |
| Setup complexity | Simpler | Requires PSK exchange |
| Best for | Trusted networks, CNI connections | Internet-facing connections requiring encryption |
Refer to [Tunnels and encapsulation](https://developers.cloudflare.com/magic-transit/reference/gre-ipsec-tunnels/) to learn more about the technical requirements for both tunnel types.
#### IPsec supported ciphers
Refer to [supported ciphers for IPsec](https://developers.cloudflare.com/magic-transit/reference/gre-ipsec-tunnels/#supported-configuration-parameters) for a complete list. IPsec tunnels only support Internet Key Exchange version 2 (IKEv2).
#### Anti-replay protection
If you use Magic Transit and anycast IPsec tunnels, we recommend disabling anti-replay protection. Cloudflare disables this setting by default. However, you can enable it through the API or the Cloudflare dashboard for devices that do not support disabling it, including Cisco Meraki, Velocloud, and AWS VPN Gateway.
Refer to [Anti-replay protection](https://developers.cloudflare.com/magic-transit/reference/anti-replay-protection/) for more information on this topic, or [Add IPsec tunnels](#add-ipsec-tunnel) to learn how to enable this feature.
### Network Interconnect (CNI)
Beyond GRE and IPsec tunnels, you can also use Network Interconnect (CNI) to onboard your traffic to Magic Transit. Refer to [Network Interconnect (CNI)](https://developers.cloudflare.com/magic-transit/network-interconnect/) for more information.
## Add tunnels
Warning
Cloudflare Network Firewall rules apply to Internet Control Message Protocol (ICMP) traffic. If you enable Cloudflare Network Firewall, ensure your rules allow ICMP traffic sourced from Cloudflare public IPs. Otherwise, health checks will fail. Refer to [Cloudflare Network Firewall rules](https://developers.cloudflare.com/cloudflare-network-firewall/about/ruleset-logic/#cloudflare-network-firewall-rules-and-magic-transit-endpoint-health-checks) for more information.
* [ Dashboard ](#tab-panel-5403)
* [ API ](#tab-panel-5404)
1. Go to **Connectors** page.
[ Go to **Connectors** ](https://dash.cloudflare.com/?to=/:account/magic-networks/connections)
1. From the **IPsec/GRE tunnels** tab, select **Create a tunnel**.
2. On the **Add tunnels** page, choose either a **GRE tunnel** or **IPsec tunnel**.
1. In **Name**, give your tunnel a descriptive name. This name must be unique, cannot contain spaces or special characters, and cannot be shared with other tunnels.
2. _(Optional)_ Give your tunnel a description in **Description**.
3. In **IPv4 Interface address**, enter the internal IP address for your tunnel along with the interface's prefix length (`/31` or `/30`). This is used to route traffic through the tunnel on the Cloudflare side. We recommend using a `/31` subnet, as it provides the most efficient use of IP address space.
Expand the section below for your tunnel type to complete the configuration:
GRE tunnel
1. In **Customer GRE endpoint**, enter your router's public IP address. You do not need this value if you use a physical or virtual connection like Cloudflare Network Interconnect because Cloudflare provides it.
2. In **Cloudflare GRE endpoint**, enter one of the anycast addresses assigned to your account. You can find them in [Leased IPs ↗](https://dash.cloudflare.com/?to=/:account/ip-addresses/address-space).
3. _(Optional)_ Leave the default values for **TTL** and **MTU**, or customize them for your network.
4. _(Optional)_ Configure health check settings. Expand the following to learn more about each option:
Health check options
* **Tunnel health checks**: Enabled by default. If you disable tunnel health checks, your tunnels appear 100% down in your [tunnel health dashboard](https://developers.cloudflare.com/magic-transit/network-health/check-tunnel-health-dashboard/) even when working. Cloudflare keeps sending traffic through the tunnel without the means to detect if the tunnel goes down. You must set up your own system to detect down tunnels, as Cloudflare cannot warn you about down tunnels. Refer to [Tunnel health checks](https://developers.cloudflare.com/magic-transit/reference/tunnel-health-checks/) for more information.
* **Health check rate**: If you keep tunnel health checks enabled, choose a [health check rate](https://developers.cloudflare.com/magic-transit/network-health/update-tunnel-health-checks-frequency/) for your tunnel. Available options are _Low_, _Medium_, and _High_.
* **Health check type**: Defaults to _Reply_ and to creating an ICMP (Internet Control Message Protocol) reply. If your firewall drops this type of packet because it assumes the packet is an attack, change this option to _Request_ which creates an ICMP request. Refer to [Tunnel health checks](https://developers.cloudflare.com/magic-transit/reference/tunnel-health-checks/) for more information.
* **Health check direction**: Defaults to **unidirectional** for Magic Transit. Refer to [Bidirectional vs unidirectional health checks](#bidirectional-vs-unidirectional-health-checks) for more details.
* **Health check target**: The customer end of the tunnel. This field is only visible when **Health check direction** is set to _Unidirectional_.
5. _(Optional)_ We recommend you test your tunnel before officially adding it. To test the tunnel, select **Test tunnels**.
1. To add multiple tunnels, select **Add GRE tunnel** for each new tunnel.
1. After adding your tunnel information, select **Add tunnels**.
1. (_Optional_) Select **Allow BGP (Border Gateway Protocol) peering** (beta) if you want to dynamically exchange routes between your network and Cloudflare. This feature requires [Unified Routing (beta)](https://developers.cloudflare.com/magic-transit/reference/traffic-steering/#unified-routing-mode-beta).
BGP is recommended for environments with frequently changing routes or when you need automatic failover. Refer to [Configure BGP routes](https://developers.cloudflare.com/magic-transit/how-to/configure-routes/#configure-bgp-routes) for more information.
IPsec tunnel
1. _(Optional)_ In **Customer endpoint**, enter your router's public IP address. This value is only required if your router uses an IKE ID of type `ID_IPV4_ADDR`.
2. In **Cloudflare endpoint**, enter one of the anycast addresses assigned to your account. You can find them in [Leased IPs ↗](https://dash.cloudflare.com/?to=/:account/ip-addresses/address-space).
3. _(Optional)_ Configure health check settings. Expand the following to learn more about each option:
Health check options
* **Tunnel health checks**: Enabled by default. If you disable tunnel health checks, your tunnels appear 100% down in your [tunnel health dashboard](https://developers.cloudflare.com/magic-transit/network-health/check-tunnel-health-dashboard/) even when working. Cloudflare keeps sending traffic through the tunnel without the means to detect if the tunnel goes down. You must set up your own system to detect down tunnels, as Cloudflare cannot warn you about down tunnels. Refer to [Tunnel health checks](https://developers.cloudflare.com/magic-transit/reference/tunnel-health-checks/) for more information.
* **Health check rate**: If you keep tunnel health checks enabled, choose a [health check rate](https://developers.cloudflare.com/magic-transit/network-health/update-tunnel-health-checks-frequency/) for your tunnel. Available options are _Low_, _Medium_, and _High_.
* **Health check type**: Defaults to _Reply_ and to creating an ICMP (Internet Control Message Protocol) reply. If your firewall drops this type of packet because it assumes the packet is an attack, change this option to _Request_ which creates an ICMP request. Refer to [Tunnel health checks](https://developers.cloudflare.com/magic-transit/reference/tunnel-health-checks/) for more information.
* **Health check direction**: Defaults to **unidirectional** for Magic Transit. Refer to [Bidirectional vs unidirectional health checks](#bidirectional-vs-unidirectional-health-checks) for more details.
* **Health check target**: The customer end of the tunnel. This field is only visible when **Health check direction** is set to _Unidirectional_.
Note
IPsec tunnels will not function without a pre-shared key (PSK).
4. If you do not have a pre-shared key yet:
1. Select **Add pre-shared key later**.
2. _(Optional)_ We recommend you test your tunnel configuration before officially adding it. To test the tunnel, select **Test tunnels**.
3. Select **Add tunnels**.
4. The Cloudflare dashboard loads the list of tunnels you have configured. The IPsec tunnel you just created displays a warning triangle icon to indicate it is not yet functional. Select **Edit**.
5. Choose **Generate a new pre-shared key** \> **Update and generate a pre-shared key**. Save the key to a safe place, and select **Done**.
5. If you already have a pre-shared key:
1. Select **Use my own pre-shared key**.
2. Paste your key in **Your pre-shared key**.
3. _(Optional)_ We recommend you test your tunnel before officially adding it. To test the tunnel, select **Test tunnels**.
4. Select **Add tunnels**.
6. _(Optional)_ Enable **Replay protection** if you have devices that do not support disabling it. Refer to [Anti-replay protection](https://developers.cloudflare.com/magic-transit/reference/anti-replay-protection/) for more information.
1. To add multiple tunnels, select **Add IPsec tunnel** for each new tunnel.
1. After adding your tunnel information, select **Add tunnels**.
1. (_Optional_) Select **Allow BGP (Border Gateway Protocol) peering** (beta) if you want to dynamically exchange routes between your network and Cloudflare. This feature requires [Unified Routing (beta)](https://developers.cloudflare.com/magic-transit/reference/traffic-steering/#unified-routing-mode-beta).
BGP is recommended for environments with frequently changing routes or when you need automatic failover. Refer to [Configure BGP routes](https://developers.cloudflare.com/magic-transit/how-to/configure-routes/#configure-bgp-routes) for more information.
Note
You will need your [account ID](https://developers.cloudflare.com/fundamentals/account/find-account-and-zone-ids/) and [API token](https://developers.cloudflare.com/fundamentals/api/get-started/account-owned-tokens/) to use the API.
GRE tunnel
Create a `POST` request [using the API](https://developers.cloudflare.com/api/resources/magic%5Ftransit/subresources/gre%5Ftunnels/methods/create/) to create a GRE tunnel.
Required API token permissions
At least one of the following [token permissions](https://developers.cloudflare.com/fundamentals/api/reference/permissions/)is required:
* `Magic WAN Write`
* `Magic Transit Write`
Create a GRE tunnel
```
curl "https://api.cloudflare.com/client/v4/accounts/$ACCOUNT_ID/magic/gre_tunnels" \
--request POST \
--header "Authorization: Bearer $CLOUDFLARE_API_TOKEN" \
--json '{
"name": "",
"description": "",
"interface_address": "",
"cloudflare_gre_endpoint": "",
"customer_gre_endpoint": ""
}'
```
```
{
"errors": [
{
"code": 1000,
"message": "message"
}
],
"messages": [
{
"code": 1000,
"message": "message"
}
],
"result": {
"gre_tunnels": [
{
"cloudflare_gre_endpoint": "",
"customer_gre_endpoint": "",
"interface_address": "",
"name": "",
"description": "",
"health_check": {
"direction": "unidirectional",
"enabled": true,
"rate": "low",
"type": "reply"
},
"mtu": 0,
"ttl": 0
}
]
},
"success": true
}
```
IPsec tunnel
1. Create a `POST` request [using the API](https://developers.cloudflare.com/api/resources/magic%5Ftransit/subresources/ipsec%5Ftunnels/methods/create/) to create an IPsec tunnel.
Note that in the example, replay protection is disabled by default. You can enable it with the flag `"replay_protection": true` for each IPsec tunnel, if the devices you use do not support disabling this feature. If you have already created IPsec tunnels, update them with a [PUT request](https://developers.cloudflare.com/api/resources/magic%5Ftransit/subresources/ipsec%5Ftunnels/methods/update/). Refer to [Anti-replay protection](https://developers.cloudflare.com/magic-transit/reference/anti-replay-protection/) for more information on this topic.
Required API token permissions
At least one of the following [token permissions](https://developers.cloudflare.com/fundamentals/api/reference/permissions/)is required:
* `Magic WAN Write`
* `Magic Transit Write`
Create an IPsec tunnel
```
curl "https://api.cloudflare.com/client/v4/accounts/$ACCOUNT_ID/magic/ipsec_tunnels" \
--request POST \
--header "Authorization: Bearer $CLOUDFLARE_API_TOKEN" \
--json '{
"name": "",
"description": "",
"interface_address": "",
"cloudflare_endpoint": "",
"customer_endpoint": ""
}'
```
```
{
"errors": [
{
"code": 1000,
"message": "message"
}
],
"messages": [
{
"code": 1000,
"message": "message"
}
],
"result": {
"ipsec_tunnels": [
{
"id": "",
"interface_address": "",
"name": "",
"cloudflare_endpoint": "",
"customer_endpoint": "",
"description": "",
"health_check": {
"direction": "unidirectional",
"enabled": true,
"rate": "low",
"type": "reply"
},
"psk_metadata": {},
"replay_protection": false
}
]
},
"success": true
}
```
Take note of the tunnel `id` value. We will use it to generate a pre-shared key (PSK).
2. Create a `POST` [request](https://developers.cloudflare.com/api/resources/magic%5Ftransit/subresources/ipsec%5Ftunnels/methods/psk%5Fgenerate/) to generate a PSK. Use the tunnel `id` value you received from the previous command.
Required API token permissions
At least one of the following [token permissions](https://developers.cloudflare.com/fundamentals/api/reference/permissions/)is required:
* `Magic WAN Write`
* `Magic Transit Write`
Generate Pre Shared Key (PSK) for IPsec tunnels
```
curl "https://api.cloudflare.com/client/v4/accounts/$ACCOUNT_ID/magic/ipsec_tunnels/$IPSEC_TUNNEL_ID/psk_generate" \
--request POST \
--header "Authorization: Bearer $CLOUDFLARE_API_TOKEN"
```
```
{
"result": {
"ipsec_id": "",
"ipsec_tunnel_id": "",
"psk": "",
"psk_metadata": {
"last_generated_on": "2025-03-13T14:28:47.054317925Z"
}
},
"success": true,
"errors": [],
"messages": []
}
```
Take note of your `psk` value.
3. Create a `PUT` [request](https://developers.cloudflare.com/api/resources/magic%5Ftransit/subresources/ipsec%5Ftunnels/methods/update/) to update your IPsec tunnel with the PSK.
Terminal window
```
curl "https://api.cloudflare.com/client/v4/accounts/%7Baccount_id%7D/magic/ipsec_tunnels/%7Bipsec_tunnel_id%7D" \
--request PUT \
--json '{
"psk": ""
}'
```
```
{
"result": {
"modified": true,
"modified_ipsec_tunnel": {
"id": "",
"interface_address": "",
"created_on": "2025-03-13T14:28:21.139535Z",
"modified_on": "2025-03-13T14:33:26.09683Z",
"name": "",
"cloudflare_endpoint": "",
"customer_endpoint": "",
"remote_identities": {
"hex_id": "",
"fqdn_id": "",
"user_id": ""
},
"psk_metadata": {
"last_generated_on": "2025-03-13T14:28:47.054318Z"
},
"description": "",
"health_check": {
"enabled": true,
"target": "",
"type": "reply",
"rate": "mid",
"direction": "unidirectional"
}
}
},
"success": true,
"errors": [],
"messages": []
}
```
1. Use the `psk` value from step 3 to configure the IPsec tunnel on your equipment as well.
Configure bidirectional health checks
Bidirectional health checks are available for GRE and IPsec tunnels. For Magic Transit this option defaults to unidirectional.
You can change this setting via the API with `"bidirectional"` or `"unidirectional"`:
Terminal window
```
curl "https://api.cloudflare.com/client/v4/accounts/%7Baccount_id%7D/magic/ipsec_tunnels/%7Bipsec_tunnel_id%7D" \
--request PUT \
--json '{
"health_check": {
"direction": "bidirectional"
}
}'
```
```
{
"result": {
"modified": true,
"modified_ipsec_tunnel": {
"id": "",
"interface_address": "",
"created_on": "2025-03-13T14:28:21.139535Z",
"modified_on": "2025-03-13T14:33:26.09683Z",
"name": "",
"cloudflare_endpoint": "",
"customer_endpoint": "",
"remote_identities": {
"hex_id": "",
"fqdn_id": "",
"user_id": ""
},
"psk_metadata": {
"last_generated_on": "2025-03-13T14:28:47.054318Z"
},
"description": "",
"health_check": {
"enabled": true,
"target": "",
"type": "reply",
"rate": "mid",
"direction": "bidirectional"
}
}
},
"success": true,
"errors": [],
"messages": []
}
```
## Bidirectional vs unidirectional health checks
To check for tunnel health, Cloudflare sends a [health check probe](https://developers.cloudflare.com/magic-transit/reference/tunnel-health-checks/) consisting of ICMP (Internet Control Message Protocol) reply [packets ↗](https://www.cloudflare.com/learning/network-layer/what-is-a-packet/) to your network. Cloudflare needs to receive these probes to know if your tunnel is healthy.
Cloudflare defaults to unidirectional health checks for Magic Transit (direct server return), and bidirectional health checks for Cloudflare WAN. However, routing unidirectional ICMP reply packets over the Internet to Cloudflare is sometimes subject to drops by intermediate network devices, such as stateful firewalls. Magic Transit customers with egress traffic can modify this setting to bidirectional.
If you are a Magic Transit customer with egress traffic, refer to [Magic Transit egress traffic](https://developers.cloudflare.com/magic-transit/reference/egress/) for more information on the technical aspects you need to consider to create a successful connection to Cloudflare.
### Legacy bidirectional health checks
For customers using the legacy health check system with a public IP range, Cloudflare recommends:
* Configuring the tunnel health check target IP address to one within the `172.64.240.252/30` prefix range.
* Applying a policy-based route that matches [packets ↗](https://www.cloudflare.com/learning/network-layer/what-is-a-packet/) with a source IP address equal to the configured tunnel health check target (for example `172.64.240.253/32`), and route them over the tunnel back to Cloudflare.
## Next steps
Now that you have set up your tunnel endpoints, you need to configure routes to direct your traffic through Cloudflare. You have two routing options:
* **Static routes**: Best for simple, stable networks where routes rarely change. You manually define each route.
* **BGP peering**: Best for dynamic environments with frequently changing routes, multiple prefixes, or when you need automatic failover. Requires enabling BGP on your tunnel during creation.
Refer to [Configure routes](https://developers.cloudflare.com/magic-transit/how-to/configure-routes/) for detailed instructions on both options.
## Troubleshooting
If you experience issues with your tunnels:
* For tunnel health check problems, refer to [Troubleshoot tunnel health](https://developers.cloudflare.com/magic-transit/troubleshooting/tunnel-health/).
* For IPsec tunnel establishment issues, refer to [Troubleshoot with IPsec logs](https://developers.cloudflare.com/magic-transit/troubleshooting/ipsec-troubleshoot/).
```json
{"@context":"https://schema.org","@type":"BreadcrumbList","itemListElement":[{"@type":"ListItem","position":1,"item":{"@id":"/directory/","name":"Directory"}},{"@type":"ListItem","position":2,"item":{"@id":"/magic-transit/","name":"Magic Transit"}},{"@type":"ListItem","position":3,"item":{"@id":"/magic-transit/how-to/","name":"How to"}},{"@type":"ListItem","position":4,"item":{"@id":"/magic-transit/how-to/configure-tunnel-endpoints/","name":"Configure tunnel endpoints"}}]}
```
---
---
title: Enable Magic user roles
description: You can determine which users have, or do not have, configuration edit access for Magic products.
image: https://developers.cloudflare.com/core-services-preview.png
---
[Skip to content](#%5Ftop)
Was this helpful?
YesNo
[ Edit page ](https://github.com/cloudflare/cloudflare-docs/edit/production/src/content/docs/magic-transit/how-to/enable-magic-roles.mdx) [ Report issue ](https://github.com/cloudflare/cloudflare-docs/issues/new/choose)
Copy page
# Enable Magic user roles
You can determine which users have, or do not have, configuration edit access for Magic products, including Magic Transit, Cloudflare WAN (formerly Magic WAN), and Cloudflare Network Firewall.
For example, if multiple teams manage different Cloudflare products on the same account, you can provide select users with edit access and other users with read-only access.
## Assign permissions
1. Go to the **Members** page.
[ Go to **Members** ](https://dash.cloudflare.com/?to=/:account/members)
2. Under **Members**, enter an existing user's name and select **Search**.
3. Expand the menu at the end of the user row.
4. From the list, locate **Network Services (Magic)**.
5. Select one of two options:
* **Network Services (Magic)** \- Enables users to view and edit Magic configurations.
* **Network Services (Magic, Read-Only)** \- Enables users to view but not modify Magic configurations.
```json
{"@context":"https://schema.org","@type":"BreadcrumbList","itemListElement":[{"@type":"ListItem","position":1,"item":{"@id":"/directory/","name":"Directory"}},{"@type":"ListItem","position":2,"item":{"@id":"/magic-transit/","name":"Magic Transit"}},{"@type":"ListItem","position":3,"item":{"@id":"/magic-transit/how-to/","name":"How to"}},{"@type":"ListItem","position":4,"item":{"@id":"/magic-transit/how-to/enable-magic-roles/","name":"Enable Magic user roles"}}]}
```
---
---
title: Configure IPv6 (beta)
description: IPv6 (beta) for Magic Transit allows customers with existing IPv4 tunnels to enable and test IPv6 functionality with minimal configuration changes. This beta provides an opportunity to evaluate IPv6 addressing, routing, and security within Magic Transit while maintaining the existing IPv4 setup.
image: https://developers.cloudflare.com/core-services-preview.png
---
[Skip to content](#%5Ftop)
### Tags
[ IPv6 ](https://developers.cloudflare.com/search/?tags=IPv6)
Was this helpful?
YesNo
[ Edit page ](https://github.com/cloudflare/cloudflare-docs/edit/production/src/content/docs/magic-transit/how-to/ipv6.mdx) [ Report issue ](https://github.com/cloudflare/cloudflare-docs/issues/new/choose)
Copy page
# Configure IPv6 (beta)
IPv6 (beta) for Magic Transit allows customers with existing IPv4 tunnels to enable and test IPv6 functionality with minimal configuration changes. This beta provides an opportunity to evaluate IPv6 addressing, routing, and security within Magic Transit while maintaining the existing IPv4 setup.
As this is a beta release, we encourage customers to contact their account team to enable the feature and provide feedback to help refine the IPv6 functionality before general availability.
## Cloudflare support for IPv6 in Magic Transit
Cloudflare transports IPv6 traffic over an IPv6-over-IPv4 GRE tunnel. Here is how it works:
1. The IPv6 packet is encapsulated into an IPv4 GRE packet, with the IP protocol field set to `47` (indicating it is a GRE packet) along with a GRE header.
2. The IPv4 packet header and GRE header are the additional headers (or encapsulation overhead) that ensure the correct routing of the IPv6 traffic.
3. On most routers that support this tunneling method, the tunnel mode is set to `gre`.
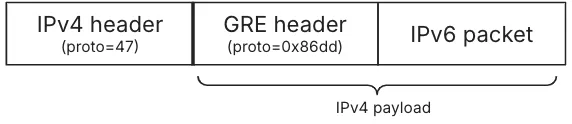
## Current known limitations
* The IPv6 beta is not available for accounts with CNI (Cloudflare Network Interconnect) links configured.
* MTU (Maximum Transmission Unit) is 1,420 bytes for egress traffic (does not impact Direct Server Return).
* Cloudflare Network Firewall supports two matching fields for IPv6 traffic: source IP address and destination IP address.
* Cloudflare supports the advertisement of IPv6 prefixes ranging from `/48` to `/32`.
* Limited to IPv4-based [tunnel health checks](https://developers.cloudflare.com/magic-transit/reference/tunnel-health-checks/) only.
* Supports only IPv4-based endpoint health checks.
## How to configure IPv6
Since IPv6 works over an existing IPv4 tunnel, you need to select either an existing IPv4 GRE tunnel or create a new one to test IPv6\. All settings that apply to the IPv4 GRE tunnel apply to the IPv6 tunnel as well, except for any MSS clamping you might need to configure — refer to [MSS clamping recommendations](#mss-clamping-recommendations) in the following section for more information.
To test and set up IPv6 in the Cloudflare dashboard, complete one new field when creating a new IPv4 GRE tunnel or editing an existing one: **IPv6 Interface address**. Enter the Cloudflare-assigned IPv6 address for the Cloudflare side of the tunnel. Each tunnel is assigned a `/127` subnet from your allocated `/96` range. You configure one address on the Cloudflare side and the other address on your router.
Warning
Cloudflare allocates a `/96` IPv6 prefix for each account. The first two addresses in this range are reserved for Cloudflare. The remaining addresses are available for customer GRE tunnels, starting from `:2`, with two IPv6 addresses assigned per tunnel.
To configure IPv6:
1. Follow the instructions on how to [add a GRE tunnel](https://developers.cloudflare.com/magic-transit/how-to/configure-tunnel-endpoints/#add-tunnels).
2. In **IPv6 Interface address**, enter the IPv6 address assigned to you for the Cloudflare side of the tunnel. This address is one of the two addresses in the `/127` subnet allocated from your `/96` allocation.
3. Configure your router with the paired IPv6 address from the same `/127` subnet.
### Example
Your account has been assigned the prefix `2001:db8:abcd:1234::/96`.
In this example, the first two addresses in the range (`::0` and `::1`) are reserved for Cloudflare. You can use any of the remaining addresses in the `/96` block to create `/127` subnets for your tunnels.
If you decide to use the first available `/127` after the reserved addresses (`2001:db8:abcd:1234::2/127`), your configuration would be:
* **Cloudflare IPv6 Interface address**: `2001:db8:abcd:1234::2`
* **Router IPv6 address**: `2001:db8:abcd:1234::3`
Continuing with the example, the next `/127` for the second tunnel would be `2001:db8:abcd:1234::4/127`. Thus, your configuration would be:
* **Cloudflare IPv6 Interface address**: `2001:db8:abcd:1234::4`
* **Router IPv6 address**: `2001:db8:abcd:1234::5`
After the first two reserved addresses, you can continue allocating `/127` subnets sequentially (or in any order you prefer) for as many tunnels as needed until you reach the end of your `/96` range. Each `/127` contains exactly two IPv6 addresses — one for Cloudflare, one for your router.
### MSS clamping recommendations
If you use Magic Transit ingress-only traffic (DSR), apply a TCP MSS (Maximum Segment Size) clamp with a maximum of 1,416 bytes to your edge router's transit ports to account for the larger IPv6 header.
```json
{"@context":"https://schema.org","@type":"BreadcrumbList","itemListElement":[{"@type":"ListItem","position":1,"item":{"@id":"/directory/","name":"Directory"}},{"@type":"ListItem","position":2,"item":{"@id":"/magic-transit/","name":"Magic Transit"}},{"@type":"ListItem","position":3,"item":{"@id":"/magic-transit/how-to/","name":"How to"}},{"@type":"ListItem","position":4,"item":{"@id":"/magic-transit/how-to/ipv6/","name":"Configure IPv6 (beta)"}}]}
```
---
---
title: Safely withdraw a BYOIP prefix
description: When you prepare to remove traffic for a Bring Your Own IP (BYOIP) prefix from the Cloudflare edge, a direct BGP withdrawal action carries the risk of a stuck BGP route. This state occurs when a route becomes stuck in the Internet's Default-Free Zone (DFZ). Core routers that missed the withdrawal announcement continue forwarding traffic to a now-inactive next-hop (what is known as a blackhole). You can read more about this in our blog post BGP zombies and excessive path hunting.
image: https://developers.cloudflare.com/core-services-preview.png
---
[Skip to content](#%5Ftop)
Was this helpful?
YesNo
[ Edit page ](https://github.com/cloudflare/cloudflare-docs/edit/production/src/content/docs/magic-transit/how-to/safely-withdraw-byoip-prefix.mdx) [ Report issue ](https://github.com/cloudflare/cloudflare-docs/issues/new/choose)
Copy page
# Safely withdraw a BYOIP prefix
### Mitigating stuck BGP routes
When you prepare to remove traffic for a [Bring Your Own IP (BYOIP)](https://developers.cloudflare.com/byoip/) prefix from the Cloudflare edge, a direct BGP withdrawal action carries the risk of a stuck BGP route. This state occurs when a route becomes stuck in the Internet's [Default-Free Zone (DFZ) ↗](https://en.wikipedia.org/wiki/Default-free%5Fzone). Core routers that missed the withdrawal announcement continue forwarding traffic to a now-inactive next-hop (what is known as a blackhole). You can read more about this in our blog post [BGP zombies and excessive path hunting ↗](https://blog.cloudflare.com/going-bgp-zombie-hunting).
This risk is especially evident in the use case where the global routing table relies on more-specific to less-specific prefix routing fallback. Since this fallback mechanism is highly prone to route instability, Cloudflare recommends a multi-step draining process.
### Multi-step BYOIP withdrawal process
When draining traffic, use the same prefix length on Cloudflare and on your ISP (Internet Service Provider), since matching prefix lengths gives the most effective and deterministic behavior.
The following steps outline the recommended multi-step draining process to achieve a clean traffic cutover and prevent blackholing.
1. **Initiate advertisement from your origin network**: Begin announcing the exact same-length prefix (for example, `192.0.2.0/24`) from your local infrastructure to your upstream Internet Service Providers (ISPs). This action introduces a competing route of the same length into the global routing table. BGP best path selection will favor your native route based on other metrics (for example, shorter AS path length or local preference), allowing traffic to begin draining away from the Cloudflare edge. Note that some of your traffic may not route as expected, since this depends on how your ISP prefers routes (for example, the Cloudflare route may be treated as a less-preferred path if not fully withdrawn).
2. **Wait for global BGP convergence**: Allow a period of time (typically five to ten minutes) for the new native advertisement to propagate fully across the global routing table, and for routes to converge. This passive waiting period ensures that the majority of traffic has shifted to your local network before the next step.
3. **Signal BGP withdrawal from the Cloudflare edge**: Once you have verified that traffic has successfully drained, use one of the BGP control methods to stop the advertisement of the prefix from the Cloudflare edge.
ISP route refresh delays may impact traffic
Cloudflare's action to withdraw the route is near-instantaneous across our global network. However, Cloudflare has no control over how quickly external ISPs refresh their BGP tables after the withdrawal.
4. The draining process is complete.
```json
{"@context":"https://schema.org","@type":"BreadcrumbList","itemListElement":[{"@type":"ListItem","position":1,"item":{"@id":"/directory/","name":"Directory"}},{"@type":"ListItem","position":2,"item":{"@id":"/magic-transit/","name":"Magic Transit"}},{"@type":"ListItem","position":3,"item":{"@id":"/magic-transit/how-to/","name":"How to"}},{"@type":"ListItem","position":4,"item":{"@id":"/magic-transit/how-to/safely-withdraw-byoip-prefix/","name":"Safely withdraw a BYOIP prefix"}}]}
```
---
---
title: Kentik
description: Kentik is a network observability company that helps detect attacks on your network and triggers Cloudflare's Magic Transit to begin advertisement. The example scenario includes two mitigations, one which pulls the advertisement from the router and a second mitigation that makes an API call to Cloudflare.
image: https://developers.cloudflare.com/core-services-preview.png
---
[Skip to content](#%5Ftop)
Was this helpful?
YesNo
[ Edit page ](https://github.com/cloudflare/cloudflare-docs/edit/production/src/content/docs/magic-transit/partners/kentik.mdx) [ Report issue ](https://github.com/cloudflare/cloudflare-docs/issues/new/choose)
Copy page
# Kentik
Kentik is a network observability company that helps detect attacks on your network and triggers Cloudflare's Magic Transit to begin advertisement. Together, Kentik and Magic Transit On Demand work to create a fully Software-as-a-Service (SaaS)-based, Distributed Denial of Service (DDoS) protection solution to help you mitigate attacks and protect your network automatically.
In this tutorial, the example scenario includes two mitigations, one which pulls the advertisement from the router and a second mitigation that makes an API call to Cloudflare to begin advertising the prefixes from Cloudflare's global network.
## Prerequisites
You will need the email address associated with your Cloudflare account, Cloudflare Account ID, and Cloudflare API token to configure the connection for Magic Transit in Kentik.
## Configure the Kentik portal
1. Log in to your Kentik account.
2. Select **Menu** \> **Settings**.
3. From the **Settings** page under **Customizations**, select **Mitigations**.
4. On the **Configure Mitigations** page, locate the **Cloudflare** section.
5. Select **Edit** next to the Cloudflare branded mitigation to edit and review the information.
In the following example, section 2 uses the Cloudflare email address, Account ID, and API token to send the API call to Cloudflare to begin advertising routes and turn on Magic Transit for the customer's network.
6. After reviewing the information, select **Update Mitigation Platform**.
7. Select **Menu** \> **Library**.
8. On the **Library** page, in the search field, enter **Cloudflare**.
9. Under **Uncategorized Views**, select **Cloudflare Saved View**. This displays the data explorer.
10. From **Options** \> **Time**, you can edit the **Lookback** information to review traffic source information for a specific time period.
For additional information about Kentik and Magic Transit, refer to [Kentik's Magic Transit setup ↗](https://kb.kentik.com/v1/docs/mitigation-overview#cloudflare-mt-setup).
## Access Cloudflare account
1. Go to the **Address space** page.
[ Go to **Address space** ](https://dash.cloudflare.com/?to=/:account/ip-addresses/address-space)
2. Select the **BYOIP addresses** tab.
3. In this example scenario, the prefix Cloudflare protects displays a **Withdrawn** status.
After a DDoS attack occurs, the status changes to **Advertised**, which indicates Cloudflare protects the network.
## Analytics
For a detailed view of actions taken and attack types, use the **Network Analytics** dashboard. For more information about Network Analytics, refer to [Network Analytics](https://developers.cloudflare.com/analytics/network-analytics/).
Go to the **Network Analytics** page.
[ Go to **Network analytics** ](https://dash.cloudflare.com/?to=/:account/networking-insights/analytics/network-analytics/transport-analytics)
```json
{"@context":"https://schema.org","@type":"BreadcrumbList","itemListElement":[{"@type":"ListItem","position":1,"item":{"@id":"/directory/","name":"Directory"}},{"@type":"ListItem","position":2,"item":{"@id":"/magic-transit/","name":"Magic Transit"}},{"@type":"ListItem","position":3,"item":{"@id":"/magic-transit/partners/","name":"Partners"}},{"@type":"ListItem","position":4,"item":{"@id":"/magic-transit/partners/kentik/","name":"Kentik"}}]}
```
---
---
title: Anti-replay protection
description: If you use Magic Transit and anycast IPsec tunnels, disable anti-replay protection. Review the information to learn more.
image: https://developers.cloudflare.com/core-services-preview.png
---
[Skip to content](#%5Ftop)
Was this helpful?
YesNo
[ Edit page ](https://github.com/cloudflare/cloudflare-docs/edit/production/src/content/docs/magic-transit/reference/anti-replay-protection.mdx) [ Report issue ](https://github.com/cloudflare/cloudflare-docs/issues/new/choose)
Copy page
# Anti-replay protection
If you use Magic Transit and anycast IPsec tunnels, we recommend disabling anti-replay protection. Cloudflare disables this setting by default. However, you can enable it through the API or the Cloudflare dashboard for devices that do not support disabling it, including Cisco Meraki, Velocloud, and AWS VPN Gateway.
Refer to [Add tunnels](https://developers.cloudflare.com/magic-transit/how-to/configure-tunnel-endpoints/#add-tunnels) to learn how to set up replay protection. This page explains replay attacks, why Cloudflare recommends disabling IPsec anti-replay, and related considerations.
## Replay attacks
Replay attacks occur when a malicious actor intercepts and records a [packet ↗](https://www.cloudflare.com/learning/network-layer/what-is-a-packet/), and later sends the recorded packet to the target network again with an intent that benefits the attacker.
### Example
Consider a poorly designed Internet of Things (IoT) garage door opener. The device has a simple protocol for operation: A User Datagram Protocol (UDP) packet contains the garage door password and either `open` or `shut` in its data segment. The garage door's key encrypts the data segment, and the owner's phone sends it to either open or close the garage door.
An attacker likely cannot open or close the garage door by guessing the encryption key and password. While the attacker cannot see the recorded packet's encrypted content, if the garage is in their line-of-sight, they could potentially correlate and guess which packets are responsible for opening the garage door. When the attacker wants to open the door, they send the recorded `open` packet, and because the recorded packet would contain the password and already be encrypted with the right key, this door would open.
To prevent this replay attack, a user could add a packet number to each command sent to the garage door. The first could be `packet 1`, the second `packet 2` and so on, and the garage door would only accept packets containing the next number in the sequence each time. For example, after the garage door receives `packet 1`, it would only accept packet 2, and if an attacker tries to replay `packet 1`, the garage door ignores the request.
## IPsec anti-replay protection
IPsec anti-replay protection works similarly to the prevention example in the scenario above. The sender assigns each IPsec packet a sequence number. The receiver tracks which sequence numbers it has already seen and only accepts packets in a small window around the highest value the receiver has seen, and the window is typically 64-1024 packets. IPsec uses a window instead of strict sequencing because sometimes packets are reordered or lost on the Internet - having a range of acceptable packet sequence numbers helps absorb these issues.
## Magic Transit and anti-replay protection
Standard IPsec anti-replay protection assumes a single sender and a single receiver. The sender stores a sequence number in memory and increments it for every packet. The receiver tracks which sequence numbers it has already processed.
Cloudflare's anycast architecture does not fit this model. Because Magic Transit uses anycast, any packet can be processed by any of thousands of servers across hundreds of data centers. This distributed processing is what gives Magic Transit its performance and resiliency benefits — but it means no single server has a complete view of the sequence number state.
If you enable replay protection for Magic Transit IPsec tunnels, Cloudflare routes packets for a single tunnel to one server that keeps track of the sequence number. The replay protection mechanism works correctly in this mode, but you lose the benefit of distributing traffic across Cloudflare's global servers. It also only applies in one direction (Cloudflare to customer network) — Cloudflare does not route packets from the customer network to a single server and does not apply replay protection in that direction.
## Additional considerations
IPsec anti-replay protection is extremely important for transport mode - host-to-host or even app-to-app IPsec. In transport mode, an attacker has a relatively easy time identifying the encrypted protocol and identifying which packets to replay if the protocol is even subject to replay attacks. Magic Transit, however, uses tunnel mode, which is inherently much harder to successfully manage a replay attack.
There are several reasons that make replay attacks difficult with tunnel mode:
* IPsec encrypts the entire inner packet, which means the attacker would know almost nothing about the user packet they capture and perform correlation for replay attack. The only information an attacker would know is the outer site network that encrypted the packet, the outer site network that receives it, and the approximate size of the packet. However, this information is not enough to identify specific inner user packet flows to correlate and replay.
* Replay attacks only work when attackers use the same encryption keys. After rekeying, the router drops old replayed packets.
* Most protocols are not susceptible to replay at the packet level. The Internet can duplicate packets, which means TCP and many protocols built on UDP already include sequence numbers or similar to handle duplicate packets coming off the wire. For those, the replay traffic just looks like a duplicate packet and is handled by the end host correctly.
* Anti-replay protection is available in a higher Open Systems Interconnection (OSI) layer. Many modern day applications use secure communication protocols such as Secure Sockets Layer/Transport Layer Security (SSL/TLS), Secure Shell (SSH), or SSH File Transfer Protocol (SFTP) to transport application data. These secure communication protocols (at a higher OSI layer than network layer) natively support anti-replay protection.
* The reduced attack surface lowers the probability for packet interception. IPsec tunnels are site-to-site VPN tunnels between a user's site router and Cloudflare's global network, through dedicated Internet Service Provider (ISP) network connections, which are typically very secure. Additionally, the anycast nature of Cloudflare's IPsec implementation terminates the IPsec tunnel to one of the more than 300 Cloudflare data centers closest to the customer's edge router, which minimizes the physical distance and footprint the encrypted packets have to traverse.
## Troubleshooting
If you're experiencing tunnel instability or packet drops related to anti-replay protection, refer to [Troubleshoot tunnel health](https://developers.cloudflare.com/magic-transit/troubleshooting/tunnel-health/#ipsec-tunnel-instability-or-packet-drops).
```json
{"@context":"https://schema.org","@type":"BreadcrumbList","itemListElement":[{"@type":"ListItem","position":1,"item":{"@id":"/directory/","name":"Directory"}},{"@type":"ListItem","position":2,"item":{"@id":"/magic-transit/","name":"Magic Transit"}},{"@type":"ListItem","position":3,"item":{"@id":"/magic-transit/reference/","name":"Reference"}},{"@type":"ListItem","position":4,"item":{"@id":"/magic-transit/reference/anti-replay-protection/","name":"Anti-replay protection"}}]}
```
---
---
title: Bandwidth measurement
description: Cloudflare measures Magic Transit usage based on the 95th percentile of clean bandwidth for your network. "Clean bandwidth" refers to the egress traffic Cloudflare routes to your network after applying all Distributed Denial of Service (DDoS) mitigation and firewall functions. The usage measurement explicitly excludes attack traffic we block at our global network.
image: https://developers.cloudflare.com/core-services-preview.png
---
[Skip to content](#%5Ftop)
Was this helpful?
YesNo
[ Edit page ](https://github.com/cloudflare/cloudflare-docs/edit/production/src/content/docs/magic-transit/reference/bandwidth-measurement.mdx) [ Report issue ](https://github.com/cloudflare/cloudflare-docs/issues/new/choose)
Copy page
# Bandwidth measurement
Cloudflare measures Magic Transit usage based on the 95th percentile of clean bandwidth for your network. "Clean bandwidth" refers to the egress traffic Cloudflare routes to your network after applying all Distributed Denial of Service (DDoS) mitigation and firewall functions. The usage measurement explicitly excludes attack traffic we block at our global network.
To measure 95th percentile bandwidth, Cloudflare records clean bandwidth leaving our global network at five-minute intervals, sorts these measurements in descending order, and discards the top 5% of measurements it recorded. The highest remaining value constitutes the 95th percentile bandwidth measurement for that time period.
```json
{"@context":"https://schema.org","@type":"BreadcrumbList","itemListElement":[{"@type":"ListItem","position":1,"item":{"@id":"/directory/","name":"Directory"}},{"@type":"ListItem","position":2,"item":{"@id":"/magic-transit/","name":"Magic Transit"}},{"@type":"ListItem","position":3,"item":{"@id":"/magic-transit/reference/","name":"Reference"}},{"@type":"ListItem","position":4,"item":{"@id":"/magic-transit/reference/bandwidth-measurement/","name":"Bandwidth measurement"}}]}
```
---
---
title: Egress traffic
description: If you have implemented Magic Transit with egress traffic, consider the following technical aspects to create a successful connection to Cloudflare.
image: https://developers.cloudflare.com/core-services-preview.png
---
[Skip to content](#%5Ftop)
Was this helpful?
YesNo
[ Edit page ](https://github.com/cloudflare/cloudflare-docs/edit/production/src/content/docs/magic-transit/reference/egress.mdx) [ Report issue ](https://github.com/cloudflare/cloudflare-docs/issues/new/choose)
Copy page
# Egress traffic
If you have implemented Magic Transit with egress traffic, consider the following technical aspects to create a successful connection to Cloudflare.
* The source IP for [packets ↗](https://www.cloudflare.com/learning/network-layer/what-is-a-packet/) you send to Cloudflare must come from your Magic Transit prefix. If you have Magic Transit [leased IPs](https://developers.cloudflare.com/magic-transit/cloudflare-ips/) or [Bring Your Own IP (BYOIP)](https://developers.cloudflare.com/byoip/) prefixes, you can choose whether to implement a Network Address Translation (NAT) on your edge device, or use the prefix as a routed Local Area Network (LAN) interface on your side.
* Cloudflare recommends that you create policy-based routing (PBR) rules to ensure that only traffic from your BYOIP prefixes or Magic Transit leased IP addresses goes through your GRE/IPsec tunnels to Cloudflare for egress to the Internet. Cloudflare only accepts egress traffic from authorized prefixes. As such, your PBR policies need to align with this. If implementing PBR is not feasible and you need to implement a default-route through the Magic Transit tunnels, ensure the routes for your tunnel destination anycast IPs go through your underlay transit path.
* You need a tunnel failure detection mechanism to re-route your PBR traffic. This ensures your device re-routes packets if a failure occurs in the upstream channel to Cloudflare. For example, you might configure your device to ping the other side of the tunnel or send a probe to an Internet website. When the probe fails, you want your device to deprecate the PBR forwarding-path, and switch to a backup tunnel. Refer to your equipment's configuration guide to learn how to implement this.
* You may need to configure multiple GRE/IPsec tunnels to load-share traffic sent to the Internet through Cloudflare. You can achieve this by applying two different PBR rules. Thus, traffic from one IP/subnet goes through one tunnel, and traffic from another IP/subnet goes through a different tunnel.
* Your Cloudflare Network Firewall rules will apply in both directions. Ensure you set up your Cloudflare Network Firewall rules for your intended traffic flows, both in and out.
* If using Magic Transit egress, we recommend you set your GRE or IPsec tunnel health check configuration to [bidirectional](https://developers.cloudflare.com/magic-transit/how-to/configure-tunnel-endpoints/#add-tunnels), so that Cloudflare health checks are in sync with the [data plane ↗](https://en.wikipedia.org/wiki/Forwarding%5Fplane) traffic flow.
* Once you configure your traffic to egress through the GRE/IPsec tunnel, Cloudflare encapsulates it and sends it to a Cloudflare anycast endpoint. Your Internet Service Provider (ISP) then routes the encapsulated traffic to the nearest available Cloudflare point of presence (PoP), where it exits to the Internet through Cloudflare's connectivity options at that location.
```json
{"@context":"https://schema.org","@type":"BreadcrumbList","itemListElement":[{"@type":"ListItem","position":1,"item":{"@id":"/directory/","name":"Directory"}},{"@type":"ListItem","position":2,"item":{"@id":"/magic-transit/","name":"Magic Transit"}},{"@type":"ListItem","position":3,"item":{"@id":"/magic-transit/reference/","name":"Reference"}},{"@type":"ListItem","position":4,"item":{"@id":"/magic-transit/reference/egress/","name":"Egress traffic"}}]}
```
---
---
title: GRE and IPsec tunnels
description: Magic Transit uses Generic Routing Encapsulation (GRE) and IPsec tunnels to transmit packets from Cloudflare's global network to your origin network.
image: https://developers.cloudflare.com/core-services-preview.png
---
[Skip to content](#%5Ftop)
Was this helpful?
YesNo
[ Edit page ](https://github.com/cloudflare/cloudflare-docs/edit/production/src/content/docs/magic-transit/reference/gre-ipsec-tunnels.mdx) [ Report issue ](https://github.com/cloudflare/cloudflare-docs/issues/new/choose)
Copy page
# GRE and IPsec tunnels
## Tunnels and encapsulation
To route traffic between Cloudflare's global network and your origin network, Magic Transit wraps your original packets inside an outer packet — a process called encapsulation. The outer packet carries your traffic across the Internet to its destination, where it is unwrapped (decapsulated) and delivered.
Magic Transit uses two encapsulation protocols: [Generic Routing Encapsulation (GRE)](https://www.cloudflare.com/learning/network-layer/what-is-gre-tunneling/) and [IPsec](https://www.cloudflare.com/learning/network-layer/what-is-ipsec/). GRE is stateless and simpler to configure but does not encrypt traffic. IPsec encrypts traffic and authenticates the source, providing stronger security. Both create tunnels — logical point-to-point connections between Cloudflare and your network. Cloudflare sets up tunnel endpoints on global network servers inside your network namespace, and you set up tunnel endpoints on routers at your data center.
To accommodate additional header data introduced by encapsulation, you must adjust the maximum segment size (MSS) to comply with the standard Internet routable maximum transmission unit (MTU), which is 1500 bytes.
For instructions, refer to [Set maximum segment size](https://developers.cloudflare.com/magic-transit/get-started/#set-maximum-segment-size).
This diagram illustrates the flow of traffic with Magic Transit.
sequenceDiagram
accTitle: Tunnels and encapsulation
accDescr: This diagram shows the flow of traffic with Magic Transit.
participant A as Client machine
participant B as Cloudflare Magic Transit
participant C as Origin router
A->>B: Payload
Protocol
IP header
Note left of A: Ingress
traffic
B->>C: Payload
Protocol
IP header
GRE
IP header
C->>A: IP header
Protocol
Payload
Note right of C: Egress
traffic
Note
By default, your Internet Service Provider (ISP) interface routes egress packets, not Cloudflare.
## Anycast
Traditional tunnels connect two fixed endpoints — one device on each side. Magic Transit uses a different model: [anycast](https://www.cloudflare.com/learning/cdn/glossary/anycast-network/) IP addresses for Cloudflare's tunnel endpoints. In the anycast model, any server in any Cloudflare data center can receive traffic and must be capable of encapsulating and decapsulating packets for any tunnel. This means your tunnel is not tied to a single Cloudflare server — traffic is handled by whichever data center is closest to the source.
This works with GRE tunnels because the GRE protocol is stateless. Cloudflare processes each packet independently without requiring any negotiation or coordination between tunnel endpoints. Tunnel endpoints bind to IP addresses but not to specific devices. Any device that can strip off the outer headers and then route the inner packet can handle any GRE packet sent over the tunnel.
For IPsec tunnels, the customer's router negotiates the creation of an IPsec tunnel with Cloudflare using the Internet Key Exchange (IKE) protocol. Because IPsec is stateful (it requires shared keys and session parameters), one Cloudflare server handles the initial negotiation, then propagates the tunnel details (traffic selectors, keys, etc.) across all Cloudflare data centers. The result is that any Cloudflare server can handle traffic for that IPsec tunnel, even though only one server negotiated the setup.
Cloudflare's anycast architecture provides a conduit to your tunnel for every server in every data center on Cloudflare's global network. The following image shows this architecture.
flowchart LR
accTitle: Anycast tunnel
accDescr: Multiple servers in data center preparing packets to send through anycast tunnel.
a(User)
subgraph 1
direction LR
b(Cloudflare global
network server)
c(Cloudflare global
network server)
d(Cloudflare global
network server)
e(Cloudflare global
network server)
f(Cloudflare global
network server)
g(Cloudflare global
network server)
h(Cloudflare global
network server)
end
subgraph 2
i("Acme router
198.51.100.1")
j("FTP server
(203.0.113.100)")
end
subgraph 3
x("Acme router
198.51.100.1")
z("FTP server
(203.0.113.100)")
end
a --> 1== Cloudflare anycast GRE
single endpoint ==>i --> j
1== Cloudflare anycast IPsec
single endpoint ==>x --> z
## IPsec tunnels
Post-quantum IPsec closed beta
Post-quantum key agreement for IPsec tunnels with third-party devices is currently in closed beta. Contact your account team to request access. Post-quantum IPsec is generally available when using the [Cloudflare One Appliance](https://developers.cloudflare.com/cloudflare-wan/configuration/appliance/).
[IPsec ↗](https://www.cloudflare.com/learning/network-layer/what-is-ipsec/) is a group of protocols that work together to set up encrypted connections between devices. It helps keep data you send over public networks secure. Organizations often use IPsec to set up Virtual Private Networks (VPNs), and it works by encrypting IP packets and authenticating the source where the packets come from.
For information on how to set up an IPsec tunnel, refer to [Configure tunnel endpoints](https://developers.cloudflare.com/magic-transit/how-to/configure-tunnel-endpoints/). To learn more about the configuration parameters Magic Transit uses to create an IPsec tunnel, keep reading.
### How IKEv2 establishes an IPsec tunnel
Magic Transit uses the following stages to establish an IPsec tunnel:
* **Initial Exchange** (`IKE_SA_INIT`): IKE peers negotiate parameters for the IKE Security Association (SA) and establish a shared secret for key derivation, and when relevant, signal support for post-quantum key exchange with [RFC 9370 ↗](https://datatracker.ietf.org/doc/rfc9370/). After this exchange, the peers have a secure communication channel but they have not yet authenticated each other.
* **Intermediate Exchange** (`IKE_INTERMEDIATE`): If both peers support RFC 9370, they perform an additional key exchange using ML-KEM (Module-Lattice-based Key-Encapsulation Mechanism), a post-quantum key exchange specified in [draft-ietf-ipsecme-ikev2-mlkem ↗](https://datatracker.ietf.org/doc/draft-ietf-ipsecme-ikev2-mlkem/). This creates a hybrid shared secret by combining a secret derived from classical Diffie-Hellman (established during the `IKE_SA_INIT`) with post-quantum ML-KEM to protect against [harvest-now, decrypt-later ↗](https://en.wikipedia.org/wiki/Harvest%5Fnow,%5Fdecrypt%5Flater) attacks.
* **Auth Exchange** (`IKE_AUTH`): Using the keys established from both the `IKE_SA_INIT` and the `IKE_INTERMEDIATE` exchange, IKE peers mutually authenticate each other. After authentication, they establish the IKE security association (SA). Next, the peers negotiate and establish an IPsec tunnel, known as a Child SA.
* **Rekeying**: Periodically, or through manual intervention, IKE SAs can be rekeyed to generate new SAs with fresh keys for the session. This rekey operation is performed for both the IKE SA (to refresh the control plane) and the Child SAs (to refresh the data plane). When a hybrid exchange is in use (RFC 9370), the rekey process for the IKE SA will once again perform the parallel classical (DH) and post-quantum (ML-KEM) exchanges to ensure continued quantum resistance.
Note
The IKE SA and the Child SA are separate entities, each with their own parameters. The Child SA is the dataplane IPsec tunnel where user traffic flows (that is, the ESP layer of IPsec). The IKE SA sets up and manages the Child SA.
In summary, IKEv2 creates an IKE SA that uses certain cryptographic transforms. It then uses that IKE SA to create a Child SA which itself uses certain cryptographic transforms. The following configuration section details which of these transforms Magic Transit currently supports for IKE SAs and Child SAs.
Note
IKE is one of the protocols that makes up IPsec. Cloudflare only operates as an IKE responder.
### Supported configuration parameters
Choose from the following configuration parameters that Magic Transit supports, based on what your appliance supports.
IKE SA (also known as Phase 1)
Documentation sometimes refers to IKE SA as Phase 1 as per IKEv1 language.
* **Encryption**
* AES-GCM-16 with 128-bit or 256-bit key length
* AES-CBC with 256-bit key length
* **Integrity** (sometimes referred to as Authentication)
* SHA2-256
* **Key Exchange Method** (formerly Diffie-Hellman group): Cloudflare supports the following key exchange methods for the IKE SA. Note that [RFC 9370 ↗](https://datatracker.ietf.org/doc/rfc9370/) renames "DH Group" to "Key Exchange Method" to accommodate non-DH algorithms.
* **Post-quantum hybrid (beta) (recommended)**: ML-KEM-768 in parallel with DH Group 20 (per RFC 9370 and [draft-ietf-ipsecme-ikev2-mlkem ↗](https://datatracker.ietf.org/doc/draft-ietf-ipsecme-ikev2-mlkem/))
* Post-quantum hybrid: ML-KEM-1024 in parallel with DH Group 20 (per RFC 9370 and [draft-ietf-ipsecme-ikev2-mlkem ↗](https://datatracker.ietf.org/doc/draft-ietf-ipsecme-ikev2-mlkem/))
* Classical DH group 20 (384-bit random ECP group)
* Classical DH group 14 (2048-bit MODP group)
* Classical DH group 5 (1536-bit MODP group)
Warning
Cloudflare recommends the **ML-KEM-768 + DH Group 20** hybrid exchange for post-quantum key agreement. If your appliance does not yet support RFC 9370 and draft-ietf-ipsecme-ikev2-mlkem, use DH group 20.
* **Pseudorandom function (PRF)**
Do not confuse this with Perfect Forward Secrecy (PFS). You often cannot configure PRF.
* SHA2-256
* SHA2-384
* SHA2-512
Child SA (also known as Phase 2 or IPsec SA)
The Child SA. Documentation sometimes refers to this as Phase 2 as per IKEv1 language.
* **Encryption**:
* AES-GCM-16 with 128-bit or 256-bit key length
* AES-CBC with 128-bit or 256-bit key length
* **Integrity** (sometimes referred to as Authentication.)
* SHA2-256
* SHA-1
Note
When using AES-GCM-16, you do not need an integrity algorithm because AES GCM includes integrity checking (since it is an Authenticated Encryption with Associated Data (AEAD) algorithm). Even when using an AEAD algorithm, however, some routers still require you to select an integrity algorithm.
* **Perfect Forward Secrecy (PFS) group**
Documentation sometimes refers to this as Phase 2 Diffie-Hellman Group. Do not confuse this with PRF. Cloudflare supports the following Diffie-Hellman (DH) groups.
* DH group 20 (384-bit random ECP group)
* DH group 14 (2048-bit MODP group)
* DH group 5 (1536-bit MODP group)
Post-quantum security
If the Child SA uses DH groups for Perfect Forward Secrecy, it is still protected against quantum threats if the parent IKE SA was established using a hybrid ML-KEM exchange.
Warning
Cloudflare recommends that you use only one DH group when configuring your device, specifically **DH group 20**.
Note
Cloudflare recommends configuring the Child SA rekey interval (SA lifetime) between 30 minutes and 8 hours.
Required configuration parameters
* The IKE version must be IKEv2.
* The IKE authentication method must be Pre-Shared Key (PSK).
* If your router is behind Network Address Translation (NAT) and requires NAT traversal (NAT-T), then your router must initiate IKE communication on port `4500`. Most devices support configuring NAT-T to begin on port `4500` (exceptions include at least some versions of the Cisco ASA). Cloudflare does not support NAT-T for IKE sessions which begin on port `500` and then switch to port `4500`.
* (Uncommon) You must disable Extended Sequence Numbers (ESN).
* If your tunnels need replay protection, enable Dead Peer Detection (DPD) in your router and select the option that restarts your IKE session when a DPD timeout occurs. This "restart" option ensures that the connection can recover in the event that a Cloudflare server goes offline. If your router does not offer this setting, check the router documentation for its dead peer detection behavior.
* **Multiple Key Exchange ([RFC 9370 ↗](https://datatracker.ietf.org/doc/rfc9370/))**: To use post-quantum security, your router must support the `IKE_INTERMEDIATE` and `IKE_FOLLOWUP_KE` exchange as defined in RFC 9370 and [draft-ietf-ipsecme-ikev2-mlkem ↗](https://datatracker.ietf.org/doc/draft-ietf-ipsecme-ikev2-mlkem/). Because post-quantum public keys and ciphertexts (like ML-KEM-768) are larger than classical keys, you must enable IKEv2 fragmentation on your router to prevent packets from exceeding the 1,500-byte MTU. When configuring the first Additional Key Exchange, use the IANA-assigned Transform ID `36` for ML-KEM-768, or Transform ID `37` for ML-KEM-1024.
Optional configuration parameters
* Disable [anti-replay protection](https://developers.cloudflare.com/magic-transit/reference/anti-replay-protection/).
* **`NULL` encryption for IPsec (not recommended):** Do not use this option unless necessary because it reduces security by leaving IPsec traffic unencrypted. You must explicitly opt in to use this option. Using this option also eliminates post-quantum protections.
### Supported IKE ID formats
Magic Transit supports the following IKE ID types for IPsec:
Request for Comments (RFC) name `ID_RFC822_ADDR`
* **Format**: `ipsec@..ipsec.cloudflare.com`
* **Example**: `ipsec@f5407d8db1a542b196c59f6d04ba8bd1.123456789.ipsec.cloudflare.com`
RFC name `ID_FQDN`
* **Format**: `..ipsec.cloudflare.com`
* **Example**: `f5407d8db1a542b196c59f6d04ba8bd1.123456789.ipsec.cloudflare.com`
RFC name `ID_KEY_ID`
* **Format**: `_`
* **Example**: `123456789_f5407d8db1a542b196c59f6d04ba8bd1`
Additionally, Cloudflare supports the IKE ID type of `ID_IPV4_ADDR` if the following two conditions are met:
1. You set the IPsec tunnel's `customer_endpoint` value.
2. The combination of `cloudflare_endpoint` and `customer_endpoint` is unique among the customer's IPsec tunnels.
Warning
Make sure each IPsec tunnel has a unique combination of a [Cloudflare endpoint and customer endpoint](https://developers.cloudflare.com/magic-transit/how-to/configure-tunnel-endpoints/). If this combination is not unique among your IPsec tunnels, you should use one of the custom IKE formats (`ID_RFC822_ADDR`, `ID_FQDN`, or `ID_KEY_ID`) to specify the tunnel ID and account ID. This helps Cloudflare link the IKE packet to the right IPsec tunnel for tasks like authentication.
### Route-based vs. policy-based VPNs
Although Cloudflare supports both route-based and policy-based VPNs, we recommend route-based VPNs.
If route-based VPNs are not an option and you must use policy-based VPNs, be aware of the following limitations:
* Cloudflare only supports a single set of traffic selectors per Child SA.
* A policy must cover reply-style health checks — that is, they must match traffic selectors — otherwise, Cloudflare drops them, just like any other traffic from an IPsec tunnel that does not match a policy.
* A single IPsec tunnel can only contain around 100 Child SAs. Therefore, there is effectively a limit on the number of different policies per tunnel.
### Troubleshooting
For help resolving tunnel issues:
* [Troubleshoot tunnel health](https://developers.cloudflare.com/cloudflare-wan/configuration/common-settings/check-tunnel-health-dashboard/) \- Diagnose and fix health check failures
* [Troubleshoot with IPsec logs](https://developers.cloudflare.com/logs/logpush/logpush-job/datasets/account/ipsec%5Flogs/) \- Use Logpush to analyze IPsec handshake issues
## Network Analytics
Cloudflare's Network Analytics provides near real-time visibility into network and transport layer traffic patterns and Distributed Denial of Service (DDoS) attacks to help troubleshoot IP traffic issues. You can also use Network Analytics to view information about the traffic that leaves Cloudflare's global network by reviewing ingress and egress tunnel traffic over a specific amount of time.
For more information, refer to [Analytics](https://developers.cloudflare.com/magic-transit/analytics/).
## Troubleshooting
For help resolving tunnel issues:
* [Troubleshoot tunnel health](https://developers.cloudflare.com/magic-transit/troubleshooting/tunnel-health/) \- Diagnose and fix health check failures
* [Troubleshoot with IPsec logs](https://developers.cloudflare.com/magic-transit/troubleshooting/ipsec-troubleshoot/) \- Use Logpush to analyze IPsec handshake issues
```json
{"@context":"https://schema.org","@type":"BreadcrumbList","itemListElement":[{"@type":"ListItem","position":1,"item":{"@id":"/directory/","name":"Directory"}},{"@type":"ListItem","position":2,"item":{"@id":"/magic-transit/","name":"Magic Transit"}},{"@type":"ListItem","position":3,"item":{"@id":"/magic-transit/reference/","name":"Reference"}},{"@type":"ListItem","position":4,"item":{"@id":"/magic-transit/reference/gre-ipsec-tunnels/","name":"GRE and IPsec tunnels"}}]}
```
---
---
title: How Cloudflare calculates tunnel health alerts
description: Tunnel health alerts notify you when the reliability of your tunnel connections drops below an acceptable threshold. Understanding how Cloudflare calculates these alerts helps you interpret notifications and distinguish between brief, recoverable issues and sustained problems that require attention.
image: https://developers.cloudflare.com/core-services-preview.png
---
[Skip to content](#%5Ftop)
Was this helpful?
YesNo
[ Edit page ](https://github.com/cloudflare/cloudflare-docs/edit/production/src/content/docs/magic-transit/reference/how-cloudflare-calculates-tunnel-health-alerts.mdx) [ Report issue ](https://github.com/cloudflare/cloudflare-docs/issues/new/choose)
Copy page
# How Cloudflare calculates tunnel health alerts
Tunnel health alerts notify you when the reliability of your tunnel connections drops below an acceptable threshold. Understanding how Cloudflare calculates these alerts helps you interpret notifications and distinguish between brief, recoverable issues and sustained problems that require attention.
Cloudflare uses a multi-window approach that combines short-term and long-term metrics to avoid alerting on transient issues while still detecting real degradation. The following sections explain the key concepts behind this process.
### Service-level indicator (SLI)
SLI is the ratio of positive events to total events. An SLI of 0% means the feature is not working at all, and an SLI of 100% means the feature is fully working as expected.
Note
Cloudflare counts degraded health checks as failed health checks when calculating SLIs.
### Service-level objectives (SLOs)
SLOs are the threshold for the SLI and set a target level of reliability for IPsec/GRE tunnels. For example, an SLO could be 99.9% of tunnel states being healthy over the past 30 days. Cloudflare calculates the SLI values for the SLO based on the [down tunnel state value](https://developers.cloudflare.com/magic-transit/reference/tunnel-health-checks/#down), not on the timeout results from tunnel health checks.
### Error budget
The error budget is the amount of unsuccessful events that can happen over the course of the SLO time window while maintaining the service at the level of availability the SLO defines.
The SLO is a target percentage, and the error budget equals 100% minus the SLO. For example, assume that during 30 days there were one million tunnel health checks in your account, and your SLO is set to 99.9%. The error budget for this case would be:
```
number of events x (1 - SLO) = 1,000,000 x (1-0.999) = 1,000
```
This means the SLO allows for 1,000 unsuccessful tunnel health checks over the course of 30 days. However, what happens if all errors happen in one hour instead of 30 days? This leads to the concept of burn rate.
### Burn rate
The burn rate measures how fast you expend the error budget over a given time window relative to the SLO window. In the example, an SLO of 99.9% means you can observe 1,000 tunnel health check failures over the course of 30 days. However, those same 1,000 health check failures are not acceptable during one hour.
## When Cloudflare alerts you
To determine when to send Tunnel health alerts, Cloudflare relies on a multi-window, multi-burn rate approach. Every five minutes, Cloudflare analyzes the last hour and the last five minutes of data. Cloudflare calculates the SLI for the short window (five minutes) and long window (one hour) of data.
Cloudflare only alerts you when both the short and long windows fall short of the configured threshold. This means both windows must fail the threshold for an alert to trigger. For example, if you defined a threshold of 99%:
* Short window: 99.2%, Long window: 99%. Cloudflare would not trigger an alert because the short window exceeds the 99% threshold.
* Short window: 98%, Long window: 98%. Cloudflare would trigger an alert because both windows fall short of the 99% threshold.
```json
{"@context":"https://schema.org","@type":"BreadcrumbList","itemListElement":[{"@type":"ListItem","position":1,"item":{"@id":"/directory/","name":"Directory"}},{"@type":"ListItem","position":2,"item":{"@id":"/magic-transit/","name":"Magic Transit"}},{"@type":"ListItem","position":3,"item":{"@id":"/magic-transit/reference/","name":"Reference"}},{"@type":"ListItem","position":4,"item":{"@id":"/magic-transit/reference/how-cloudflare-calculates-tunnel-health-alerts/","name":"How Cloudflare calculates tunnel health alerts"}}]}
```
---
---
title: Maximum transmission unit and maximum segment size
description: Because Magic Transit wraps your traffic in additional headers (encapsulation), the effective space available for your original data in each packet is reduced. If you do not account for this overhead, packets may be too large for the network path and will be dropped or fragmented — leading to performance loss or failed connections. This page explains the two key values you need to configure: maximum transmission unit (MTU) and maximum segment size (MSS).
image: https://developers.cloudflare.com/core-services-preview.png
---
[Skip to content](#%5Ftop)
Was this helpful?
YesNo
[ Edit page ](https://github.com/cloudflare/cloudflare-docs/edit/production/src/content/docs/magic-transit/reference/mtu-mss.mdx) [ Report issue ](https://github.com/cloudflare/cloudflare-docs/issues/new/choose)
Copy page
# Maximum transmission unit and maximum segment size
Because Magic Transit wraps your traffic in additional headers (encapsulation), the effective space available for your original data in each packet is reduced. If you do not account for this overhead, packets may be too large for the network path and will be dropped or fragmented — leading to performance loss or failed connections. This page explains the two key values you need to configure: maximum transmission unit (MTU) and maximum segment size (MSS).
## MTU and MSS
The [maximum transmission unit (MTU) ↗](https://www.cloudflare.com/learning/network-layer/what-is-mtu/) is a measurement representing the largest data packet that a network-connected device will accept. The MTU almost always applies to Layer 3 of the Open Systems Interconnection (OSI) model in networking and includes the entire packet, including all headers (Transmission Control Protocol (TCP), Internet Protocol (IP), etc.) and the data (payload) itself. For example, packets must not exceed 1,500 bytes to route through the Internet.
The [maximum segment size (MSS) ↗](https://www.cloudflare.com/learning/network-layer/what-is-mss/) refers to the amount of data that you can send in a single TCP datagram packet. You determine this value by subtracting the size of the IP and TCP headers from the MTU, which instructs the router how large the payload can be. It applies to Layer 4 of the OSI model in networking.
One common misconception about MSS/MTU is that setting these values negatively impacts performance. While there is a slight performance penalty, it is worse not to configure these values to account for the specificities of your network.
## Encapsulation
Since Magic Transit uses encapsulation to deliver its services, it is also important to understand why MTU and MSS matter in this case.
Encapsulation adds bytes to the packet because Cloudflare adds a new IP header and (often) some sort of encapsulating header to every packet. For example, in the case of Generic Routing Encapsulation (GRE) for Internet Protocol version 4 (IPv4), encapsulation adds 24 bytes — 20 bytes for the IPv4 header and 4 bytes for the GRE tunnel header.
A network interface that performs GRE encapsulation needs to account for the added overhead by reducing its MTU. Since the MTU maximum size is 1,500 bytes, for IPv4 this means the MTU becomes 1,476 bytes (the original 1,500 bytes minus the 24 bytes from the GRE encapsulation). This reduced MTU defines the maximum size of the IP packet that GRE can encapsulate.
## Fragmentation
If the data packet is larger than what the network interface can accept, the network must either drop or fragment it into smaller packets. When fragmentation occurs, Cloudflare only accepts data packets that it can completely reassemble. If some fragments are missing, Cloudflare discards all received fragments. Cloudflare does not forward incomplete packets to the customer.
Setting the do not fragment (DF) bit in the TCP header to `1` denotes that the network must drop the packet rather than fragment it if the packet is larger than the MTU that intermediary network devices can accept. Most TCP implementations set the DF bit to `1` to avoid the potential issues that fragmentation causes.
If you experience issues with fragmentation and cannot set an MSS clamp, Cloudflare can clear the DF bit for you. When you enable this option, Cloudflare fragments packets greater than 1,500 bytes, and your infrastructure reassembles the packets after decapsulation. Use this as a last resort option. Contact your account team for more information.
### Fragmentation in Magic Transit
Consider a UDP datagram of size 3,000 bytes (8 bytes for the UDP header + 2,992 bytes for the UDP data). To fit within a standard 1,500-byte MTU, this UDP datagram would be fragmented across three IP packets as follows:
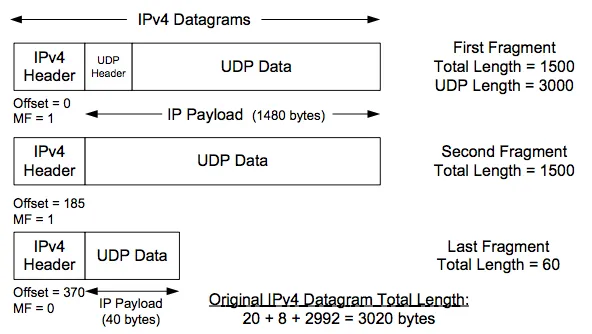
Suppose that the UDP datagram has source port `389` and is destined for a Magic Transit customer IP address. Suppose also that the Magic Transit customer has a firewall rule in place that drops UDP traffic with source port `389`, a common [Connectionless Lightweight Directory Access Protocol (CLDAP) ↗](https://blog.cloudflare.com/reflections-on-reflections) reflection attack vector.
The three preceding packet fragments will arrive at Cloudflare, but only the first fragment contains a UDP header with source port information. The second and third fragments contain UDP data but do not have UDP header information.
So the question is: which of these fragments does Cloudflare drop and which does it deliver to the customer? If Cloudflare only drops the first parts of fragmented packets, the remaining parts could still generate a large amount of traffic during a Denial of Service (DoS) attack.
### How Cloudflare handles fragments
The following diagram shows how the three UDP fragments in the preceding example flow through Cloudflare and Magic Transit. The main takeaways are:
* **Cloudflare never sends incomplete packets to customers**: If Cloudflare does not see all parts of a packet required to fully reassemble that packet, Cloudflare will not send the partial data fragments to the customer.
* **Cloudflare Network Firewall operates on fully reassembled packets, not individual fragments**: This means that filters that match on UDP/TCP header information, for example, apply to the fully reassembled packet, not just the initial fragment. Cloudflare will not leak non-initial fragments to customers.
* **Customers can still see fragmented packets**: By default (without `clear_dont_fragment_bit` set), Cloudflare fragments packets to fit within the configured MTU of the tunnel before sending the data to the customer. If a packet is larger than 1,476 bytes, Cloudflare will fragment it and send those fragments to the customer for reassembly.
In all cases, Cloudflare sends all fragments to the customer.
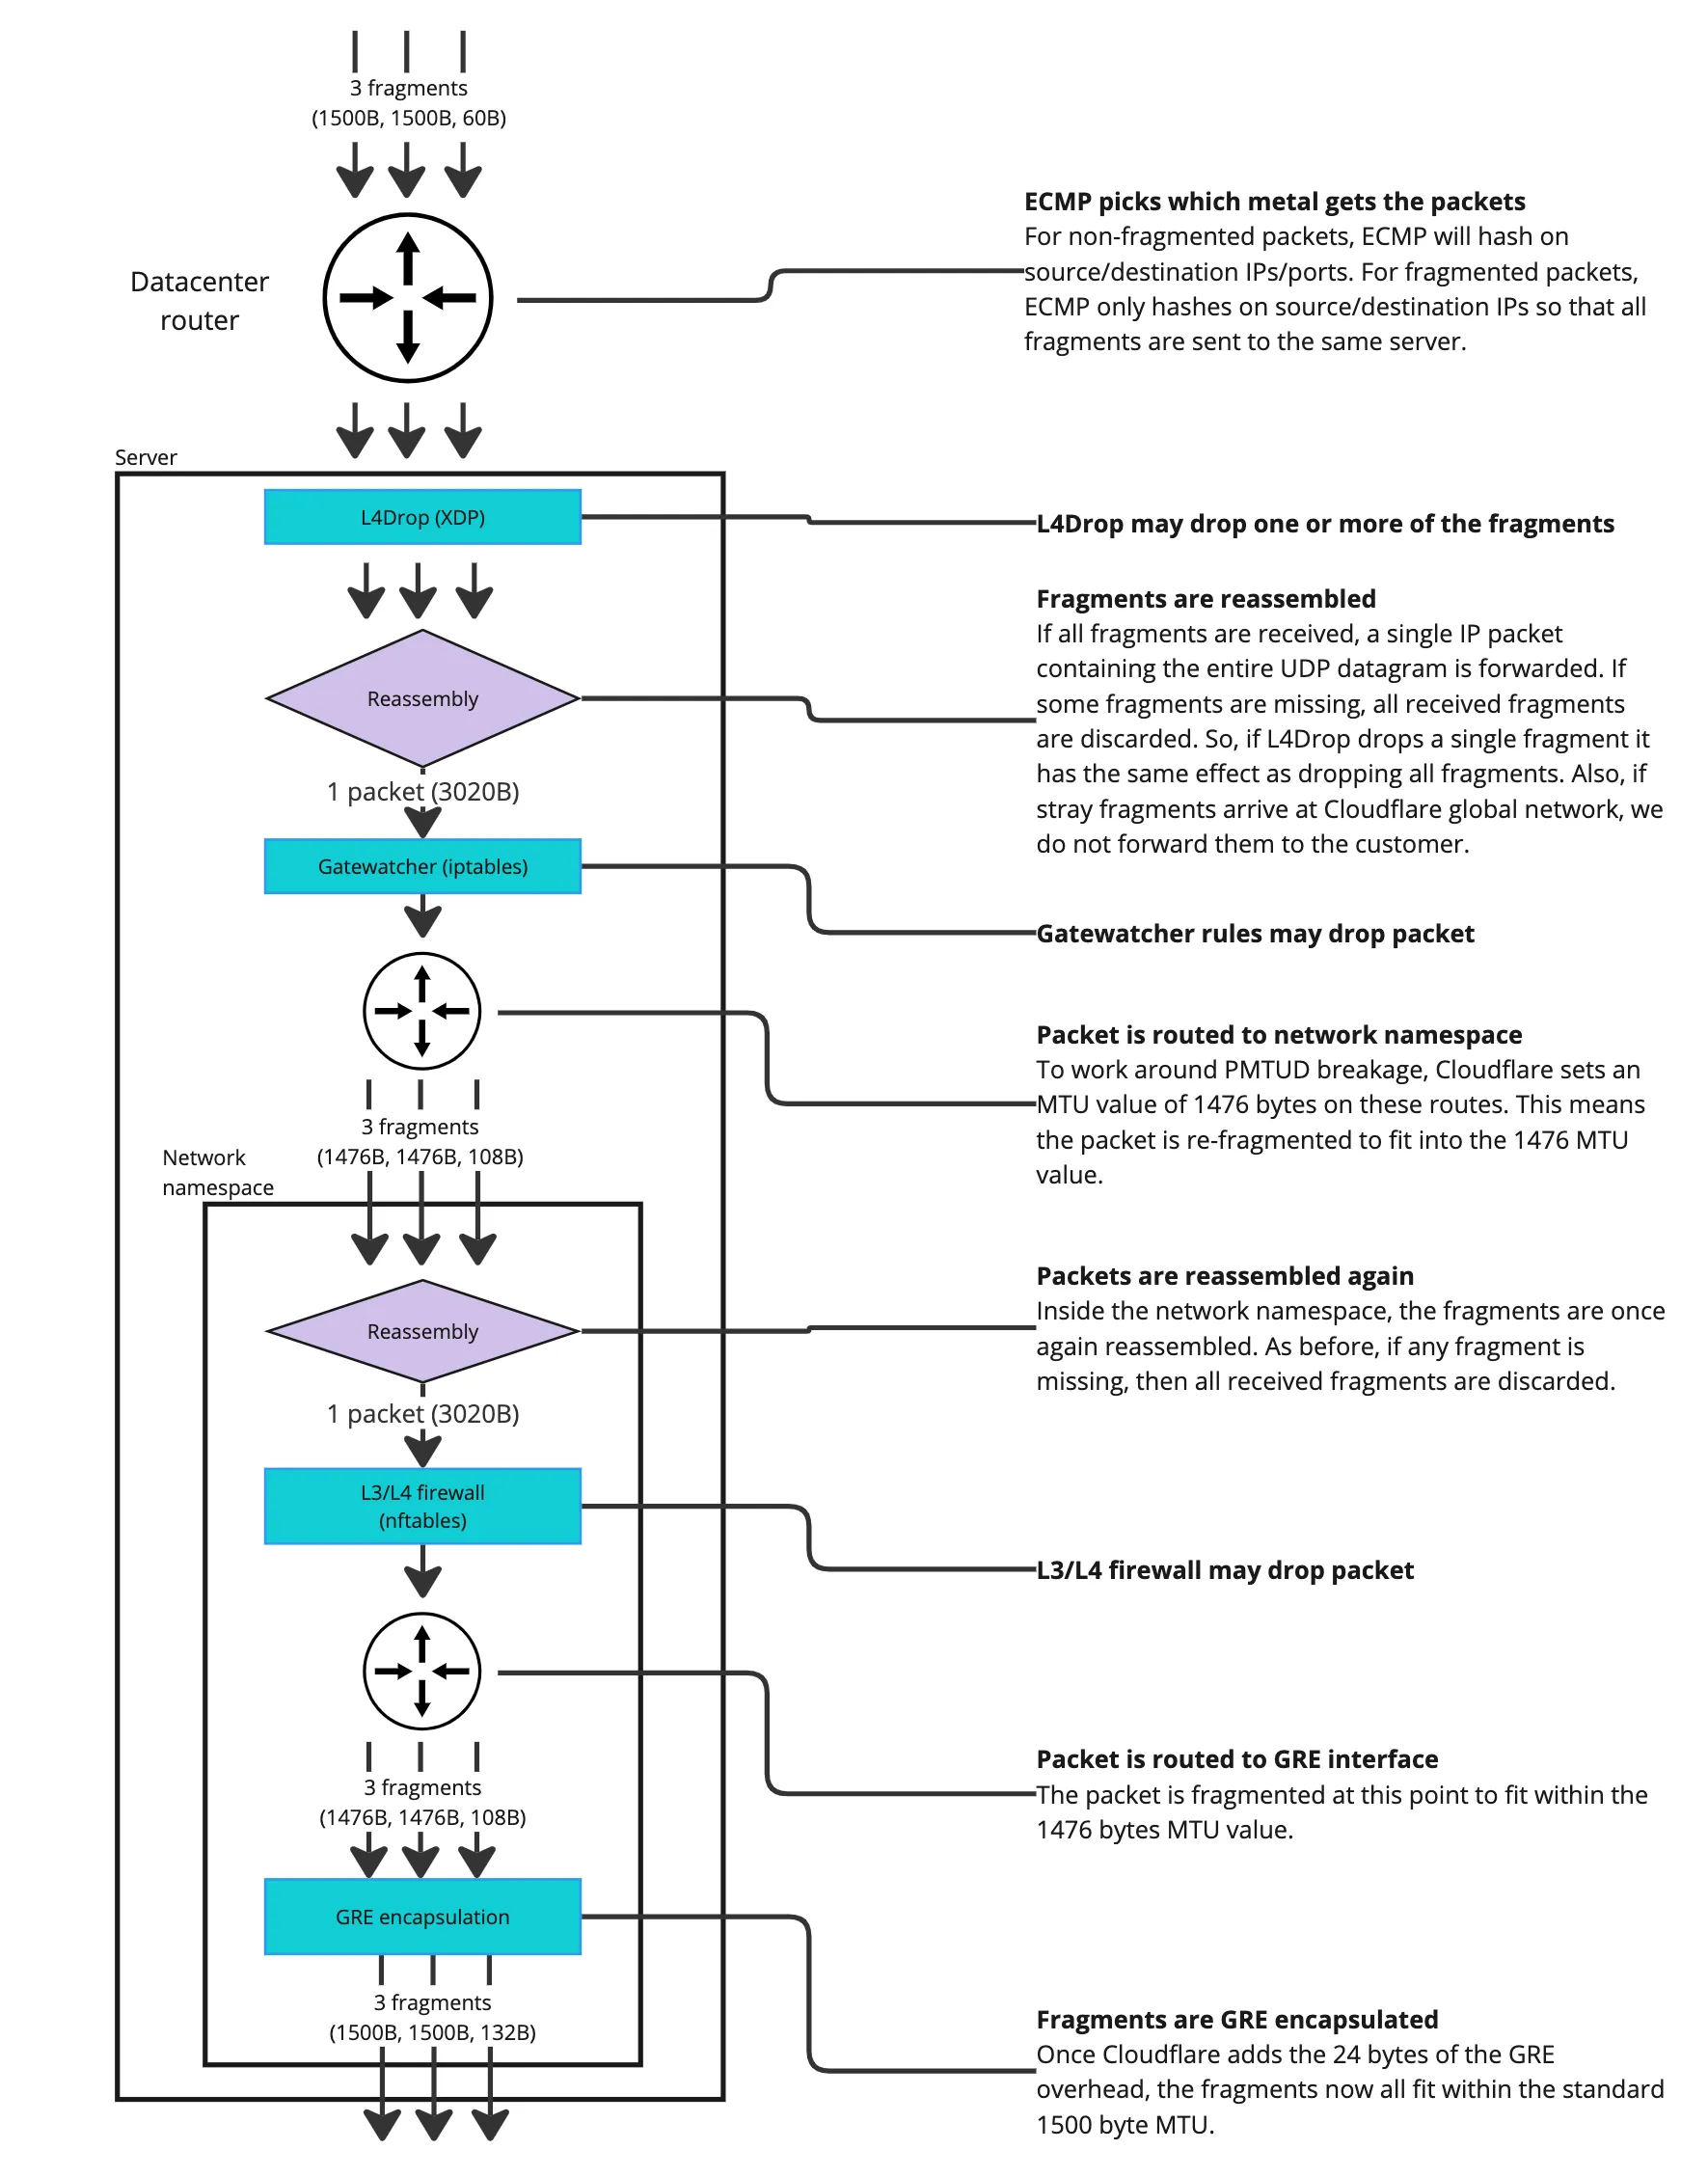
## MSS clamping
Maximum segment size (MSS) is a TCP setting that limits the size of TCP segments. The SYN packets set this option during the three-way handshake.
By default, a TCP endpoint sets its MSS value based on its local network interface MTU. For example, for IPv4, if the MTU is 1,500 bytes then MSS becomes 1,460 bytes (1,500 bytes minus 20 bytes from the IPv4 header minus 20 bytes from the TCP header).
MSS is a tool that you can use to configure TCP packet size behavior. If a TCP endpoint sits behind a network with reduced MTU, changing the MSS value to match the actual path MTU value forces remote endpoints to send packets that fit within the specified MTU. So, if an IPv4 TCP endpoint sits behind a GRE tunnel with an MTU of 1,476 bytes, the MSS value in its TCP SYN packets should be 1,436 bytes - 1,476 bytes minus the 20 bytes from the IPv4 header, minus the 20 bytes from the TCP header.
One way to modify the MSS setting is by changing the MTU of the network interface in the router's WAN interface to match the path MTU. Another way to modify MSS is by applying an MSS clamp, where you configure an intermediary network device - such as a router - to modify the MSS TCP option on-the-fly when packets pass through it. Note that changing the MTU on the interface of an intermediary network device is not the same as applying an MSS clamp, and it does not change the TCP MSS value.
Refer to [MSS clamping recommendations](#mss-clamping-recommendations) for information on what you should set your MSS clamping to, depending on the type of tunnel.
Warning
Cloudflare only recommends applying a MSS clamp to adjust the size of TCP packets. Changing the MTU of a network interface is not recommended as this might have unforeseen impacts on traffic.
## MSS with Magic Transit and Direct Server Return
Asymmetric [routing](https://www.cloudflare.com/learning/network-layer/what-is-routing/) is a common scenario especially with Magic Transit. Ingress traffic from the Internet enters the Cloudflare network, then traverses a GRE tunnel (MTU of 1,476 bytes), and egress traffic from the datacenter is sent through Direct Server Return (DSR) over the Internet (MTU of 1,500 bytes).
In an asymmetric scenario, you need to reduce the MSS value of packets sent by Magic Transit users to the Internet to reduce the size of packets sent from the Internet towards their network. To accomplish this, you must configure either the customer's end-hosts or an MSS clamp on an intermediary device on the egress path of traffic leaving their network. The following chart details how MSS values affect payload sizes on both routing paths.
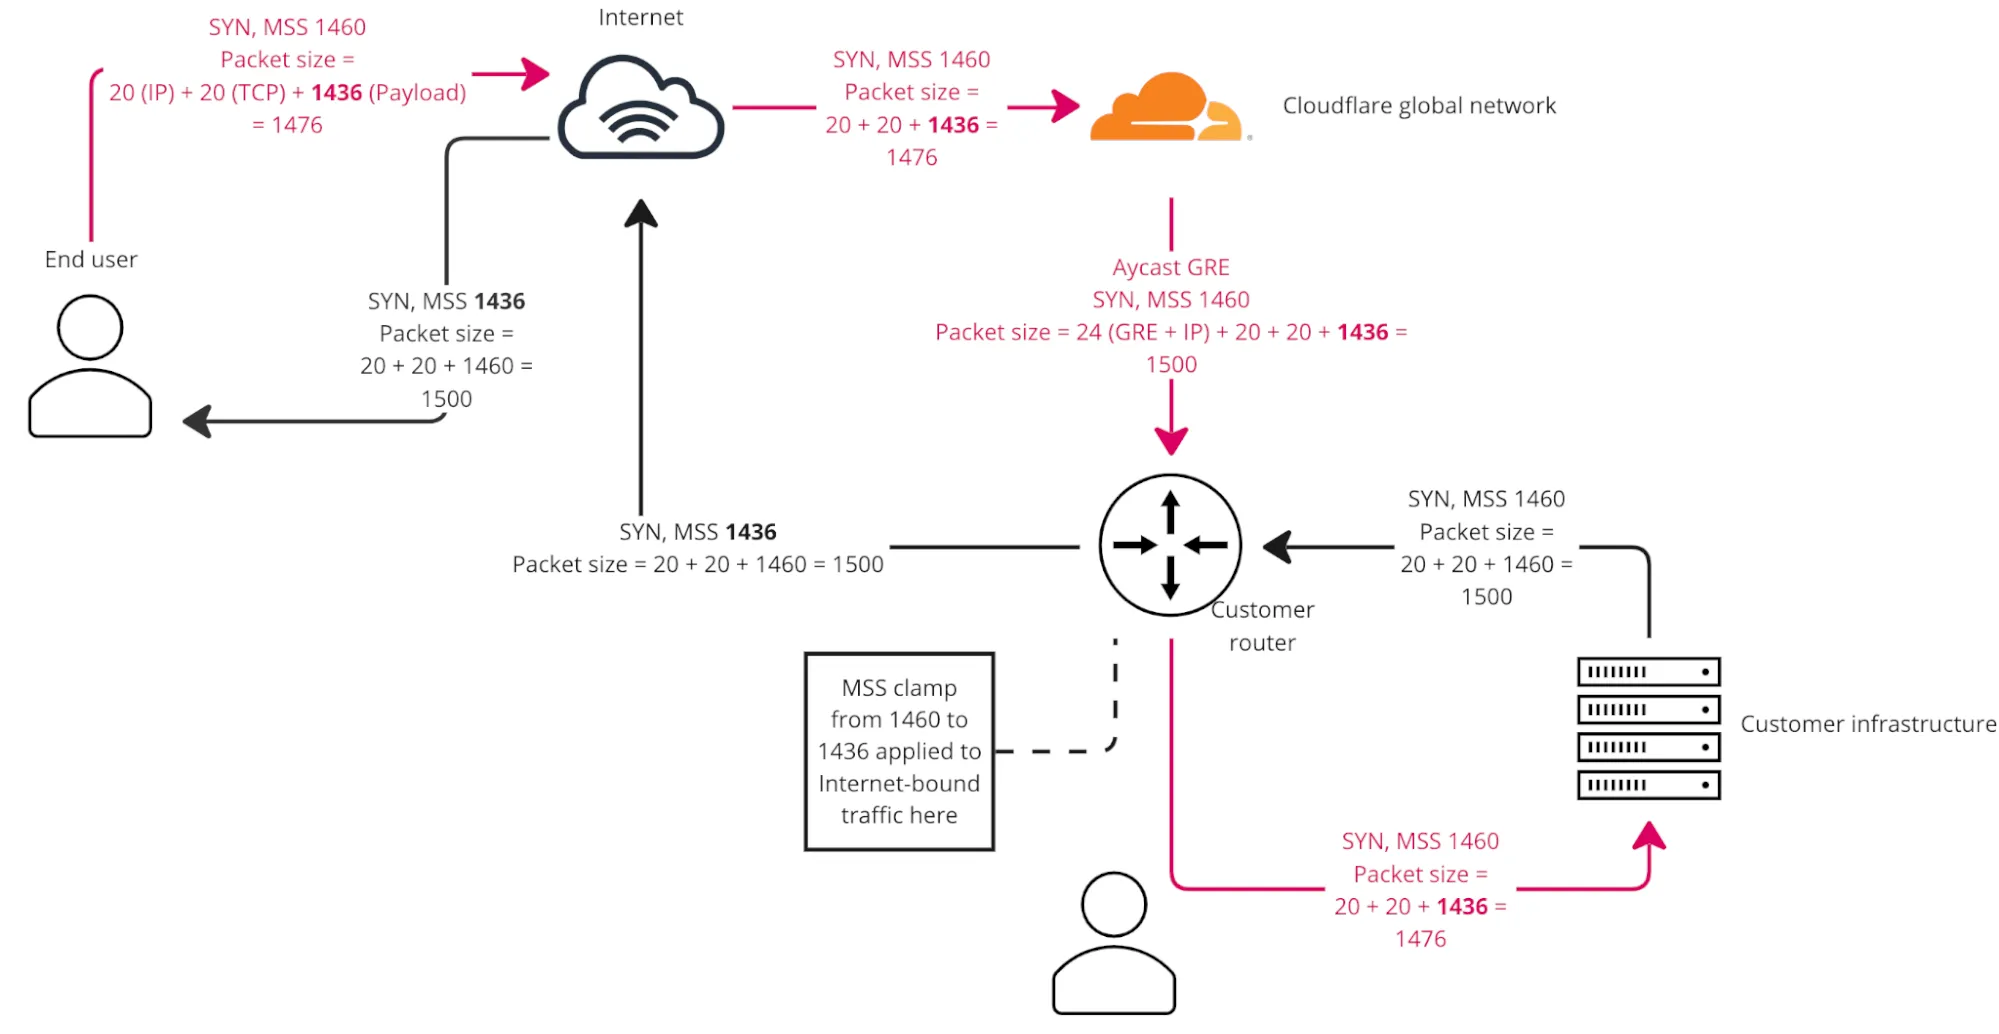
_Key takeaway from the preceding chart: MSS clamping affects TCP packet payload sizes flowing in the opposite direction versus where the clamp is applied._
## Tunnel-in-tunnel scenario with Magic Transit
MSS clamping only affects TCP traffic. If, for example, you have a web server on your Magic Transit prefix, then the MSS clamp takes effect on the TCP data from Direct Server Return (DSR) traffic. However, you need to take a different approach for any tunnels inside of your Magic Transit tunnel (tunnel-in-tunnel scenario).
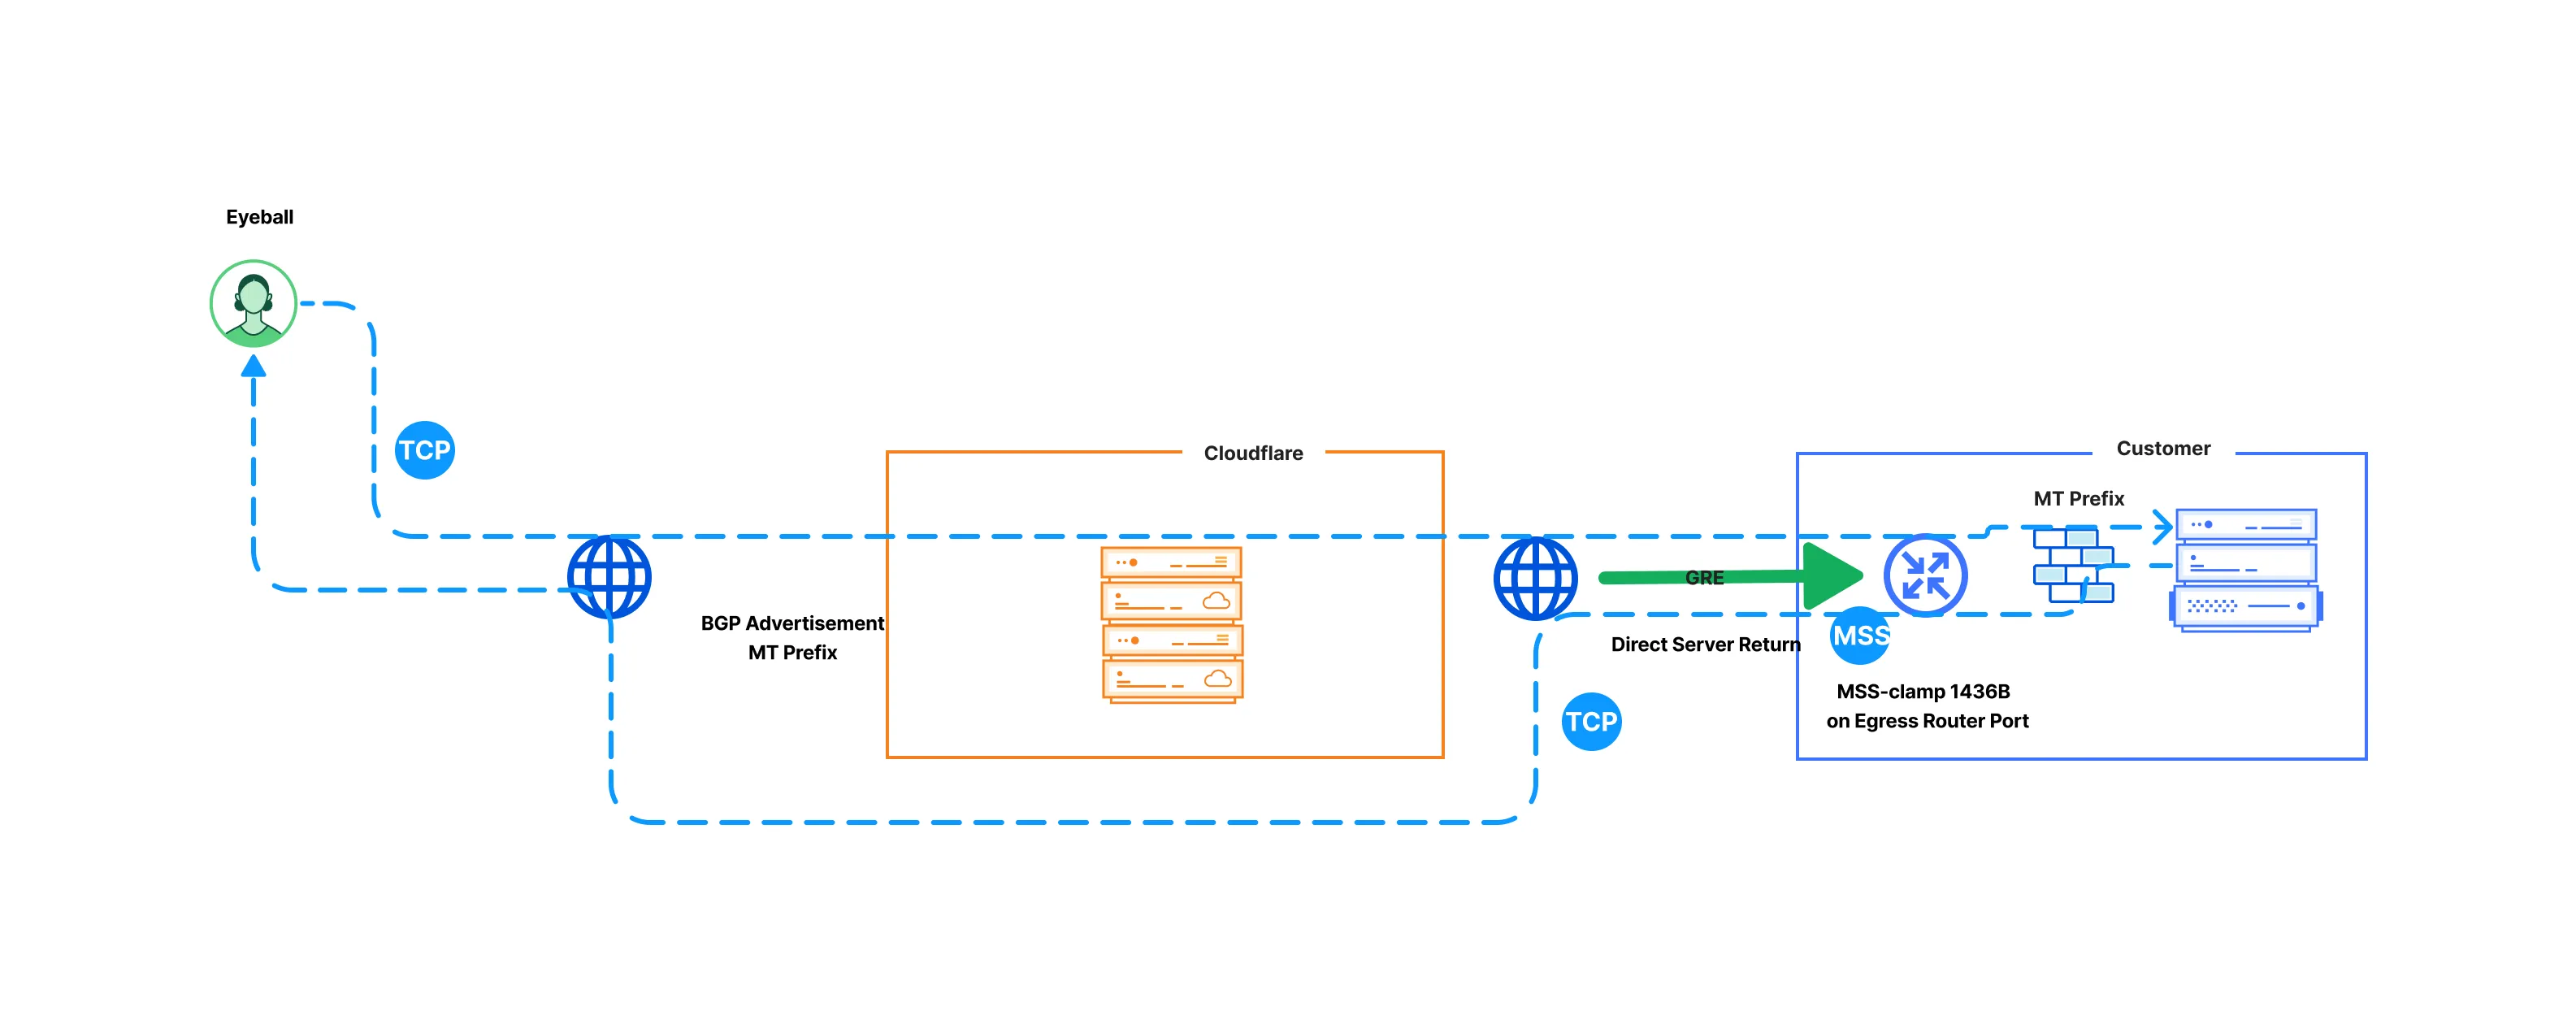
For example, if you have a Magic Transit GRE tunnel set up, and then another IPsec or GRE tunnel running from third-party devices on your premises, MSS clamp has no impact on the outer packets of the encapsulated traffic. This is because MSS clamping affects only TCP traffic, and IPsec/GRE encapsulated traffic is IP. For this scenario, you need to lower the MTU of the internal tunnel interface further, both for your ingress and egress traffic.
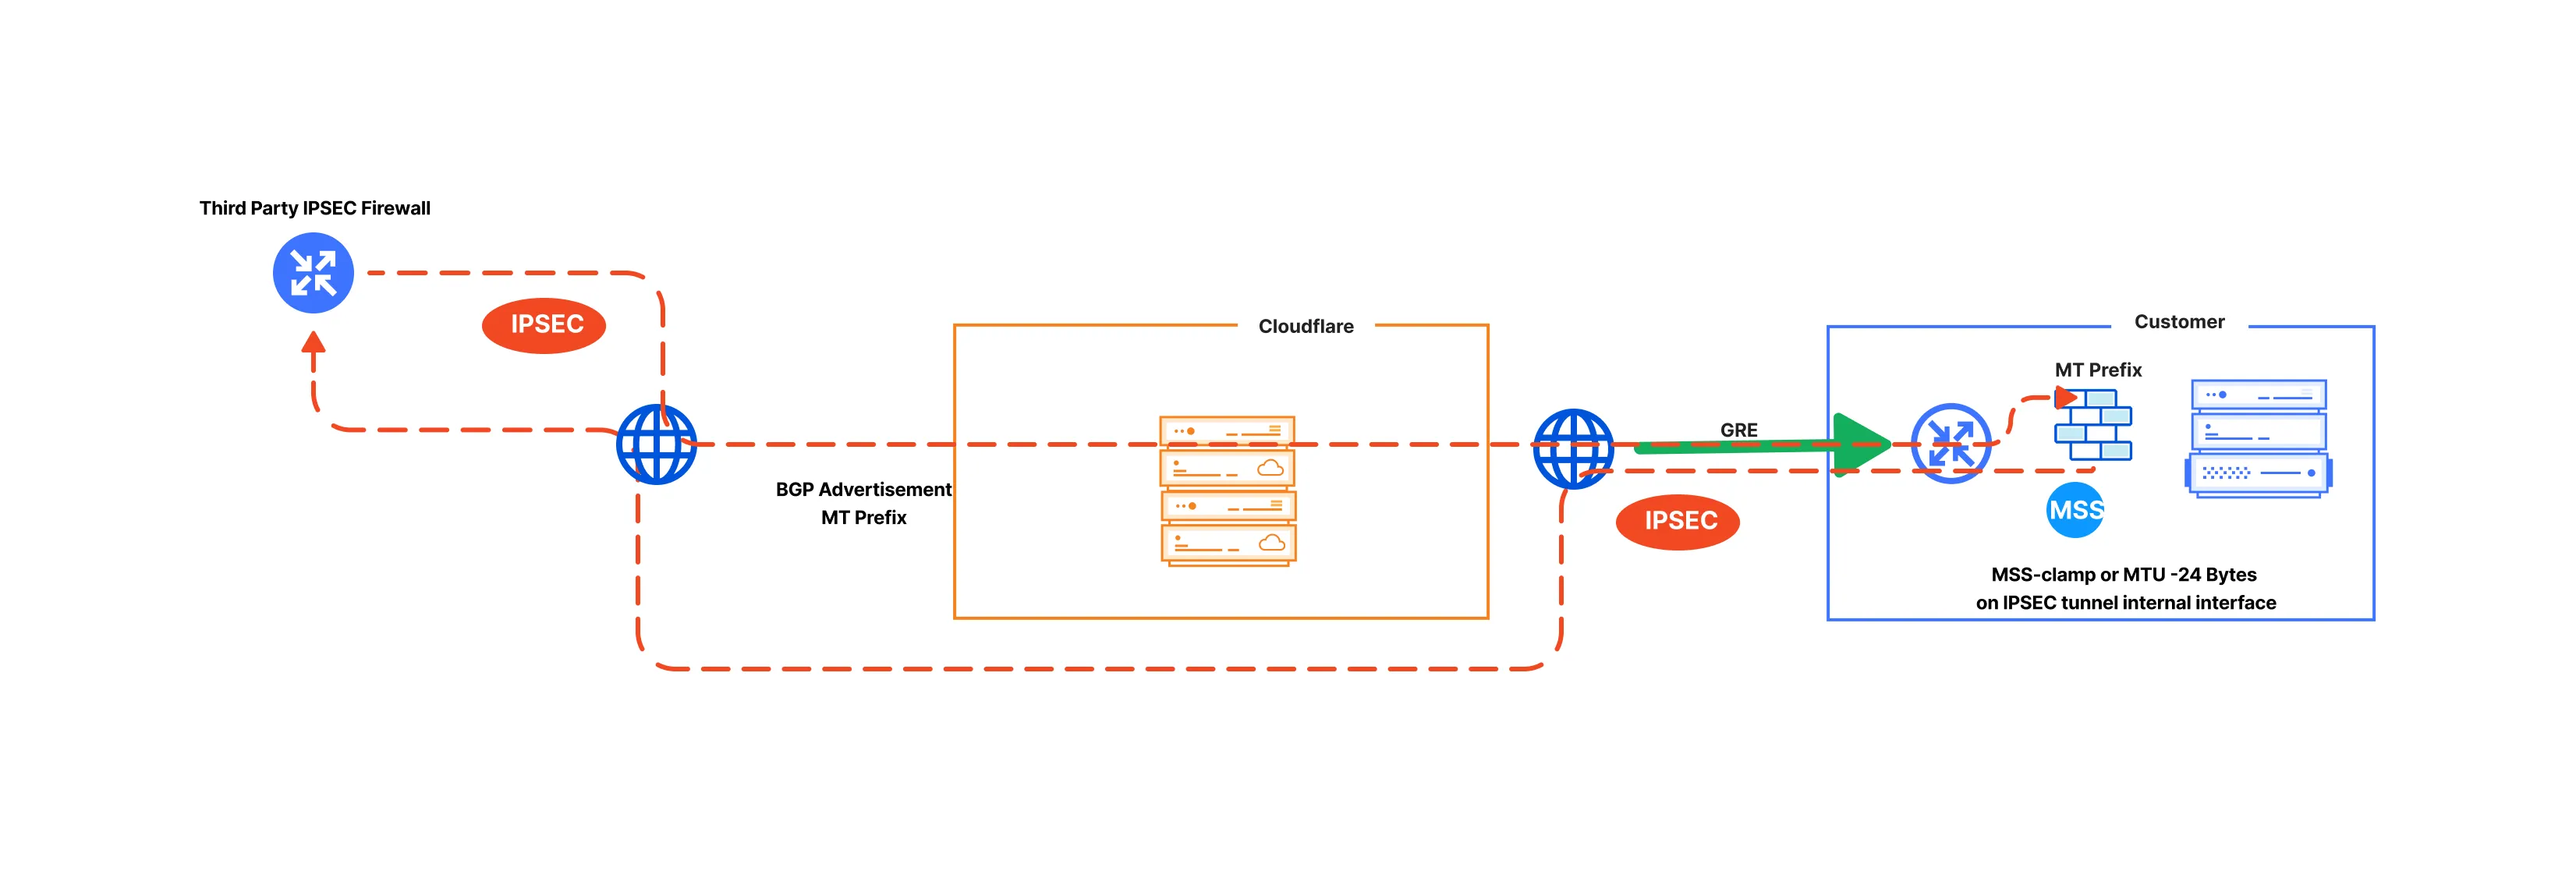
## MSS clamping recommendations
### GRE tunnels as off-ramp
The MSS value depends on how your network is set up.
* **Magic Transit ingress-only traffic (DSR):**
* **On your edge router transit ports**: Set a TCP MSS clamp to a maximum of 1,436 bytes.
* **On any IPsec/GRE tunnels with third parties on your Magic Transit prefix**: Apply the MSS clamp on the internal tunnel interface (most likely on a separate firewall behind the GRE-terminating router) to reduce the current value by 24 bytes.
* **For Magic Transit ingress + egress traffic:**
* **On the Magic Transit GRE tunnel internal interface**: Meaning where the Magic Transit egress traffic will traverse. Your devices may do this automatically once the tunnel is configured, but it depends on your devices. Set the TCP MSS clamp to 1,436 bytes maximum.
* **On any IPsec/GRE tunnels with third parties on your Magic Transit prefix**: On the internal tunnel interface (most likely on a separate firewall behind the GRE-terminating router) to reduce its current value by 24 bytes.
### IPsec tunnels
For IPsec tunnels, the value you need to specify depends on how your network is set up. The MSS clamping value is lower than for GRE tunnels because the physical interface sees IPsec-encrypted [packets ↗](https://www.cloudflare.com/learning/network-layer/what-is-a-packet/), not TCP packets, and MSS clamping does not apply to those.
* **Magic Transit ingress-only traffic (DSR):**
* **On your edge router transit ports**: Set the TCP MSS clamp to 1,436 bytes maximum.
* **On any IPsec/GRE tunnels with third parties on your Magic Transit prefix**: On the internal tunnel interface (most likely on a separate firewall behind the GRE-terminating router) to reduce its current value by 140 bytes.
* **Magic Transit ingress + egress traffic:**
* **On your edge router**: Apply this on your Magic Transit IPsec tunnel internal interface (that is, where the Magic Transit egress traffic will traverse). Your devices may do this automatically once the tunnel is configured, but it depends on your devices. Set the TCP MSS clamp to 1,360 bytes maximum.
* **On any IPsec/GRE tunnels with third parties on your Magic Transit prefix**: On the internal tunnel interface (most likely on a separate firewall behind the IPsec-terminating device in your premises) to reduce its current value by 140 bytes.
```json
{"@context":"https://schema.org","@type":"BreadcrumbList","itemListElement":[{"@type":"ListItem","position":1,"item":{"@id":"/directory/","name":"Directory"}},{"@type":"ListItem","position":2,"item":{"@id":"/magic-transit/","name":"Magic Transit"}},{"@type":"ListItem","position":3,"item":{"@id":"/magic-transit/reference/","name":"Reference"}},{"@type":"ListItem","position":4,"item":{"@id":"/magic-transit/reference/mtu-mss/","name":"Maximum transmission unit and maximum segment size"}}]}
```
---
---
title: Reference architecture
image: https://developers.cloudflare.com/core-services-preview.png
---
[Skip to content](#%5Ftop)
Was this helpful?
YesNo
[ Edit page ](https://github.com/cloudflare/cloudflare-docs/edit/production/src/content/docs/magic-transit/reference/reference-architecture.mdx) [ Report issue ](https://github.com/cloudflare/cloudflare-docs/issues/new/choose)
Copy page
# Reference architecture
```json
{"@context":"https://schema.org","@type":"BreadcrumbList","itemListElement":[{"@type":"ListItem","position":1,"item":{"@id":"/directory/","name":"Directory"}},{"@type":"ListItem","position":2,"item":{"@id":"/magic-transit/","name":"Magic Transit"}},{"@type":"ListItem","position":3,"item":{"@id":"/magic-transit/reference/","name":"Reference"}},{"@type":"ListItem","position":4,"item":{"@id":"/magic-transit/reference/reference-architecture/","name":"Reference architecture"}}]}
```
---
---
title: Traffic steering
description: Magic Transit uses a static configuration to route traffic through anycast tunnels using the Generic Routing Encapsulation (GRE) and Internet Protocol Security (IPsec) protocols from Cloudflare's global network to your network.
image: https://developers.cloudflare.com/core-services-preview.png
---
[Skip to content](#%5Ftop)
Was this helpful?
YesNo
[ Edit page ](https://github.com/cloudflare/cloudflare-docs/edit/production/src/content/docs/magic-transit/reference/traffic-steering.mdx) [ Report issue ](https://github.com/cloudflare/cloudflare-docs/issues/new/choose)
Copy page
# Traffic steering
## Magic Transit Virtual Network routing table
When traffic enters Cloudflare's network, it needs to reach the correct destination in your infrastructure — a specific data center, office, or cloud environment. Traffic steering controls how Cloudflare makes these routing decisions.
The Magic Transit Virtual Network is a virtual network overlay, private to your account, that spans all Cloudflare data centers globally. This overlay network provides:
* Magic Transit delivery for [Denial of Service (DoS)](https://developers.cloudflare.com/ddos-protection/) and [Cloudflare Network Firewall](https://developers.cloudflare.com/cloudflare-network-firewall/) filtered Internet traffic, from the entry data center where the traffic ingressed, to your publicly addressed edge/border network.
* Magic Transit packet transport between IPsec/GRE tunnels, interconnects, [Cloudflare Load Balancer](https://developers.cloudflare.com/load-balancing/), and [Zero Trust](https://developers.cloudflare.com/cloudflare-one/) connections such as [Cloudflare One Client](https://developers.cloudflare.com/cloudflare-one/team-and-resources/devices/cloudflare-one-client/), [Remote Browser Isolation](https://developers.cloudflare.com/cloudflare-one/remote-browser-isolation/), [Access](https://developers.cloudflare.com/cloudflare-one/access-controls/policies/), and [Gateway](https://developers.cloudflare.com/cloudflare-one/traffic-policies/).
The Magic Transit Virtual Network supports routing the Magic Transit traffic through anycast tunnels using [GRE and Internet Protocol Security (IPsec)](https://developers.cloudflare.com/magic-transit/reference/gre-ipsec-tunnels/) or [CNI with Dataplane v2](https://developers.cloudflare.com/network-interconnect/). You can add entries to the Magic Transit Virtual Network routing table through static route configuration or through routes learned through BGP peering (beta).
### Allowed IP ranges
The following IPv4 address ranges are allowed in the Magic Transit Virtual Network routing table:
* [BYOIP](https://developers.cloudflare.com/byoip/) public address space which you have onboarded to Cloudflare Magic Transit.
* Cloudflare [leased IPs](https://developers.cloudflare.com/magic-transit/cloudflare-ips/) assigned to your account.
### Default routing
If traffic does not match any route you have configured in the virtual network, Cloudflare applies default behavior based on the destination address type:
* **Public (Internet-routable) addresses**: Traffic exits to the Internet.
* **Private addresses** ([RFC 1918 ↗](https://datatracker.ietf.org/doc/html/rfc1918) or [CGNAT/RFC 6598 ↗](https://datatracker.ietf.org/doc/html/rfc6598)): Traffic is dropped (null routed), because private addresses are not routable on the public Internet and Cloudflare has no path to deliver them without a matching route.
### Route prioritization
Magic Transit steers traffic along tunnel routes based on route entry priorities.
* Lower values have greater priority.
* When the priority values for prefix entries match, Cloudflare uses [equal-cost multi-path (ECMP)](#equal-cost-multi-path-routing) packet forwarding to route traffic. You can apply an optional weight value to static routes to [modify ECMP tunnel distribution](#set-priority-and-weights-for-static-routes).
* Cloudflare routing applies longest-prefix match. A more specific static route (like `/30`) always takes precedence over a less specific one (like `/29`), regardless of tunnel priority — unless you remove the more specific route.
* When BGP and static routes have the same prefix and priority, Cloudflare enforces priority by preferring static routes over BGP routes. This ensures that manually configured static routes take precedence unless you explicitly deprioritize them.
### Set priority and weights for static routes
The priority value for static routes is directly configured as part of the route object in the Cloudflare [dashboard or through the API](https://developers.cloudflare.com/magic-transit/how-to/configure-routes/#create-a-static-route). For example:
| Prefix | NextHop | Priority |
| --------------- | -------------- | -------- |
| 10.10.10.100/24 | TUNNEL\_1\_IAD | 200 |
| 10.10.10.100/24 | TUNNEL\_2\_IAD | 200 |
| 10.10.10.100/24 | TUNNEL\_3\_ATL | 100 |
| 10.10.10.100/24 | TUNNEL\_4\_ATL | 100 |
In this example, tunnels with priority of `100` are preferred to tunnels with priority of `200` because lower numbers have greater priority.
Optionally, you can assign weights to distribute traffic more effectively among multiple tunnels. Weight values determine traffic proportion, with higher weights receiving more traffic. The maximum weight value is `256`.
In the following example, `TUNNEL_2_IAD` is likely to receive twice as much traffic as `TUNNEL_1_IAD`.
| Prefix | NextHop | Priority | Weight |
| --------------- | -------------- | -------- | ------ |
| 10.10.10.100/24 | TUNNEL\_1\_IAD | 100 | 64 |
| 10.10.10.100/24 | TUNNEL\_2\_IAD | 100 | 128 |
| 10.10.10.100/24 | TUNNEL\_3\_ATL | 100 | 192 |
| 10.10.10.100/24 | TUNNEL\_4\_ATL | 100 | 255 |
Aside from priority, scoping static routes to specific geographic regions also impacts how traffic is steered. Refer to [Scoping routes to specific regions](#scoping-routes-to-specific-regions) for more details.
### Set priority for BGP routes
When BGP advertises a route, Cloudflare automatically adds it to the Magic Transit Virtual Network routing table with a default priority of `100` which applies to [all regions](#scoping-routes-to-specific-regions). However, if a static route exists with the same prefix and priority, the static route always takes precedence over the BGP route. Set a different priority for static routes (more or less than `100`) depending on which you want to prioritize. Lower values have greater priority.
Additionally, when multiple BGP routes exist with the same prefix length and priority, ECMP distributes traffic across them using [equal-cost multi-path (ECMP) routing](#equal-cost-multi-path-routing).
### Change route priorities with BGP attributes
Cloudflare supports traffic engineering through BGP communities and AS prepending. You can use these traffic routing techniques to set route priorities and perform traffic engineering across multiple interconnects.
#### BGP communities for setting route priority
The default BGP route priority is `100`. This base priority can be adjusted using communities. For example, when a route is tagged with the community `13335:60010` its priority is set to `10`. This makes it a higher priority than the default of `100` because lower numeric priorities are preferred.
The community values supported for setting base route priority are:
* `13335:60010`: Set base route priority to `10`
* `13335:60050`: Set base route priority to `50`
* `UNSET`: Set base route priority to `100`
* `13335:60150`: Set base route priority to `150`
* `13335:60200`: Set base route priority to `200`
* `13335:60901`: Set base route priority to `501000`
* `13335:60902`: Set base route priority to `1001000`
Setting multiple base priority communities in the same prefix update message is a misconfiguration. In this situation, Cloudflare prefers the highest priority (lowest integer value).
#### AS path prepending for adjusting route priority
For each additional mention of your ASN in the received AS path, Cloudflare adds `10` to the route's base priority. By increasing the priority number, the route becomes less preferred.
For example, if your ASN is `65000` then the `BGP UPDATE` to Cloudflare will be:
```
# No change to base priority.
AS_PATH: 65000 65200
# Add 10 to base priority for 1 prepend of 65000
AS_PATH: 65000 65000 65200
# Add 20 to base priority for 2 prepend of 65000
AS_PATH: 65000 65000 65000 65200
```
#### How communities and prepends work together
Cloudflare adjusts route priority when using AS prepending with communities. For example, if a route is tagged with `13335:60150`, the base priority is set to `150`. If you prepend your ASN twice, Cloudflare adds `10` for each prepend, increasing the route priority to `180`.
## Unified Routing mode (beta)
The Unified Routing mode is the newer Cloudflare One data plane that uses a single routing fabric for all supported connection types. Unified Routing mode routes traffic across the Cloudflare One Client, Cloudflare Tunnel, IPsec, GRE, and Cloudflare Network Interconnect (CNI) in a single system, making it easier to set up your Cloudflare One connections.
In the Magic Transit dashboard, routing mode appears where you manage routes:
* **Routing mode: Unified** — your account is on the unified data plane and supports the new routing features.
* **Routing mode: Legacy** — your account uses the previous data plane and does not support all unified routing features.
### Why use Unified Routing
Unified Routing is the future of the dedicated virtual network overlay that powers Magic Transit and Cloudflare One network connectivity.
For Magic Transit customers, the primary reason to consider Unified Routing is to evaluate [BGP for IPsec/GRE tunnels](#release-status), which depends on Unified Routing.
### Beta limitations
The following limitations apply to accounts using Unified Routing mode. This list will get shorter as Cloudflare adds support for additional features.
| Current beta limitations | Details |
| ------------------------------------------------------------------------------------------------------------------------------------------------------ | --------------------------------------------------------------------------------------------------------------------------------------------- |
| Performance | Typically around 150 Mbps for each onramp |
| Network analytics | Not yet fully supported |
| Basic packet captures | Captures exclude Automatic Return Routing or BGP-over-tunnels traffic |
| Full packet captures | Not yet supported |
| Advanced Cloudflare Network Firewall features: GeoIP/Country rules, IP Lists, ASN Lists, Threat Intel Lists, IDS, Rate Limiting, SIP, Managed Rulesets | Not yet supported |
| Gateway filtering rules | Not supported on traffic where both the onramp and offramp is IPsec/GRE/CNI |
| Load Balancer | Public-to-private use case is supported to IPsec/GRE/CNI destinations. Private-to-private use case does not yet support Cloudflare Source IPs |
### Enroll in the Unified Routing beta
Unified Routing is currently in closed beta. To sign up:
* **Existing Cloudflare WAN or Magic Transit customers**: Cloudflare recommends you evaluate the new functionality with your use case in a non-production account. Contact your account team to enable Unified Routing.
* **New customers**: Contact your account team to enable Unified Routing in a proof-of-concept for your use case.
## Scoping routes to specific regions
If you have multiple connectivity paths to a network segment and want to apply different route prioritization based on where traffic arrives at the Cloudflare network, you can scope routes to specific Cloudflare data center regions. This is useful if you run your own anycast network and want your end-user traffic to arrive at your network location closest to the user.
When you scope a route to a Cloudflare data center region, it only shows up in the Magic Transit Virtual Network routing table in that region, along with all global routes that do not have any region scope. Route prioritization and ECMP logic apply across both region-scoped and global routes.
Note
Scoping routes to specific regions is not supported with BGP peering, and is only available to statically configured routes at this time.
When using region-scoped routes, ensure that all prefixes have routes covering all regions. Otherwise, traffic may arrive at a Cloudflare region that is not covered by any route, in which case Cloudflare drops the traffic.
The following table exemplifies how to use geographic scoping for routes:
| Prefix | NextHop | Priority | Region code |
| --------------- | -------------- | -------- | ----------- |
| 10.10.10.100/24 | TUNNEL\_1\_IAD | 100 | AFR |
| 10.10.10.100/24 | TUNNEL\_2\_IAD | 100 | EEUR |
| 10.10.10.100/24 | TUNNEL\_3\_ATL | 100 | ENAM |
| 10.10.10.100/24 | TUNNEL\_4\_ATL | 100 | ME |
| 10.10.10.100/24 | TUNNEL\_5\_ATL | 100 | WNAM |
| 10.10.10.100/24 | TUNNEL\_4\_ATL | 100 | ENAM |
When there are multiple routes to the same prefix with equal priority, and those routes are assigned to different geographic regions (like WNAM and ENAM), traffic entering the network in a specific region — for example, WNAM — egresses through the route associated with that same region.
Anycast routing
Cloudflare uses anycast to route traffic. Anycast is a network addressing and routing method that routes incoming requests to different locations. Traffic can arrive at a different geographic location than expected. Not all requests go to the closest data center because Internet routing and peering relationships are complex, and Cloudflare optimizes for performance and reliability.
### Region codes and associated regions
Cloudflare has nine geographic regions:
| Region code | Region |
| ----------- | --------------------- |
| AFR | Africa |
| APAC | Asia Pacific |
| EEUR | Eastern Europe |
| ENAM | Eastern North America |
| ME | Middle East |
| OC | Oceania |
| SAM | South America |
| WEUR | Western Europe |
| WNAM | Western North America |
Configure scoping for your traffic in the **Region code** section when adding or editing a static route. Refer to [Create a static route](https://developers.cloudflare.com/magic-transit/how-to/configure-routes/#create-a-static-route) and [Edit a static route](https://developers.cloudflare.com/magic-transit/how-to/configure-routes/#edit-a-static-route) for more information.
## Magic Transit prefix mapping
### Map route prefixes smaller than `/24`
You must provide your prefixes and the tunnels that should be mapped to for Cloudflare to route your traffic from our global network to your data centers through anycast tunnels. Use the following table as reference.
| Prefix | NextHop |
| --------------- | -------------- |
| 103.21.244.0/29 | TUNNEL\_1\_IAD |
| 103.21.244.8/29 | TUNNEL\_2\_ATL |
The minimum advertising prefix is `/24`, but because Cloudflare uses anycast tunnels as an outer wrapper for your traffic, Cloudflare can route prefixes within that `/24` to different tunnel endpoints. For example, you can send `x.x.x.0/29` to Data Center 1 and `x.x.x.8/29` to Data Center 2\. This is helpful when you operate in an environment with constrained IP resources.
### Map route prefixes bigger than onboarded prefixes
If you have multiple onboarded `/24` subnets that belong to a larger contiguous block, you can configure a summary static route for the corresponding supernet (like a `/23` or a `/22`) instead of adding each `/24` individually. This eliminates the need to configure each `/24` route, as all traffic will be routed through the same GRE tunnels.
For example, if you have two tunnels:
* `192.0.2.0/24`
* `192.0.3.0/24`
You can summarize these into a single `192.0.2.0/23`.
Refer to [Add tunnels](https://developers.cloudflare.com/magic-transit/how-to/configure-tunnel-endpoints/#add-tunnels) to learn more about configuring GRE tunnels.
Note
These address blocks are a part of [RFC 5737](https://datatracker.ietf.org/doc/rfc5737/) and are reserved for use as examples in documentation.
## Equal-cost multi-path routing
Equal-cost multi-path routing uses hashes calculated from [packet ↗](https://www.cloudflare.com/learning/network-layer/what-is-a-packet/) data to determine the route chosen. The hash always uses the source and destination IP addresses. For TCP and UDP packets, the hash includes the source and destination ports as well. The ECMP algorithm divides the hash for each packet by the number of equal-cost next hops. The modulus (remainder) determines the route the packet takes.
Using ECMP has a number of consequences:
* Routing to equal-cost paths is probabilistic.
* Packets in the same session with the same source and destination have the same hash. The packets also use the same next hop.
* Routing changes in the number of equal-cost next hops can cause traffic to use different tunnels. For example, dynamic reprioritization triggered by health check events can cause traffic to use different tunnels.
As a result, ECMP provides load balancing across tunnels with the same prefix and priority.
Note
Packets in the same flow use the same tunnel unless the tunnel priority changes. Packets for different flows can use different tunnels depending on which tunnel the flow's 4-tuple — source and destination IP and source and destination port — hash to.
### Examples
This diagram illustrates how ECMP distributes traffic equally across two paths with the same prefix and priority.
#### Normal traffic flow
flowchart LR
accTitle: Tunnels diagram
accDescr: This example has three tunnel routes, with traffic equally distributed across two paths.
subgraph Cloudflare
direction LR
B[Cloudflare
data center]
C[Cloudflare
data center]
D[Cloudflare
data center]
end
Z("Load balancing for some
priority tunnels uses ECMP
(hashing on src IP, dst IP,
scr port, dst port)") --- Cloudflare
A((User)) --> Cloudflare --- E[Anycast IP]
E[Anycast IP] --> F[/"GRE Tunnel 1 /
priority 1 /
~50% of flows"/] --> I{{Customer
data center/
network 1}}
E[Anycast IP] --> G[/"GRE Tunnel 2 /
priority 1 /
~50% of flows"/] --> J{{Customer
data center/
network 2}}
E[Anycast IP] --> H[/GRE Tunnel 3 /
priority 2 /
0% of flows/] --o K{{Customer
data center/
network 3}}
#### Failover traffic flow: Scenario 1
**Customer router failure**
When Magic Transit health checks determine that Tunnel 2 is unhealthy, Magic Transit dynamically de-prioritizes that route, leaving Tunnel 1 as the sole top-priority route. As a result, Magic Transit steers traffic away from Tunnel 2, and all traffic flows to Tunnel 1.
flowchart LR
accTitle: Tunnels diagram
accDescr: This example has Tunnel 2 unhealthy, and all traffic prioritized to Tunnel 1.
subgraph Cloudflare
direction LR
B[Cloudflare
data center]
C[Cloudflare
data center]
D[Cloudflare
data center]
end
Z(Tunnel health is
determined by
health checks that
run from all Cloudflare
data centers) --- Cloudflare
A((User)) --> Cloudflare --- E[Anycast IP]
E[Anycast IP] --> F[/"Tunnel 1 /
priority 1 /
~100% of flows"/]:::green --> I{{Customer
data center/
network 1}}
E[Anycast IP] --> G[/Tunnel 2 /
priority 3 /
unhealthy / 0% of flows/]:::red --x J{{Customer
data center/
network 2}}
E[Anycast IP] --> H[/Tunnel 3 /
priority 2 /
0% of flows/] --o K{{Customer
data center/
network 3}}
classDef red fill:#EE4B2B,color: black
classDef green fill:#00FF00,color: black
#### Failover traffic flow: Scenario 2
**Intermediary Internet Service Provider (ISP) failure**
When Magic Transit determines that Tunnel 1 is unhealthy as well, that route is also de-prioritized, leaving Tunnel 3 with the top priority route. In that case, all traffic flows to Tunnel 3.
flowchart LR
accTitle: Tunnels diagram
accDescr: This example has Tunnel 1 and 2 unhealthy, and all traffic prioritized to Tunnel 3.
subgraph Cloudflare
direction LR
B[Cloudflare
data center]
C[Cloudflare
data center]
D[Cloudflare
data center]
end
Z(Lower-priority tunnels
are used when
higher-priority tunnels
are unhealthy) --- Cloudflare
A((User)) --> Cloudflare --- E[Anycast IP]
E[Anycast IP] -- Intermediary
network issue --> F[/Tunnel 1 /
priority 3 /
unhealthy / 0% of flows/]:::red --x I{{Customer
data center/
network 1}}
E[Anycast IP] -- Intermediary
network issue --> G[/Tunnel 2 /
priority 3 /
unhealthy / 0% of flows/]:::red --x J{{Customer
data center/
network 2}}
E[Anycast IP] --> H[/Tunnel 3 /
priority 2 /
100% of flows/]:::green --> K{{Customer
data center/
network 3}}
classDef red fill:#EE4B2B,color: black
classDef green fill:#00FF00,color: black
When Magic Transit determines that Tunnels 1 and 2 are healthy again, it re-prioritizes those routes, and traffic flow returns to normal.
### ECMP and bandwidth utilization
Because ECMP is probabilistic, the algorithm routes roughly the same number of flows through each tunnel. However, it does not consider the amount of traffic already sent through a tunnel when deciding where to route the next packet.
For example, consider a scenario with many very low-bandwidth TCP connections and one very high-bandwidth TCP connection. Packets for the high-bandwidth connection have the same hash and thus use the same tunnel. As a result, that tunnel utilizes greater bandwidth than the others.
Note
Magic Transit supports a weight field that you can apply to a route so that a specified percentage of traffic uses a certain tunnel rather than other equal-cost tunnels. Refer to [Route prioritization](#route-prioritization) for more information.
For example, in a scenario where you want to route 70% of your traffic through ISP A and 30% through ISP B, you can use the weight field to help achieve that.
Because ECMP balances flows probabilistically, the use of weights is only approximate.
For more on Magic Transit tunnel weights, contact your Cloudflare customer service manager.
## BGP information
Using BGP peering with your Cloudflare One or Magic Transit Virtual Network routing table allows you to:
* Automate the process of adding or removing networks and subnets.
* Take advantage of failure detection and session recovery features.
With this functionality, you can:
* Establish an eBGP session between your devices and the Magic Transit service when connected through CNI, GRE or IPsec tunnels.
* Secure the session by MD5 authentication to prevent misconfigurations.
* Exchange routes dynamically between your devices and your Magic Transit Virtual Network routing table.
### Release status
The following table outlines the current availability and recommended use cases for BGP across different connectivity methods.
| Feature | Release stage | Recommended use | Prerequisites |
| ------------------------------ | ------------- | ---------------------------------------------------------- | ------------------------------------------------------------------------------------------- |
| **BGP over CNI** | Closed Beta | Not available to new customers — contact your account team | Cloudflare Network Interconnect (CNI) v2 |
| **BGP over Anycast IPsec/GRE** | Closed Beta | Lab / Testing only | [Unified Routing (beta)](#unified-routing-mode-beta) \- contact your account team to enroll |
### BGP architecture
#### Global routing and anycast edge
Magic Transit Virtual Network makes a one-pass, per-packet routing decision at the Cloudflare data center that first processes the packet (the ingress node). This ensures that even when a packet traverses multiple nodes within the Cloudflare backbone, its path is determined at the point of entry for maximum efficiency.
Your BGP session over IPsec, GRE, or CNI is established with the Cloudflare data center closest to your BGP peer device. Routes learned here must propagate to Cloudflare's global edge to govern how traffic is routed across the entire network.
* **Convergence time**: Global route convergence typically completes within 20 seconds.
* **Visibility**: You can monitor learned routes and their propagation status through the Cloudflare dashboard or API.
#### Centralized route propagation
Magic Transit Virtual Network uses a centralized control plane for route propagation, functioning similarly to a BGP Route Reflector. This architecture decouples the physical BGP session from global route distribution:
* **Session termination**: BGP peering sessions are terminated at the Cloudflare edge location closest to your router.
* **SDN conversion**: Ingress BGP updates are converted into Software-Defined Networking (SDN) state and transmitted to a centralized relay function.
* **Global dissemination**: The relay propagates these instructions to every Cloudflare data center globally, updating the local Forwarding Information Base (FIB) at each site.
#### Edge Resiliency Mode (Non-Stop Forwarding)
Cloudflare's data plane is designed for high availability. If the edge location loses communication with the centralized relay, the system enters Edge Resiliency Mode, mimicking Non-Stop Forwarding (NSF) behavior:
* **Forwarding continuity**: Edge locations continue to route traffic using the last-known-good forwarding table (FIB). Data plane traffic remains uninterrupted.
* **Stale path retention**: Because the FIB is frozen during this mode, forwarding decisions remain active even if the underlying BGP session with your router flaps or resets.
* **Continuous health monitoring**: While BGP updates are frozen, tunnel health checks remain active. These are sent from all Cloudflare data centers, allowing the edge at any ingress node to detect if a physical connection to your router has failed. If a health check fails, the ingress node at the edge will deprioritize that specific path, preventing traffic from being sent into a black hole despite the frozen routing state.
* **Update freeze**: During this state, the global control plane is frozen. New BGP updates received from your router will be held locally at the edge and will not propagate globally until connectivity to the centralized relay is restored.
* **Magic Transit edge announcement**: During this frozen state, your BYOIP prefix(es) will continue to be announced at Cloudflare's global edge. You can manually change this announcement status through the API or dashboard.
Traffic persistence during BGP resets
In Edge Resiliency Mode, Cloudflare prioritizes forwarding continuity. If your on-premises router resets or the BGP session flaps, the edge will continue to forward traffic toward your peer device based on the last known valid routing state — provided that the underlying tunnel health checks remain successful.
If the BGP session resets **and** the tunnel health checks fail (for example, your router is completely offline), the edge will typically take alternate paths until connectivity is restored.
#### System recovery and re-synchronization
Once connectivity between the Cloudflare edge and the centralized relay is restored, the system automatically exits Edge Resiliency Mode and performs a stateful re-synchronization:
1. **RIB-to-relay sync**: The edge pushes all currently held BGP updates (the current RIB state) to the relay.
2. **Global update**: The relay reconciles these updates and propagates any changes to the rest of the Cloudflare global network.
3. **FIB unfreeze**: The local forwarding tables at the edge are unfrozen and updated with the latest validated routing instructions.
### BGP peering with the Magic Transit Virtual Network routing table
Magic Transit BGP peering is with the Magic Transit Virtual Network routing table (as opposed to peering with the Cloudflare Internet global network). BGP peers configured by following this guide will receive advertisements for all prefixes in the Magic Transit Virtual Network routing table plus any additional prefixes configured in the on-ramp [Advertised prefix list](https://developers.cloudflare.com/magic-transit/how-to/configure-routes/#set-up-bgp-peering).
If instead you are seeking to do public peering with the Cloudflare ASN 13335 at one of the Cloudflare data centers, refer to [PNI and peering setup](https://developers.cloudflare.com/network-interconnect/). It is not currently possible to share Magic Transit Virtual Network BGP peering and PNI on the same physical interconnect port.
### BGP route distribution and convergence
Cloudflare redistributes routes received from your device into the Magic Transit Virtual Network routing table.
All routes in the Magic Transit Virtual Network routing table are advertised to BGP peers. Each BGP peer receives each prefix route along with the full `AS_PATH`, with the selected Cloudflare side [ASN ↗](https://www.cloudflare.com/learning/network-layer/what-is-an-autonomous-system/) prepended. This is so that the peer can accurately perform [loop prevention ↗](https://datatracker.ietf.org/doc/html/rfc4271#section-9.1.2).
BGP peering sessions can advertise reachable prefixes to a peer and withdraw previously advertised prefixes. This propagation takes no more than a few minutes.
### BGP timers and settings
Cloudflare uses the following timers, which are not configurable:
| Setting | Description |
| -------------------- | --------------------------------------------------------------------------------------------------------------------------------------------------------------------------------------------------------------------------- |
| **Hold timer** | 240 seconds for CNI and 90 seconds for GRE and IPsec tunnels (_To establish a session, Cloudflare compares its hold timer and the peer's hold timer, and uses the smaller of the two values to establish the BGP session._) |
| **Keepalive timer** | One third of the hold timer. |
| **Graceful restart** | 120 seconds (currently, only supported on CNI) |
* **Hold timer**: Specifies the maximum amount of time that a BGP peer waits to receive a keepalive, update, or notification message before declaring the BGP session down. Cloudflare uses the smaller of this default hold timer and that received from the peer in the open message.
* **Keepalive timer**: BGP systems exchange keepalive messages to determine whether the peer router is reachable. If keepalive messages are not received within the hold timer, the session is assumed to be down, indicating that the peer is no longer reachable at the BGP protocol level.
* **Graceful restart timer**: Tracks how long a router waits for a peer to re-establish a BGP session after the peer initiates a graceful restart. If the peer does not reconnect within this time, the router declares the session down and removes stale routes.
### BGP capabilities and limitations
BGP multipath is supported. If BGP learns the same prefix on two different interconnects, Cloudflare distributes traffic destined for that prefix across each interconnect according to the usual ECMP behavior.
BGP Graceful Restart is supported in a passive (helper/aware) mode. Cloudflare maintains forwarding state for a restarting neighbor.
BGP support currently has the following limitations:
* The Cloudflare account ASN and your device ASN must be different. Only eBGP is supported.
* Cloudflare always injects routes with a priority of `100`.
* Bidirectional Forwarding Detection (BFD) is not supported.
* If you are using BGP with IPsec/CNI (beta), you must set the ASN on the Cloudflare side to `13335`. Private ASNs are not yet supported.
For Magic Transit customers, BGP with the Magic Transit Virtual Network routing table is separated from the announcement of anycast prefixes at the Cloudflare edge. Anycast withdrawal must be controlled with existing methods documented in [Advertise prefixes](https://developers.cloudflare.com/magic-transit/how-to/advertise-prefixes/).
### Tunnel health checks
You need to enable [legacy health checks](https://developers.cloudflare.com/magic-transit/reference/tunnel-health-checks/#legacy-bidirectional-health-checks) alongside BGP. This is essential to determine if a specific Cloudflare data center is reachable from your device. [Tunnel health checks](https://developers.cloudflare.com/magic-transit/reference/tunnel-health-checks/) modify the route priorities for dynamically learned BGP routes.
```json
{"@context":"https://schema.org","@type":"BreadcrumbList","itemListElement":[{"@type":"ListItem","position":1,"item":{"@id":"/directory/","name":"Directory"}},{"@type":"ListItem","position":2,"item":{"@id":"/magic-transit/","name":"Magic Transit"}},{"@type":"ListItem","position":3,"item":{"@id":"/magic-transit/reference/","name":"Reference"}},{"@type":"ListItem","position":4,"item":{"@id":"/magic-transit/reference/traffic-steering/","name":"Traffic steering"}}]}
```
---
---
title: Tunnel health checks
description: Magic Transit uses probes to check for tunnel health. Review information on this page to learn more.
image: https://developers.cloudflare.com/core-services-preview.png
---
[Skip to content](#%5Ftop)
Was this helpful?
YesNo
[ Edit page ](https://github.com/cloudflare/cloudflare-docs/edit/production/src/content/docs/magic-transit/reference/tunnel-health-checks.mdx) [ Report issue ](https://github.com/cloudflare/cloudflare-docs/issues/new/choose)
Copy page
# Tunnel health checks
Cloudflare continuously monitors whether each tunnel connecting your network to Cloudflare is reachable and performing well. When a tunnel becomes unhealthy, Cloudflare automatically steers traffic to an alternate path — without requiring manual intervention. This monitoring relies on tunnel health check probes.
A tunnel health check probe consists of an [ICMP (Internet Control Message Protocol) ↗](https://www.cloudflare.com/learning/ddos/glossary/internet-control-message-protocol-icmp/) payload encapsulated in the protocol of the tunnel being tested. For example, if the tunnel is an Internet Protocol Security (IPsec) tunnel, the ICMP [packet ↗](https://www.cloudflare.com/learning/network-layer/what-is-a-packet/) is encrypted within the Encapsulating Security Payload (ESP) packet of the tunnel.
A tunnel health check probe travels from Cloudflare to the tunnel origin, then returns a response to Cloudflare. Cloudflare uses this response to determine the probe outcome and calculate the tunnel state (the following sections explain this in greater detail).
Note
Magic Transit customers with [Customer Metadata Boundary](https://developers.cloudflare.com/data-localization/metadata-boundary/) enabled for the European Union can access GRE, IPsec, and CNI (Cloudflare Network Interconnect) health check and traffic volume data in the Cloudflare dashboard and through the API. This ensures that customers who need to be General Data Protection Regulation (GDPR) compliant can access all Magic Transit features.
## Types of health checks
Magic Transit uses two types of health checks:
### Tunnel health checks
Tunnel health checks monitor the status of the tunnels that route traffic from Cloudflare to your origin network. Magic Transit relies on these checks to steer traffic to the best available routes. During onboarding, you [specify the tunnel endpoints](https://developers.cloudflare.com/magic-transit/how-to/configure-tunnel-endpoints/) or tunnel health check targets the tunnel probes originating from Cloudflare's global network will target.
You can access tunnel health check results [through the API](https://developers.cloudflare.com/analytics/graphql-api/tutorials/querying-magic-transit-tunnel-healthcheck-results/). Cloudflare aggregates these results from individual health check results from Cloudflare servers.
### Endpoint health checks
Endpoint health checks evaluate connectivity from Cloudflare distributed data centers to your origin network. Unlike tunnel health checks, endpoint probes are designed to provide a broad picture of Internet health between Cloudflare and your network. They flow over available tunnels but do not inform tunnel selection or steering logic.
Cloudflare global network servers issue endpoint health checks outside of customer network namespaces and typically target endpoints beyond the tunnel-terminating border router. During onboarding, you specify IP addresses to configure endpoint health checks.
## Tunnel health check attributes
A tunnel health check probe has the following attributes.
### Target
A tunnel health check probe tests whether Cloudflare can successfully connect to a specific address or endpoint through the tunnel. The target is the address you want to verify is reachable. It is optional, and defaults vary depending on the direction of the health check (refer to [Direction](#direction) for more information).
### Direction
A tunnel health check probe can have two possible directions — unidirectional and bidirectional.
#### Unidirectional
A unidirectional health check probe stays encapsulated in one direction and comes into the origin through the tunnel (from Cloudflare to the origin). The response comes back to Cloudflare unencapsulated and routes outside of the tunnel following standard Internet [routing ↗](https://www.cloudflare.com/learning/network-layer/what-is-routing/).
The target defaults to the publicly routable origin specified as the `customer_endpoint` on the tunnel, if present. Otherwise, you can use a custom target.
#### Bidirectional
A bidirectional probe stays encapsulated in both directions. The probe comes in through the tunnel and the response also leaves encapsulated through the tunnel. The ICMP reply from your router destined for the anycast IP address on Cloudflare's network arrives at the closest Cloudflare data center and lands on one of the servers using Equal-Cost Multi-Path (ECMP), ensuring the response takes the most efficient path.
**Default packet addressing**
By default, Cloudflare destinations these packets for the Cloudflare side of the interface address field set on the tunnel, and sources them from the client side of the tunnel. For example, if the interface address is `10.100.0.8/31`, Cloudflare destinations the packet for `10.100.0.9` and sources it from `10.100.0.8`.
**Interface address ranges**
The interface address field uses either a `/30` or `/31` CIDR range:
* **`/31` range**: The IP you provide is the Cloudflare side, and the other IP is the client side. For example, if the interface address is `10.100.0.8/31`, then `10.100.0.8` is the Cloudflare side and `10.100.0.9` is the client side.
* **`/30` range**: The IP you provide is the Cloudflare side, and the other IP (excluding the broadcast and network identifier) is the client side. For example, if the interface address is `10.100.0.9/30`, then `10.100.0.9` is the Cloudflare side and `10.100.0.10` is the client side.
You can also configure a bidirectional health check with a custom public target, which is the recommended approach for an Azure Active Standby tunnel setup.
These packets flow to and from Cloudflare over the tunnels you have configured to provide full visibility into the traffic path between Cloudflare's network and your sites. You need to configure traffic selectors to accept the health check packets for IPsec tunnels.
Refer to [Add tunnels](https://developers.cloudflare.com/magic-transit/how-to/configure-tunnel-endpoints/#add-tunnels) to learn how to configure bidirectional or unidirectional health checks.
#### Legacy bidirectional health checks
For customers using the legacy health check system with a public IP range, Cloudflare recommends:
* Configuring the tunnel health check target IP address to one within the `172.64.240.252/30` prefix range.
* Applying a policy-based route that matches packets with a source IP address equal to the configured tunnel health check target (for example `172.64.240.253/32`), and route them over the tunnel back to Cloudflare.
### Type
A tunnel health check probe can have two possible types: request and reply. For each type, the source and destination address depends on the direction. Refer to [Add tunnels](https://developers.cloudflare.com/magic-transit/how-to/configure-tunnel-endpoints/#add-tunnels) to learn how to change this setting.
#### Request style
In a request style health check the payload probe is an ICMP request.
For a unidirectional probe, the source address is the Cloudflare side of the tunnel (a publicly routable address) and the destination is the origin router (also publicly routable). The origin router receives the probe and produces an ICMP response with the opposite source and destination, and sends it outside of the tunnel.
For a bidirectional probe, the source address is the interface address of the Cloudflare side of the tunnel (a privately routable address) and the destination is the interface address of the tunnel (also privately routable). The origin router receives the probe and produces an ICMP response with the opposite source and destination and sends it into the tunnel.
#### Reply style
In a reply style health check the payload probe is an ICMP response.
For a unidirectional probe, the destination address is the Cloudflare side of the tunnel (a publicly routable address) and the source is the origin router (also publicly routable). The origin router receives the probe and sends it back as the response, unchanged, outside of the tunnel.
For a bidirectional probe, the destination address is the interface address of the Cloudflare side of the tunnel (a privately routable address) and the source is the interface address of the tunnel (also privately routable). The origin router receives the probe packet and sends the probe packet back as the response (unchanged) into the tunnel because the destination routes through the tunnel.
Note
To avoid control plane policies enforced by the origin network, you can set tunnel health checks to use a request style health check if your network drops reply style health checks.
### Summary table with tunnel health check probe types
| Attribute | Type | Unidirectional health checks | Bidirectional health checks |
| ------------------- | ------------- | ------------------------------------------ | ------------------------------------------------------------- |
| Source Address | Request Style | Cloudflare Address (Publicly Routable) | Cloudflare Interface Address (Privately Routable) |
| Destination Address | Request Style | Origin Tunnel Endpoint (Publicly Routable) | Origin Interface Address (Privately Routable) / Custom Target |
| Source Address | Reply Style | Origin Tunnel Endpoint (Publicly Routable) | Origin Interface Address (Privately Routable) / Custom Target |
| Destination Address | Reply Style | Cloudflare Address (Publicly Routable) | Cloudflare Interface Address (Privately Routable) |
### Graphics summarizing health check types
#### Bidirectional request style
flowchart TB
accTitle: Bidirectional request style
accDescr: Shows the flow of a bidirectional request-style tunnel health check probe and response between Cloudflare and the origin.
subgraph Tunnel Healthcheck Probe
cloudflare(Cloudflare) --- bare_echo_request([ICMP Echo Request])
bare_echo_request --> tunnel[Tunnel]
tunnel --- encapsulated_echo_request([Tunnel Protocol < ICMP Echo Request >])
encapsulated_echo_request --> Internet([Internet])
Internet --- encapsulated_echo_request_2([Tunnel Protocol < ICMP Echo Request >])
encapsulated_echo_request_2 --> origin_tunnel(Tunnel)
origin_tunnel --- received_bare_echo_request([ICMP Echo Request])
received_bare_echo_request --> origin(Origin)
end
subgraph Tunnel Healthcheck Response
origin --> bare_echo_reply([ICMP Echo Reply])
bare_echo_reply --- origin_tunnel_2(Tunnel)
origin_tunnel_2 --- encapsulated_echo_reply([Tunnel Protocol < ICMP Echo Reply >])
encapsulated_echo_reply --- Internet_2([Internet])
Internet_2 --> encapsulated_echo_reply_2([Tunnel Protocol < ICMP Echo Reply >])
encapsulated_echo_reply_2 --> tunnel_2[Tunnel]
tunnel_2 --> bare_echo_reply_2([ICMP Echo Reply])
bare_echo_reply_2 --> cloudflare
end
#### Bidirectional reply style
flowchart TB
accTitle: Bidirectional reply style
accDescr: Shows the flow of a bidirectional reply-style tunnel health check probe and response between Cloudflare and the origin.
subgraph Tunnel Healthcheck Probe
cloudflare(Cloudflare) --- bare_echo_probe([ICMP Echo Reply])
bare_echo_probe --> tunnel[Tunnel]
tunnel --- encapsulated_echo_probe([Tunnel Protocol < ICMP Echo Reply >])
encapsulated_echo_probe --> Internet([Internet])
Internet --- encapsulated_echo_probe_2([Tunnel Protocol < ICMP Echo Reply >])
encapsulated_echo_probe_2 --> origin_tunnel(Tunnel)
origin_tunnel --- received_bare_echo_reply([ICMP Echo Reply])
received_bare_echo_reply --> origin(Origin)
end
subgraph Tunnel Healthcheck Response
origin --> bare_echo_reply([ICMP Echo Reply])
bare_echo_reply --- origin_tunnel_2(Tunnel)
origin_tunnel_2 --- encapsulated_echo_reply([Tunnel Protocol < ICMP Echo Reply >])
encapsulated_echo_reply --- Internet_2([Internet])
Internet_2 --> encapsulated_echo_reply_2([Tunnel Protocol < ICMP Echo Reply >])
encapsulated_echo_reply_2 --> tunnel_2[Tunnel]
tunnel_2 --> bare_echo_reply_2([ICMP Echo Reply])
bare_echo_reply_2 --> cloudflare
end
#### Unidirectional echo request
flowchart TB
accTitle: Unidirectional echo request
accDescr: Shows the flow of a unidirectional echo request health check from Cloudflare to the origin and back.
cloudflare(Cloudflare) --- bare_echo_probe([ICMP Echo Request])
bare_echo_probe --> tunnel[Tunnel]
tunnel --- encapsulated_echo_probe([Tunnel Protocol < ICMP Echo Request >])
encapsulated_echo_probe --> Internet([Internet])
Internet --- encapsulated_echo_probe_2([Tunnel Protocol < ICMP Echo Request >])
encapsulated_echo_probe_2 --> origin_tunnel(Tunnel)
origin_tunnel --- received_bare_echo_reply([ICMP Echo Request])
received_bare_echo_reply --> origin(Origin)
origin --- received_bare_echo_reply_2([ICMP Echo Reply])
received_bare_echo_reply_2 --> Internet_2([Internet])
Internet_2 --> cloudflare
#### Unidirectional echo reply
flowchart TB
accTitle: Unidirectional echo reply
accDescr: Shows the flow of a unidirectional echo reply health check from Cloudflare to the origin and back.
cloudflare(Cloudflare) --- bare_echo_probe([ICMP Echo Reply])
bare_echo_probe --> tunnel[Tunnel]
tunnel --- encapsulated_echo_probe([Tunnel Protocol < ICMP Echo Reply >])
encapsulated_echo_probe --> Internet([Internet])
Internet --- encapsulated_echo_probe_2([Tunnel Protocol < ICMP Echo Reply >])
encapsulated_echo_probe_2 --> origin_tunnel(Tunnel)
origin_tunnel --- received_bare_echo_reply([ICMP Echo Reply])
received_bare_echo_reply --> origin(Origin)
origin --- received_bare_echo_reply_2([ICMP Echo Reply])
received_bare_echo_reply_2 --> Internet_2([Internet])
Internet_2 --> cloudflare
### Rate
Warning
Cloudflare Network Firewall rules apply to Internet Control Message Protocol (ICMP) traffic. If you enable Cloudflare Network Firewall, ensure your rules allow ICMP traffic sourced from Cloudflare public IPs. Otherwise, health checks will fail. Refer to [Cloudflare Network Firewall rules](https://developers.cloudflare.com/cloudflare-network-firewall/about/ruleset-logic/#cloudflare-network-firewall-rules-and-magic-transit-endpoint-health-checks) for more information.
Every Cloudflare data center configured to process your traffic sends tunnel health check probes. The rate at which Cloudflare sends these probes varies based on tunnel and location. You can tune this rate on a per-tunnel basis by modifying the `health_check` rate with the [API or the dashboard](https://developers.cloudflare.com/magic-transit/network-health/update-tunnel-health-checks-frequency/). You can set the rate as _low_, _mid_, or _high_, with _mid_ being the default.
The actual rate formula considers the number of servers in a Cloudflare data center or the number of servers with the customer namespace provisioned on them for dynamically provisioned namespaces. The rate is dynamic and depends on the size of Cloudflare's network.
When a probe attempt fails for a [healthy tunnel](#health-state-and-prioritization), each server detecting the failure quickly probes up to two more times to obtain an accurate result. Cloudflare does the same if a tunnel has been down and probes start returning success. Because Cloudflare global network servers send probes up to every second, your network will receive several hundred health check packets per second. Each Cloudflare data center sends only one health check packet as part of a probe, representing a relatively trivial amount of traffic.
## Health state and prioritization
There are three tunnel health states: healthy, degraded, and down.
Healthy tunnels are preferred to degraded tunnels, and degraded tunnels are preferred to those that are down.
Magic Transit steers traffic to tunnels based on priorities you set when you [assign tunnel route priorities during onboarding](https://developers.cloudflare.com/magic-transit/how-to/configure-routes/). Tunnel routes with lower values have priority over those with higher values.
Note
Cloudflare global network servers may reach the origin infrastructure from some locations but not others. This occurs because Cloudflare does not synchronize health checks among global network servers and because the Internet is not homogeneous. Therefore, tunnel health may be in different states in different parts of the world at the same time.
## Tunnel state determination
### Degraded
* When at least 0.1% of tunnel health checks fail in the previous five minutes (with at least two failures), Magic Transit considers the link lossy and sets the tunnel state to degraded (assuming the tunnel is not down).
* Magic Transit requires two failures so that a single lost packet does not trigger a penalty.
* Magic Transit then immediately sets the tunnel status to degraded and applies a priority penalty.
### Down
* When all health checks of at least three samples in the last one second fail, Magic Transit immediately transitions the tunnel from healthy or degraded to down, and applies a priority penalty to routes through that tunnel.
* A down state determination takes precedence over a degraded state determination. This means that a tunnel can only be one of the following: down, degraded, or healthy.
When Magic Transit identifies a route that is not healthy, it applies these penalties:
* **Degraded**: Add `500,000` to priority.
* **Down**: Add `1,000,000` to priority.
The values for failure penalties are intentionally extreme so that they always exceed the priority values assigned during [routing configuration](https://developers.cloudflare.com/magic-transit/how-to/configure-routes/).
Applying a penalty instead of removing the route altogether preserves redundancy and maintains options for customers with only one tunnel. Penalties also support the case when multiple tunnels are unhealthy.
## Cloudflare data centers and tunnels
In the event a Cloudflare data center is down, Cloudflare's global network does not advertise your prefixes, and Cloudflare routes your packets to the next closest data center. To check the system status for Cloudflare's global network and dashboard, refer to [Cloudflare System Status ↗](https://www.cloudflarestatus.com/).
## Recovery
Once a tunnel is in the down state, global network servers continue to emit probes according to the cadence described earlier. When a probe returns healthy, the global network server that received the healthy packet immediately sends two more probes. If the two probes return healthy, Magic Transit sets the tunnel status to degraded (as three consecutive successful probes no longer satisfy the condition for a down state).
Tunnels in a degraded state transition to healthy when the failure rate for the previous 30 probes is less than 0.1%. This transition may take up to 30 minutes.
Magic Transit's tunnel health check system allows a tunnel to quickly transition from healthy to degraded or down, but transitions slowly from degraded or down to healthy. This behavior is called hysteresis and prevents routing changes caused by flapping and other intermittent network failures.
Note
Cloudflare always attempts to send traffic over available tunnel routes with the highest priority (lowest route value), even when all configured tunnels are in an unhealthy state.
## Example
Consider two tunnels and their associated routing priorities. Remember that lower route values have priority.
* Tunnel 1, route priority `100`
* Tunnel 2, route priority `200`
When both tunnels are in a healthy state, routing priority directs traffic exclusively to Tunnel 1 because its route priority of `100` beats that of Tunnel 2\. Tunnel 2 does not receive any traffic, except for tunnel health check probes. Endpoint health checks only flow over Tunnel 1 to their destination inside the origin network.
### Failure response
If the link between Tunnel 1 and Cloudflare becomes unusable, Cloudflare global network servers discover the failure on their next health check probe, and immediately issue two more probes (assuming the tunnel was initially healthy).
When a global network server does not receive the proper ICMP reply packets from these two additional probes, the global network server labels Tunnel 1 as down, and downgrades Tunnel 1 priority to `1,000,100`. The priority then shifts to Tunnel 2, and Magic Transit immediately steers packets arriving at that global network server to Tunnel 2.
### Recovery response
Suppose the connectivity issue that set Tunnel 1 health to down becomes resolved. At the next health check interval, the issuing global network server receives a successful probe and immediately sends two more probes to validate tunnel health.
When all three probes return successfully, Magic Transit transitions the tunnel from down to degraded. As part of this transition, Cloudflare reduces the priority penalty for that route so that its priority becomes `500,100`. Because Tunnel 2 has a priority of `200`, traffic continues to flow over Tunnel 2.
Global network servers continue probing Tunnel 1\. When the health check failure rate drops below 0.1% for a five-minute period, Magic Transit sets tunnel status to healthy. Cloudflare fully restores Tunnel 1's routing priority to `100`, and traffic steering returns the data flow to Tunnel 1.
## Troubleshooting
For help resolving tunnel health issues, refer to [Troubleshoot tunnel health](https://developers.cloudflare.com/magic-transit/troubleshooting/tunnel-health/).
```json
{"@context":"https://schema.org","@type":"BreadcrumbList","itemListElement":[{"@type":"ListItem","position":1,"item":{"@id":"/directory/","name":"Directory"}},{"@type":"ListItem","position":2,"item":{"@id":"/magic-transit/","name":"Magic Transit"}},{"@type":"ListItem","position":3,"item":{"@id":"/magic-transit/reference/","name":"Reference"}},{"@type":"ListItem","position":4,"item":{"@id":"/magic-transit/reference/tunnel-health-checks/","name":"Tunnel health checks"}}]}
```
---
---
title: Troubleshoot connectivity
description: This guide helps you determine whether a tunnel health alert is actually affecting your traffic. A degraded or down tunnel only matters if your traffic is currently routing through the Cloudflare data center where that tunnel is unhealthy.
image: https://developers.cloudflare.com/core-services-preview.png
---
[Skip to content](#%5Ftop)
Was this helpful?
YesNo
[ Edit page ](https://github.com/cloudflare/cloudflare-docs/edit/production/src/content/docs/magic-transit/troubleshooting/connectivity.mdx) [ Report issue ](https://github.com/cloudflare/cloudflare-docs/issues/new/choose)
Copy page
# Troubleshoot connectivity
This guide helps you determine whether a tunnel health alert is actually affecting your traffic. A degraded or down tunnel only matters if your traffic is currently routing through the Cloudflare data center where that tunnel is unhealthy.
Note
Cloudflare does not synchronize health checks among global network servers. A tunnel can be healthy in one data center and degraded in another at the same time. This is normal behavior, not an outage.
## Before you begin
Understand how Magic Transit health checks and traffic routing work:
* Health checks run independently from every Cloudflare data center.
* Each data center evaluates tunnel health based on its own probes.
* Traffic enters Cloudflare at the data center closest to the source (anycast routing).
* A degraded tunnel in a data center that is not handling your traffic has no impact on your connectivity.
If you are experiencing actual tunnel health issues (tunnels flapping, all tunnels down, or IPsec errors), refer to [Troubleshoot tunnel health](https://developers.cloudflare.com/magic-transit/troubleshooting/tunnel-health/) instead.
## Diagnostic flowchart
Use this flowchart to determine whether a tunnel health alert requires action.
flowchart TD
accTitle: Connectivity troubleshooting flowchart
accDescr: A decision tree to determine whether a degraded tunnel alert is affecting your traffic.
A["You received a tunnel
health alert"] --> B{"Is your traffic
affected?"}
B -- "Yes, I have
connectivity issues" --> C["Identify your ingress
data center and check
tunnel health there"]
B -- "No, traffic
flows normally" --> D{"Does the alert match
a data center carrying
your traffic?"}
D -- "No" --> E["No action required.
The degraded tunnel is in
a data center not serving
your traffic."]
D -- "Yes" --> C
C --> G{"Are tunnels healthy
at your ingress
data center?"}
G -- "Yes" --> H["The issue is not
tunnel-related. Check
Cloudflare Status and
your origin network."]
G -- "No" --> I["Tunnels at your ingress
data center are unhealthy.
Refer to Troubleshoot
tunnel health."]
## 1\. Identify your ingress data center
Determine which Cloudflare data center your traffic is entering. This is the only data center whose tunnel health status matters for your current connectivity.
### Use traceroute
Run a `traceroute` from the source network to your Magic Transit prefix. Look for the Cloudflare data center hostname in the trace output, which contains a three-letter [IATA airport code ↗](https://en.wikipedia.org/wiki/IATA%5Fairport%5Fcode) that identifies the data center.
Terminal window
```
traceroute 203.0.113.1
```
```
1 192.168.1.1 (192.168.1.1) 1.234 ms
2 10.0.0.1 (10.0.0.1) 5.678 ms
3 198.51.100.1 (198.51.100.1) 10.123 ms
4 198.51.100.10 (198.51.100.10) 12.345 ms
5 lhr01.cf (198.51.100.11) 15.678 ms
```
In this example, `lhr` indicates that traffic enters Cloudflare at the London (Heathrow) data center.
### Use the Cloudflare dashboard
You can identify which data centers handle your traffic by using **Network Analytics**.
1. Go to the **Network Analytics** page.
[ Go to **Network analytics** ](https://dash.cloudflare.com/?to=/:account/networking-insights/analytics/network-analytics/transport-analytics)
2. Select **Add filter** and filter traffic by your source IP addresses to isolate your traffic.
3. Under **Packets summary**, select the **Source data center** tab. If the tab is not visible, select the three-dot menu (`...`) to reveal additional view options and select **Source data center**.
4. Review the per-data-center traffic breakdown to identify which Cloudflare data centers are handling your traffic.
5. Cross-reference these data centers with the tunnel health status on the [**Connector health** page](https://developers.cloudflare.com/magic-transit/network-health/check-tunnel-health-dashboard/). If tunnels are healthy at the data centers carrying your traffic, a degraded tunnel alert for a different data center is not the cause of your connectivity issue.
## 2\. Correlate with Cloudflare status
If your tunnels are healthy at the relevant data center but you still experience connectivity issues, check for broader platform issues.
1. Go to [Cloudflare Status ↗](https://www.cloudflarestatus.com/).
2. Look for any active incidents or maintenance at the data center you identified.
3. Check for any incidents that might affect your traffic, such as outages related to networking, BYOIP, or the services your configuration depends on.
## 3\. Gather information for support
If you have worked through this guide and cannot resolve the issue, gather the following information before contacting Cloudflare support.
### Required information
1. **Account ID** and **tunnel name(s)** affected
2. **Timestamps** (in UTC) when the issue started
3. **Ingress data center** you identified (airport code, for example `LHR`, `IAD`)
4. **Symptoms observed:**
* Whether user traffic is affected or only health check alerts fired
* Which tunnels and data centers show degraded or down status
* Whether the issue is intermittent or persistent
### Helpful diagnostic data
* **Traceroute output** from your source network to your Magic Transit prefix
* **Dashboard screenshots** showing tunnel health at the relevant data center
* **Distributed traceroutes** using tools like [ping.pe ↗](https://ping.pe) to test reachability from multiple global locations
* **Packet captures** from your router if traffic loss is confirmed
## Related resources
* [Troubleshoot tunnel health](https://developers.cloudflare.com/magic-transit/troubleshooting/tunnel-health/): Resolve common tunnel health issues (flapping, IPsec errors, stateful firewall drops).
* [Troubleshoot routing and BGP](https://developers.cloudflare.com/magic-transit/troubleshooting/routing-and-bgp/): Diagnose routing and BGP issues that affect traffic delivery.
* [Check tunnel health in the dashboard](https://developers.cloudflare.com/magic-transit/network-health/check-tunnel-health-dashboard/): Monitor tunnel status per data center.
* [Tunnel health checks](https://developers.cloudflare.com/magic-transit/reference/tunnel-health-checks/): Technical details on how health checks work.
* [Network Analytics](https://developers.cloudflare.com/magic-transit/analytics/network-analytics/): Analyze traffic patterns over time.
```json
{"@context":"https://schema.org","@type":"BreadcrumbList","itemListElement":[{"@type":"ListItem","position":1,"item":{"@id":"/directory/","name":"Directory"}},{"@type":"ListItem","position":2,"item":{"@id":"/magic-transit/","name":"Magic Transit"}},{"@type":"ListItem","position":3,"item":{"@id":"/magic-transit/troubleshooting/","name":"Troubleshooting"}},{"@type":"ListItem","position":4,"item":{"@id":"/magic-transit/troubleshooting/connectivity/","name":"Troubleshoot connectivity"}}]}
```
---
---
title: Troubleshoot with IPsec logs
description: Use IPsec logs to troubleshoot issues with your IPsec tunnels during the key-exchange phase of the IPsec handshake. Configure a logpush job to forward these logs to your preferred storage service for analysis.
image: https://developers.cloudflare.com/core-services-preview.png
---
[Skip to content](#%5Ftop)
Was this helpful?
YesNo
[ Edit page ](https://github.com/cloudflare/cloudflare-docs/edit/production/src/content/docs/magic-transit/troubleshooting/ipsec-troubleshoot.mdx) [ Report issue ](https://github.com/cloudflare/cloudflare-docs/issues/new/choose)
Copy page
# Troubleshoot with IPsec logs
Use IPsec logs to troubleshoot issues with your IPsec tunnels during the key-exchange phase of the IPsec handshake. Configure a logpush job to forward these logs to your preferred storage service for analysis.
## Set up an IPsec logpush job
1. Go to the **Logpush** page.
[ Go to **Logpush** ](https://dash.cloudflare.com/?to=/:account/logs)
2. Select **Create a Logpush job**.
3. Select **IPsec logs** as your dataset.
Refer to the [Logpush documentation](https://developers.cloudflare.com/logs/logpush/) for more information about features, including the [available fields](https://developers.cloudflare.com/logs/logpush/logpush-job/datasets/account/ipsec%5Flogs/) in the dataset.
```json
{"@context":"https://schema.org","@type":"BreadcrumbList","itemListElement":[{"@type":"ListItem","position":1,"item":{"@id":"/directory/","name":"Directory"}},{"@type":"ListItem","position":2,"item":{"@id":"/magic-transit/","name":"Magic Transit"}},{"@type":"ListItem","position":3,"item":{"@id":"/magic-transit/troubleshooting/","name":"Troubleshooting"}},{"@type":"ListItem","position":4,"item":{"@id":"/magic-transit/troubleshooting/ipsec-troubleshoot/","name":"Troubleshoot with IPsec logs"}}]}
```
---
---
title: Troubleshoot routing and BGP
description: This guide helps you diagnose and resolve common routing and BGP issues with Magic Transit. These issues can affect traffic delivery, cause unexpected latency, or result in connectivity loss.
image: https://developers.cloudflare.com/core-services-preview.png
---
[Skip to content](#%5Ftop)
Was this helpful?
YesNo
[ Edit page ](https://github.com/cloudflare/cloudflare-docs/edit/production/src/content/docs/magic-transit/troubleshooting/routing-and-bgp.mdx) [ Report issue ](https://github.com/cloudflare/cloudflare-docs/issues/new/choose)
Copy page
# Troubleshoot routing and BGP
This guide helps you diagnose and resolve common routing and BGP issues with Magic Transit. These issues can affect traffic delivery, cause unexpected latency, or result in connectivity loss.
## Quick diagnostic checklist
If you are experiencing routing or BGP issues, check these items first:
1. **BGP session state**: Verify session is **Established**, not stuck in **Connect** or **Active**.
2. **Firewall rules**: Ensure TCP port `179` is permitted bidirectionally between your router and Cloudflare.
3. **Prefix advertisement status**: Confirm prefixes show **Advertised** in the dashboard, not **Withdrawn** or **Approved**.
4. **Route propagation timing**: Allow two to five minutes for changes to propagate globally. Cloudflare propagates changes within minutes, but has no control over how quickly external ISPs refresh their BGP tables.
5. **Tunnel or CNI health**: Check that underlying connectivity is healthy. Degraded tunnels affect route priority.
6. **Static route conflicts**: Static routes take precedence over BGP routes at equal priority.
## Route propagation timing
When you advertise or withdraw a BYOIP prefix, changes propagate across Cloudflare's network within minutes.
ISP route refresh delays may impact traffic
Cloudflare's action to advertise or withdraw a route takes effect across the global network within minutes. However, Cloudflare has no control over how quickly external ISPs refresh their BGP tables after the change.
| Action | Cloudflare propagation | Global Internet propagation |
| -------------------- | ---------------------- | ------------------------------- |
| Prefix advertisement | 1-2 minutes | 2-5 minutes typical |
| Prefix withdrawal | 1-2 minutes | 2-15 minutes (BGP path hunting) |
### Why withdrawals take longer
When a route is withdrawn, Internet networks perform BGP path hunting. They search for alternative paths before converging on the new routing state. This behavior is amplified by:
* Cloudflare's global anycast network and extensive peering relationships
* The Minimum Route Advertisement Interval (MRAI), typically 30 seconds per iteration
* Multiple Tier-1 networks needing to converge independently
During path hunting, traffic may be routed suboptimally or dropped entirely.
Note
When failing traffic off Cloudflare, use the same-length prefix strategy. Advertise the identical prefix from your alternate provider before withdrawing from Cloudflare. This prevents path hunting because BGP does not need to search for alternative routes.
Refer to [Safely withdraw a BYOIP prefix](https://developers.cloudflare.com/magic-transit/how-to/safely-withdraw-byoip-prefix/) for the recommended procedure.
## Resolve common issues
### BGP session not establishing
This section covers BGP peering sessions (beta) between your network and Cloudflare, established over [CNI](https://developers.cloudflare.com/network-interconnect/) or tunnels. These sessions are separate from how Cloudflare advertises your prefixes to the Internet, which is covered in [Route propagation timing](#route-propagation-timing).
#### Symptoms
* BGP session never reaches **Established** state
* No routes being advertised or received
* Router logs show repeated connection attempts
#### BGP session states
| State | Meaning | Action |
| --------------- | ------------------------------------ | ------------------------------------------ |
| **Established** | Session up, exchanging routes | Normal operation |
| **Active** | Attempting to initiate connection | Check firewall rules, verify neighbor IP |
| **Connect** | TCP connection in progress | Check port 179 access, verify peering IP |
| **Idle** | Session down, no connection attempts | Check configuration, verify BGP is enabled |
#### Solution
1. Verify your firewall permits TCP port `179` bidirectionally between your router and the Cloudflare peering address.
2. Confirm the neighbor IP matches the Cloudflare-provided peering address exactly.
3. Verify your ASN configuration matches the dashboard settings. Only eBGP is supported, so your ASN must differ from the Cloudflare account ASN.
4. If using MD5 authentication, verify the password matches on both sides.
### Prefixes not reachable after advertisement
#### Symptoms
* Dashboard shows prefix as **Advertised**
* External hosts cannot reach IPs in the prefix
* Traffic is dropped
#### Causes
* Route propagation still in progress
* Missing return path routing on your network
* ROA/RPKI validation issues with upstream ISPs
#### Solution
1. **Wait for propagation**: Allow up to five minutes for full global propagation. Changes propagate across Cloudflare quickly but external networks update at varying speeds.
2. **Verify return path routing**: Ensure your network has routes to send return traffic back through Cloudflare for egress configurations. For ingress-only or direct server return configurations, route return traffic through your tunnels.
3. **Check external visibility**: Use BGP looking glass tools such as [bgp.he.net](https://bgp.he.net) or [RIPE RIS](https://ris.ripe.net/) to confirm your prefix is visible from external networks.
4. **Verify RPKI configuration**: If you use Resource Public Key Infrastructure (RPKI), confirm your Route Origin Authorization (ROA) records match your prefix and the ASN configuration in Cloudflare.
### Traffic loss during prefix withdrawal
#### Symptoms
* Prefix withdrawn through API or dashboard
* External traffic continues arriving at Cloudflare but is dropped
* Connectivity loss persists for several minutes after withdrawal
#### Cause
This is BGP path hunting behavior. When Cloudflare withdraws your prefix, Internet networks search for alternative paths. Convergence typically takes two to five minutes but can extend beyond 11 minutes. During this period, traffic may:
* Route to Cloudflare through cached paths at ISPs
* Loop between Tier-1 providers that have not yet converged
* Be dropped before reaching your network
#### Solution
Follow the safe prefix withdrawal procedure:
1. **Before withdrawal**: Advertise the same prefix (identical prefix length) from your alternate provider. This gives BGP an immediate alternative path.
2. **Optional - deprioritize Cloudflare**: Add AS prepends to Cloudflare's route to make it less preferred, allowing traffic to shift gradually.
3. **Withdraw from Cloudflare**: Request prefix withdrawal through the API or dashboard.
4. **Wait for convergence**: Allow at least 15 minutes before considering the migration complete.
Using identical prefix lengths from both Cloudflare and your ISP prevents path hunting. Networks immediately have an alternative route available.
Refer to [Safely withdraw a BYOIP prefix](https://developers.cloudflare.com/magic-transit/how-to/safely-withdraw-byoip-prefix/) for detailed instructions.
### Unexpected traffic routing or latency
#### Symptoms
* Traffic from specific regions routed through distant data centers
* Higher than expected latency for regional users
* Traffic not using the closest tunnel or CNI
#### Causes
* Tunnel health degradation causing route deprioritization
* Regional route scoping misconfiguration
* BGP route priorities not set as expected
* Static routes overriding BGP routes
#### Solution
1. **Check tunnel health**: Degraded tunnels have 500,000 added to their route priority. Down tunnels have 1,000,000 added. Traffic shifts to healthier paths, which may be in different regions. Refer to [Troubleshoot tunnel health](https://developers.cloudflare.com/magic-transit/troubleshooting/tunnel-health/) for diagnostic steps.
2. **Review route priorities**: Lower priority values indicate higher preference. Verify your routes have the expected priority configuration.
* Default BGP route priority: `100`
* Static routes at priority `100` take precedence over BGP routes at `100`
3. **Check regional scoping**: If you use region-scoped routes, ensure all regions have route coverage. Traffic arriving at a region without a matching route is dropped.
4. **Use Network Analytics**: Review traffic patterns to identify where traffic is landing and which paths it follows. Refer to [Network Analytics](https://developers.cloudflare.com/magic-transit/analytics/network-analytics/) for usage instructions.
### CNI link failures
#### Symptoms
* CNI shows down in dashboard
* BGP session over CNI drops
* Traffic fails over to tunnels or alternate CNIs
#### CNI issue layers
CNI issues can occur at multiple layers:
| Issue type | Impact | What to check |
| ------------------ | ---------------------------------- | ---------------------------------- |
| Physical link down | All traffic over that CNI affected | Light levels, cross-connect status |
| BGP session down | Dynamic routes withdrawn | BGP neighbor state on your router |
| Prefixes withdrawn | Specific routes unavailable | BGP advertised and received routes |
A healthy physical link can still have BGP issues. A healthy BGP session can exist while specific prefixes are withdrawn.
#### Solution
**Check physical layer (your side):**
Note
In the case of interconnects provisioned by third parties, you may need to request that your provider carry these steps out.
1. Verify the interface is administratively up on your router.
2. Check optical light levels (Tx/Rx dBm). Abnormal readings indicate fiber or transceiver issues.
3. If light levels are low or absent on your receive side, contact your data center to verify cross-connect status.
**Check BGP session:**
1. Verify BGP neighbor state on your router shows **Established**.
2. Check for MD5 authentication mismatches if authentication is configured.
3. Review BGP logs for error messages indicating why the session may have dropped.
**Check for maintenance:**
1. Review [Cloudflare Status ↗](https://www.cloudflarestatus.com/) for scheduled maintenance affecting your CNI location.
2. Some maintenance events may temporarily affect CNI connectivity even when marked as non-disruptive.
Refer to [Network Interconnect](https://developers.cloudflare.com/network-interconnect/) for CNI configuration and setup information.
### Static and BGP route conflicts
#### Symptoms
* BGP routes not being used despite being learned
* Traffic not following expected BGP path
* Route changes not taking effect as expected
#### Cause
Cloudflare prefers static routes when static and BGP routes share the same prefix and priority. This ensures manually configured routes take precedence unless explicitly deprioritized.
#### Solution
Adjust route priorities based on your preference:
* **To prefer BGP routes**: Set static route priority to a higher number (for example, `150` or `200`). Higher numbers indicate lower preference.
* **To prefer static routes**: Keep static route priority at or below `100`. BGP routes default to priority `100`.
| Route type | Prefix | Priority | Selected |
| ---------- | ----------- | -------- | ---------------------- |
| Static | 10.0.0.0/24 | 100 | Yes (static wins ties) |
| BGP | 10.0.0.0/24 | 100 | No |
To make the BGP route preferred in this example, change the static route priority to `150` or higher, or remove the static route entirely.
Refer to [Route prioritization](https://developers.cloudflare.com/magic-transit/reference/traffic-steering/#route-prioritization) for detailed information on how priorities work.
## CNI, tunnel, and BGP health
Understanding the relationship between these components helps diagnose routing issues:
| Component | What it monitors | Impact when unhealthy |
| ----------------- | ------------------------------------------------------- | -------------------------------------------------------------- |
| **CNI health** | Physical or virtual interconnect link status | BGP session may drop. All traffic over that CNI is affected. |
| **Tunnel health** | Logical GRE or IPsec tunnel through health check probes | Route priority penalized. Traffic steers to healthier tunnels. |
| **BGP session** | Control plane connectivity for dynamic routing | Dynamic routes withdrawn. Static routes remain unaffected. |
A healthy CNI can have an unhealthy tunnel if health check probes are blocked or misconfigured. BGP routes can be withdrawn even when the underlying physical link is operational.
## Gather information for support
If you have worked through this guide and still experience routing issues, gather the following information before contacting Cloudflare support.
### Required information
1. **Account ID** and affected prefix(es), tunnel name(s), or CNI identifier(s)
2. **Timestamps** (in UTC) when the issue occurred
3. **BGP configuration details:**
* Your ASN and Cloudflare peering ASN
* Neighbor IP addresses
* Sanitized router configuration (remove passwords and keys)
4. **Current state information:**
* BGP session state from your router
* Dashboard screenshots showing prefix, route, or tunnel status
### Helpful diagnostic data
* **External BGP visibility**: Results from looking glass tools showing your prefix
* **Router logs**: BGP neighbor logs covering the incident timeframe
* **Traceroute results**: From affected source networks to your prefix
* **For CNI issues**: Optical light level readings from your equipment
### Router diagnostic commands
Collect output from these commands (syntax varies by vendor):
Terminal window
```
# Show BGP neighbor status
show bgp neighbors
# Show BGP summary
show bgp ipv4 unicast summary
# Show specific prefix in BGP table
show bgp ipv4 unicast
# Show interface status (for CNI)
show interface
# Show received and advertised routes
show bgp ipv4 unicast neighbors routes
show bgp ipv4 unicast neighbors advertised-routes
```
## Resources
* [Traffic steering](https://developers.cloudflare.com/magic-transit/reference/traffic-steering/#route-prioritization): Route prioritization, BGP communities, and ECMP behavior
* [Advertise prefixes](https://developers.cloudflare.com/magic-transit/how-to/advertise-prefixes/): BGP control methods and safe withdrawal procedures
* [Configure routes](https://developers.cloudflare.com/magic-transit/how-to/configure-routes/): Static route configuration
* [Network Interconnect](https://developers.cloudflare.com/network-interconnect/): CNI setup and BGP peering
* [Troubleshoot tunnel health](https://developers.cloudflare.com/magic-transit/troubleshooting/tunnel-health/): Tunnel-specific diagnostic steps
* [Network Analytics](https://developers.cloudflare.com/magic-transit/analytics/network-analytics/): Traffic analysis and monitoring
* [Cloudflare Status ↗](https://www.cloudflarestatus.com/): Maintenance and incident notifications
```json
{"@context":"https://schema.org","@type":"BreadcrumbList","itemListElement":[{"@type":"ListItem","position":1,"item":{"@id":"/directory/","name":"Directory"}},{"@type":"ListItem","position":2,"item":{"@id":"/magic-transit/","name":"Magic Transit"}},{"@type":"ListItem","position":3,"item":{"@id":"/magic-transit/troubleshooting/","name":"Troubleshooting"}},{"@type":"ListItem","position":4,"item":{"@id":"/magic-transit/troubleshooting/routing-and-bgp/","name":"Troubleshoot routing and BGP"}}]}
```
---
---
title: Troubleshoot tunnel health
description: This guide helps you diagnose and resolve common tunnel health issues with Magic Transit. Tunnel health checks monitor your GRE and IPsec tunnels and steer traffic to the best available routes.
image: https://developers.cloudflare.com/core-services-preview.png
---
[Skip to content](#%5Ftop)
Was this helpful?
YesNo
[ Edit page ](https://github.com/cloudflare/cloudflare-docs/edit/production/src/content/docs/magic-transit/troubleshooting/tunnel-health.mdx) [ Report issue ](https://github.com/cloudflare/cloudflare-docs/issues/new/choose)
Copy page
# Troubleshoot tunnel health
This guide helps you diagnose and resolve common tunnel health issues with Magic Transit. Tunnel health checks monitor your GRE and IPsec tunnels and steer traffic to the best available routes.
## Quick diagnostic checklist
If you are experiencing tunnel health issues, check these items first:
1. **Health check type**: If using a stateful firewall (Palo Alto, Checkpoint, Cisco, Fortinet), change health check type from _Reply_ to _Request_.
2. **Anti-replay protection**: Disable anti-replay protection on your router, or set the replay window to `0`.
3. **MTU settings**: Verify MTU is set correctly (typically `1476` for GRE, `1400-1450` for IPsec).
4. **IPsec parameters**: Confirm your cryptographic parameters match [Cloudflare's supported configuration](https://developers.cloudflare.com/magic-transit/reference/gre-ipsec-tunnels/#supported-configuration-parameters).
5. **Health check direction**: Magic Transit defaults to _Unidirectional_ (direct server return).
6. **Cloudflare Network Firewall rules (Less common)**: Ensure ICMP traffic from [Cloudflare IP addresses ↗](https://www.cloudflare.com/ips/) is allowed.
---
## Tunnel health states
The [Connector health ↗](https://dash.cloudflare.com/?to=/:account/networking-insights/health) page in the Cloudflare dashboard displays three tunnel health states:
| State | Dashboard display | Technical threshold |
| ------------ | ----------------------------------------- | ------------------------------------------------------------------ |
| **Healthy** | More than 80% of health checks pass | Less than 0.1% failure rate |
| **Degraded** | Between 40% and 80% of health checks pass | At least 0.1% failures in last five minutes (minimum two failures) |
| **Down** | Less than 40% of health checks pass | All health checks failed (at least three samples in last second) |
The dashboard shows tunnel health as measured from each Cloudflare data center where your traffic lands. It is normal to see some locations reporting degraded status due to Internet path issues. Focus on locations that show traffic in the Average ingress traffic column.
Probe retry behavior
When a health check probe fails, Cloudflare sends two additional probes to confirm the failure. A tunnel is only marked as unhealthy if all three probes fail. This retry behavior provides resilience against random packet loss.
### Routing priority penalties
When a tunnel becomes unhealthy, Cloudflare applies priority penalties to routes through that tunnel:
* **Degraded**: Adds `500,000` to route priority
* **Down**: Adds `1,000,000` to route priority
These penalties shift traffic to healthier tunnels while maintaining redundancy. Cloudflare never completely removes routes, preserving failover options even when all tunnels are unhealthy.
### Recovery behavior
Tunnels transition between states asymmetrically to prevent flapping:
* **Healthy to Degraded/Down**: Transitions quickly when failures are detected. A tunnel can go directly from Healthy to Down if all probe retries fail.
* **Down to Degraded**: Requires three consecutive successful health check probes.
* **Degraded to Healthy**: Requires failure rate below 0.1% over 30 consecutive probes.
Minimum state duration
Tunnels remain in a degraded or down state for at least five minutes, even if health checks start succeeding immediately. This minimum duration prevents rapid flapping when there is intermittent packet loss. Additionally, a tunnel recovering from `Down` must always transition through `Degraded` before returning to `Healthy`.
Recovery from degraded to healthy can take up to 30 minutes. This intentional slow recovery behavior (called hysteresis) prevents rapid state changes caused by intermittent network issues or tunnel flapping.
For instructions on monitoring tunnel status, refer to [Check tunnel health in the dashboard](https://developers.cloudflare.com/magic-transit/network-health/check-tunnel-health-dashboard/).
### Health check types and directions
**Health check type:**
| Type | Behavior | When to use |
| ------------------- | ------------------------------------- | ------------------------------------------------------------------- |
| **Reply** (default) | Cloudflare sends an ICMP reply packet | Simple networks without stateful firewalls |
| **Request** | Cloudflare sends an ICMP echo request | Networks with stateful firewalls (recommended for most deployments) |
**Health check direction:**
| Direction | Behavior | Default for |
| ------------------ | ----------------------------------------------------- | ------------------------------------ |
| **Bidirectional** | Probe and response both traverse the tunnel | Cloudflare WAN (formerly Magic WAN) |
| **Unidirectional** | Probe traverses tunnel; response returns via Internet | Magic Transit (direct server return) |
Note
Unidirectional health checks can be unreliable because intermediate network devices may drop ICMP reply packets. If you have egress traffic enabled, consider switching to bidirectional health checks.
---
## Resolve common issues
### Tunnel shows `Down` but traffic is flowing
#### Symptoms
* Dashboard shows tunnel as `Down` or `Degraded`
* Actual user traffic passes through the tunnel successfully
* Health check failure rate is 100% despite working connectivity
#### Cause
Stateful firewalls (including Palo Alto, Checkpoint, Cisco ASA, and Fortinet) drop the health check packets. By default, Cloudflare sends ICMP _Reply_ packets as health check probes.
Stateful firewalls inspect these packets and look for a matching ICMP _Request_ in their session table. When no matching request exists, firewalls drop the reply as "out-of-state".
#### Solution
Change the health check type from _Reply_ to _Request_:
1. Go to the **Connectors** page.
[ Go to **Connectors** ](https://dash.cloudflare.com/?to=/:account/magic-networks/connections)
2. In **IPsec/GRE tunnels**, select **Edit** on the affected tunnel.
3. Under **Health check type**, change from _Reply_ to _Request_.
4. Select **Update tunnel**.
When you use _Request_ style health checks, Cloudflare sends an ICMP echo request. Your firewall's stateful inspection engine recognizes this as a legitimate request and automatically permits the ICMP reply response.
Note
If your firewall drops ICMP request packets as well, verify that your firewall policy permits ICMP traffic on the tunnel interface.
---
### Health check failures with Cloudflare Network Firewall
#### Symptoms
* Tunnels were healthy before enabling Cloudflare Network Firewall
* After adding Cloudflare Network Firewall rules, health checks fail
* Blocking ICMP traffic causes immediate health check failures
#### Cause
Cloudflare Network Firewall processes all traffic, including Cloudflare's health check probes. If you create a rule that blocks ICMP traffic, you also block the health check packets that Cloudflare sends to monitor tunnel status.
#### Solution
Add an allow rule for ICMP traffic from Cloudflare IP addresses _before_ any block rules:
1. Go to the **Firewall policies** page.
[ Go to **Firewall policies** ](https://dash.cloudflare.com/?to=/:account/network-security/magic%5Ffirewall)
2. Create a new policy with the following parameters:
| Field | Value |
| ------------ | --------------------------------------------------------- |
| **Action** | Allow |
| **Protocol** | ICMP |
| **Source** | [Cloudflare IP ranges ↗](https://www.cloudflare.com/ips/) |
1. Position this rule _before_ any rules that block ICMP traffic.
For more information, refer to [Cloudflare Network Firewall rules and endpoint health checks](https://developers.cloudflare.com/cloudflare-network-firewall/about/ruleset-logic/#cloudflare-network-firewall-rules-and-magic-transit-endpoint-health-checks).
---
### IPsec tunnel instability or packet drops
#### Symptoms
* IPsec tunnel frequently flaps between healthy and down states
* Intermittent packet loss on the tunnel
* Traffic works for a period then stops without configuration changes
* Router logs show packets dropped due to:
* "replay check failed"
* "invalid sequence number"
* "invalid SPI" (Security Parameter Index)
#### Cause
Anti-replay protection is enabled on your router. IPsec anti-replay protection expects packets to arrive in sequence from a single sender.
Cloudflare's anycast architecture means your tunnel traffic can originate from thousands of servers across hundreds of data centers. Each server maintains its own sequence counter, causing packets to arrive out-of-order from your router's perspective.
#### Solution
Disable anti-replay protection on your router:
**For most routers:**
Locate the anti-replay or replay protection setting in your IPsec configuration and disable it.
**If you can only set a replay window size:**
Set the replay window to `0` to effectively disable the check.
**For devices that do not support disabling anti-replay:**
Enable replay protection in the Cloudflare dashboard. This routes all tunnel traffic through a single server, maintaining proper sequence numbers at the cost of losing anycast benefits.
1. Go to the Connectors page.
[ Go to **Connectors** ](https://dash.cloudflare.com/?to=/:account/magic-networks/connections)
2. In **IPsec/GRE tunnels**, select **Edit** on your IPsec tunnel.
3. Enable **Replay protection**.
4. Select **Update tunnel**.
**For Cisco IOS/IOS-XE routers experiencing "invalid SPI" errors:**
Enable ISAKMP invalid SPI recovery to help the router resynchronize Security Associations:
```
configure terminal
crypto isakmp invalid-spi-recovery
exit
```
Warning
Enabling replay protection in Cloudflare reduces the performance and resilience benefits of the anycast architecture. Only use this option when your device does not support disabling anti-replay protection.
For a detailed explanation of why this setting is necessary, refer to [Anti-replay protection](https://developers.cloudflare.com/magic-transit/reference/anti-replay-protection/).
---
### Tunnel degraded after rekey events
#### Symptoms
* Tunnel health drops to `Degraded` or `Down` periodically
* Issues coincide with IPsec rekey intervals (typically every few hours)
* Tunnel recovers automatically after 1-3 minutes
* Router logs show successful rekey completion
#### Cause
When your router initiates an IPsec rekey, new Security Associations (SAs) are negotiated with a single Cloudflare server. These new SAs must then propagate across Cloudflare's global network.
During this propagation window (typically 90-150 seconds), some Cloudflare servers may not have the new SA. These servers drop traffic encrypted with the new SA until propagation completes.
#### Solution
This behavior is expected and the tunnel will automatically recover. To minimize impact:
1. **Increase rekey intervals**: Configure longer SA lifetimes on your router to reduce rekey frequency. Common values are 8-24 hours for IKE SA and 1-8 hours for IPsec SA.
2. **Adjust health check sensitivity**: If brief degradation during rekeys triggers alerts, consider lowering the health check rate:
1. Go to the **Connectors** page.
[ Go to **Connectors** ](https://dash.cloudflare.com/?to=/:account/magic-networks/connections)
1. In **IPsec/GRE tunnels**, select **Edit** on the tunnel.
2. Change **Health check rate** to _Low_.
3. **Stagger rekey times**: If you have multiple tunnels, configure different SA lifetimes so they do not rekey simultaneously.
---
### Bidirectional health check failures
#### Symptoms
* Health checks configured as bidirectional fail consistently
* Unidirectional health checks work correctly
* Traffic flows through the tunnel normally
#### Cause
Bidirectional health checks require both the probe and response to traverse the tunnel. Your router must:
1. Accept ICMP packets destined for the tunnel interface IP addresses
2. Route the ICMP response back through the tunnel to Cloudflare
If traffic selectors or firewall rules do not permit this traffic, bidirectional health checks fail.
#### Solution
**For IPsec tunnels:**
Configure traffic selectors to accept packets for the tunnel interface addresses. For example, if your tunnel interface address is `10.252.2.27/31`:
* Permit traffic to/from `10.252.2.26` (Cloudflare side)
* Permit traffic to/from `10.252.2.27` (your side)
**For all tunnel types:**
Ensure your firewall permits ICMP traffic on the tunnel interface. Many firewalls require explicit rules to allow management traffic (including ping) on tunnel interfaces.
For detailed information on how bidirectional health checks work, refer to [Tunnel health checks](https://developers.cloudflare.com/magic-transit/reference/tunnel-health-checks/).
---
### IPsec tunnel establishment failures
#### Symptoms
* Tunnel status shows `Down` and never becomes healthy
* No traffic passes through the tunnel
* Router logs show IKE negotiation failures
#### Cause
IPsec tunnel establishment can fail due to several configuration mismatches:
| Issue | Symptom |
| ----------------------------- | ----------------------------------------------- |
| **Crypto parameter mismatch** | IKE negotiation fails with "no proposal chosen" |
| **Incorrect PSK** | Authentication failures in Phase 1 |
| **Wrong IKE ID format** | Authentication failures despite correct PSK |
| **Firewall blocking IKE** | No IKE traffic reaches Cloudflare |
#### Solution
1. **Verify crypto parameters match Cloudflare's supported configuration:**
**Phase 1 (IKE)**
| Parameter | Supported values |
| -------------- | --------------------------- |
| IKE version | IKEv2 only |
| Encryption | AES-GCM-16, AES-CBC-256 |
| Authentication | SHA-256, SHA-384, SHA-512 |
| DH Group | DH group 14, 15, 16, 19, 20 |
**Phase 2 (IPsec)**
| Parameter | Supported values |
| -------------- | --------------------------- |
| Encryption | AES-GCM-16, AES-CBC-256 |
| Authentication | SHA-256, SHA-512 |
| PFS Group | DH group 14, 15, 16, 19, 20 |
1. **Verify the Pre-Shared Key (PSK):**
* Regenerate the PSK in the Cloudflare dashboard
* Copy the new PSK exactly (no extra spaces or characters)
* Update your router with the new PSK
2. **Check the IKE ID format:** Cloudflare uses FQDN format for the IKE ID. Ensure your router is configured to accept an FQDN peer identity. The FQDN is displayed in the tunnel details in the Cloudflare dashboard.
3. **Verify firewall rules:** Ensure your edge firewall permits:
* UDP port 500 (IKE)
* UDP port 4500 (IKE NAT-T)
* IP protocol 50 (ESP)
For the complete list of supported parameters, refer to [Supported configuration parameters](https://developers.cloudflare.com/magic-transit/reference/gre-ipsec-tunnels/#supported-configuration-parameters).
---
## Vendor-specific guidance
### Common vendor-specific issues
| Vendor | Common issue | Solution |
| ------------------- | ---------------------------------------- | ---------------------------------------------------------- |
| **Palo Alto** | Health checks fail with default settings | Change health check type to _Request_; disable anti-replay |
| **Cisco Meraki** | Cannot disable anti-replay | Enable replay protection in Cloudflare dashboard |
| **AWS VPN Gateway** | Cannot disable anti-replay | Enable replay protection in Cloudflare dashboard |
| **Velocloud** | Cannot disable anti-replay | Enable replay protection in Cloudflare dashboard |
| **Checkpoint** | Out-of-state packet drops | Change health check type to _Request_ |
---
## Gather information for support
If you have worked through this guide and still experience tunnel health issues, gather the following information before contacting Cloudflare support:
### Required information
1. **Account ID** and **Tunnel name(s)** affected
2. **Timestamps** (in UTC) when the issue occurred
3. **Tunnel configuration details:**
* Tunnel type (GRE or IPsec)
* Health check type (Request or Reply)
* Health check direction (Bidirectional or Unidirectional)
* Health check rate (Low, Medium, or High)
4. **Router information:**
* Vendor and model
* Firmware/software version
* IPsec configuration (sanitized to remove PSK)
5. **Symptoms observed:**
* Dashboard tunnel health status
* Whether user traffic is affected
* Error messages from router logs
### Helpful diagnostic data
* **Packet captures** from your router showing tunnel traffic
* **Router logs** covering the time period of the issue
* **Traceroute** results from your network to Cloudflare endpoints
* **Screenshots** of the tunnel health dashboard
* **Distributed traceroutes** using tools like [ping.pe ↗](https://ping.pe) to test reachability from multiple global locations
### Router diagnostic commands
Collect output from these commands (syntax varies by vendor):
```
# Show IPsec SA status
show crypto ipsec sa
# Show IKE SA status
show crypto isakmp sa
# Show tunnel interface status
show interface tunnel
# Show routing table
show ip route
```
---
## Resources
* [Tunnel health checks](https://developers.cloudflare.com/magic-transit/reference/tunnel-health-checks/): Technical details on health check behavior
* [Anti-replay protection](https://developers.cloudflare.com/magic-transit/reference/anti-replay-protection/): Why anti-replay must be disabled
* [Configure tunnel endpoints](https://developers.cloudflare.com/magic-transit/how-to/configure-tunnel-endpoints/): Tunnel setup instructions
* [Check tunnel health in the dashboard](https://developers.cloudflare.com/magic-transit/network-health/check-tunnel-health-dashboard/): Dashboard navigation guide
* [Network Analytics](https://developers.cloudflare.com/magic-transit/analytics/network-analytics/): Traffic analysis tools
```json
{"@context":"https://schema.org","@type":"BreadcrumbList","itemListElement":[{"@type":"ListItem","position":1,"item":{"@id":"/directory/","name":"Directory"}},{"@type":"ListItem","position":2,"item":{"@id":"/magic-transit/","name":"Magic Transit"}},{"@type":"ListItem","position":3,"item":{"@id":"/magic-transit/troubleshooting/","name":"Troubleshooting"}},{"@type":"ListItem","position":4,"item":{"@id":"/magic-transit/troubleshooting/tunnel-health/","name":"Troubleshoot tunnel health"}}]}
```